Download

1 / 62
680 likes | 899 Views
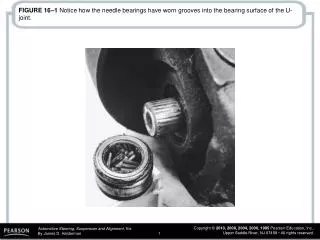
Figure 9.1 A spark tester looks like a regular spark plug with an alligator clip attached to the shell. This tester has a specified gap that requires at least 25,000 volts (25 kV) to fire.

E N D
Figure 9.1A spark tester looks like a regular spark plug with an alligator clip attached to the shell. This tester has a specified gap that requires at least 25,000 volts (25 kV) to fire.
Figure 9.2A close-up showing the recessed center electrode on a spark tester. It is recessed 3/8 in. into the shell and the spark must then jump another 3/8 in. to the shell for a total gap of 3/4 in.
Figure 9.3Checking an ignition coil using a multimeter set to read ohms. (Courtesy of Fluke Corporation)
Figure 9.4 Measuring the resistance of an HEI pickup coil using a digital multimeter set to the ohms position. The reading on the face of the meter is 0.796 kΩ or 796 ohms in the middle of the 500- to 1,500-ohm specifications.
Figure 9.5A waveform showing the primary current flow through the primary windings of an ignition coil.
Figure 9.6Schematic of a typical distributorless ignition system showing the location for the power feed and grounds. (Courtesy of Fluke Corporation)
Figure 9.7Connect the scopes current clamp around the feed wire for the primary side of the coil(s). Start the engine and view the current flow waveform. (Courtesy of Fluke Corporation)
Figure 9.8An example of a good coil current flow waveform pattern. Note the regular shape of the rise time and slope. Duration of the waveform may change as the module adjusts the dwell. The dwell is usually increased as the engine speed is increased. (Courtesy of Fluke Corporation)
Figure 9.9aA waveform pattern showing an open in the coil primary. (Courtesy of Fluke Corporation)
Figure 9.9bA shorted coil pattern waveform. (Courtesy of Fluke Corporation)
Figure 9.10A typical pickup coil showing how the waveform is created as the timer core rotates inside the pole piece.
Figure 9.11(a) A voltage waveform of a pickup coil at low engine speed. (b) A current waveform of the current through the primary windings of the ignition coil at low engine speed. (c) A voltage waveform of a pickup coil at high speed. (d) A current waveform through the primary winding of the ignition coil at high engine speed.
Figure 9.12An AC voltage is produced by a magnetic sensor. Most sensors should produce at least 0.1 volt AC while the engine is cranking if the pickup wheel has many teeth. If the pickup wheel has only a few teeth, you may need to switch the meter to read DC volts and watch the display for a jump in voltage as the teeth pass the magnetic sensor. (Courtesy of Fluke Corporation)
Figure 9.13aThe connection required to test a Hall-effect sensor. (Courtesy of Fluke Corporation)
Figure 9.13bA typical waveform from a Hall-effect sensor. (Courtesy of Fluke Corporation)
Figure 9.14aThe low-resolution signal has the same number of pulses as the engine has cylinders. (Courtesy of Fluke Corporation)
Figure 9.14bA dual-trace pattern showing both the low-resolution signal and the high-resolution signals that usually represent 1 degree of rotation. (Courtesy of Fluke Corporation)
Figure 9.15A track inside an ignition coil is not a short, but rather a low-resistance path or hole that has been burned through from the secondary wiring to the steel core.
Figure 9.16The relationship between the crankshaft position (CKP) sensor and the camshaft position (CMP) sensor is affected by wear in the timing gear and/or chain.
Figure 9.17A scan tool displays the cam retard on a Chevrolet V-6. The cam retard value should be ± 2°.
Figure 9.18A worn distributor drive gear can be the cause of an out-of-specification camshaft position (CMP) signal.
Figure 9.19Keys used in a vehicle that had an ignition switch intermittent problem.
Figure 9.20A length of vacuum hose being used for a coil wire. The vacuum hose is conductive because of the carbon content of the rubber in the hose. This hose measures only 1,000 ohms and was 1 ft long, which is lower resistance than most spark plug wires. Notice the spark from the hose’s surface to the tip of a grounded screwdriver.
Figure 9.21A distributorless ignition system (DIS) can be checked by unplugging both spark plug wires from one ignition coil and starting the engine. The spark should be able to jump the 1-in.(25-mm) distance between the terminals of the coil. No damage to the coil (or module) results because a spark occurs and does not find ground elsewhere.
Figure 9.22Using a vacuum hose and a grounded test light to ground one cylinder at a time on a DIS. This works on all types of ignition systems and provides a method for grounding out one cylinder at a time without fear of damaging any component.
Figure 9.23The firing order is cast or stamped on the intake manifold on most engines that have a distributor ignition.
Figure 9.24Note where the high-voltage spark jumped through the plastic rotor to arc into the distributor shaft. Always check for a defective spark plug(s) when a defective distributor cap or rotor is discovered. If a spark cannot jump to a spark plug, it tries to find a ground path wherever it can.
Figure 9.25This distributor cap should be replaced because of the worn inserts and excessive dusting inside the cap.
Figure 9.26This rotor had arced through to the distributor shaft. The engine would not run above an idle speed and the spark from the coil could easily fire a spark tester.
Figure 9.27Carbon track in a distributor cap. These faults are sometimes difficult to spot and can cause intermittent engine missing. The usual cause of a tracked distributor cap (or coil, if it is a distributorless ignition) is a defective (open) spark plug wire.
Figure 9.28Some rotors are retained by a screw, so look before you pry.
Figure 9.29With careful visual inspection, the technician discovered this defective spark plug wire.
Figure 9.30Measuring the resistance of a spark plug wire with a multimeter set to the ohms position. The reading of 16.03 kΩ (16,030 ohms) is okay because the wire is about 2-ft long. Maximum allowable resistance for a spark plug wire this long would be 20 kΩ (20,000 ohms).
Figure 9.31Spark plug wire boot pliers are a handy addition to any toolbox.
Figure 9.32Always take the time to install spark plug wires back into the original holding brackets (wiring combs).
Figure 9.33When removing spark plugs, it is wise to arrange them so that they can be compared and any problem can be identified with a particular cylinder.
Figure 9.34A spark plug thread chaser is a low-cost tool that hopefully will not be used often, but is necessary to clean the threads before new spark plugs are installed.
Figure 9.35Since 1991, General Motors engines have been equipped with slightly (1/8 in. or 3 mm) longer spark plugs.This requires that a longer spark plug socket should be used to prevent the possibility of cracking a spark plug during installation.The longer socket is shown next to a normal 5/8 in. spark plug socket.
Figure 9.36An extended-reach spark plug that shows normal wear. The color and condition indicate that the cylinder is operating correctly.
Figure 9.37Spark plug removed from an engine after a 500-mile race. Note the clipped side (ground) electrode. The electrode design and narrow (0.025 in.) gap are used to ensure that a spark occurs during extremely high engine speed operation. The color and condition of the spark plug indicate that near-perfect combustion has been occurring.
Figure 9.38Typical worn spark plug. Notice the rounded center electrode. The deposits indicate a possible oil usage problem.
Figure 9.39New spark plug that was fouled by a too-rich air-fuel mixture. The engine from which this spark plug came had a defective (stuck partially open) injector on this one cylinder only.
Figure 9.40A water spray bottle is an excellent diagnostic tool to help find an intermittent engine miss caused by a break in a secondary ignition circuit component.
Figure 9.41Typical timing marks. The degree numbers are on the stationary plate and the notch is on the harmonic balancer.
Figure 9.43aTypical SPOUT connector as used on many Ford engines equipped with distributor ignition (DI).
Figure 9.43bThe connector must be opened (disconnected) to check and/or adjust the ignition timing.On DIS/EDIS systems, the connector is called SPOUT/SAW (spark output/spark angle word).
Figure 9.44The first mark indicates the direction the rotor is pointing when the distributor is in the engine. The second mark indicates where the rotor is pointing just as it is pulled from the engine.
Figure 9.45Typical engine analyzer hookup that includes a scope display. (1) Coil wire on top of the distributor cap if integral type of coil; (2) number 1 spark plug connection; (3) negative side of the ignition coil; (4) ground (negative) connection of the battery.
Figure 9.46Clip-on adapters are used with an ignition system that uses an integral ignition coil. (Courtesy of Fluke Corporation)


![[PDF] Free Download Raspberry Danish Murder By Joanne Fluke](https://cdn4.slideserve.com/8070942/slide1-dt.jpg)