Download
1 / 22
220 likes | 600 Views
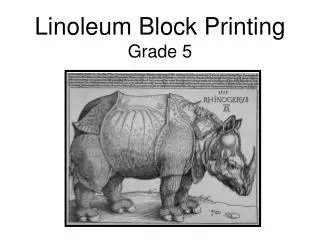
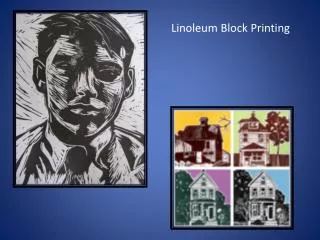
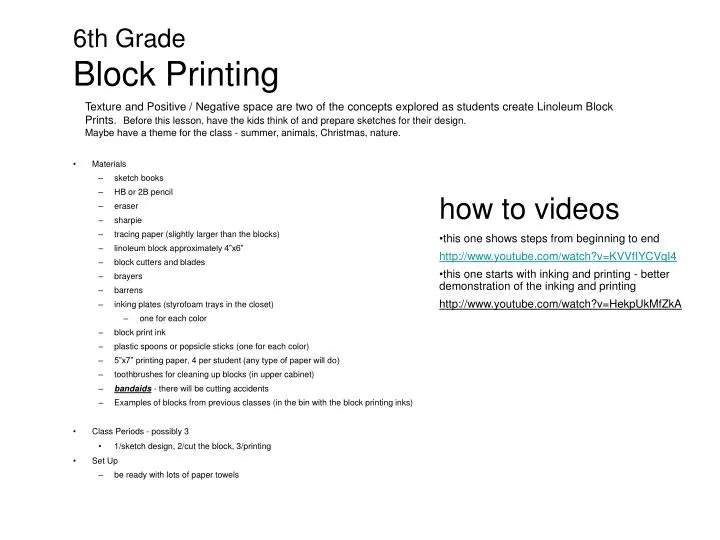
6th Grade Block Printing. Texture and Positive / Negative space are two of the concepts explored as students create Linoleum Block Prints. Before this lesson, have the kids think of and prepare sketches for their design. Maybe have a theme for the class - summer, animals, Christmas, nature.

E N D
6th GradeBlock Printing Texture and Positive / Negative space are two of the concepts explored as students create Linoleum Block Prints. Before this lesson, have the kids think of and prepare sketches for their design. Maybe have a theme for the class - summer, animals, Christmas, nature. • how to videos • this one shows steps from beginning to end • http://www.youtube.com/watch?v=KVVfIYCVqI4 • this one starts with inking and printing - better demonstration of the inking and printing • http://www.youtube.com/watch?v=HekpUkMfZkA • Materials • sketch books • HB or 2B pencil • eraser • sharpie • tracing paper (slightly larger than the blocks) • linoleum block approximately 4”x6” • block cutters and blades • brayers • barrens • inking plates (styrofoam trays in the closet) • one for each color • block print ink • plastic spoons or popsicle sticks (one for each color) • 5”x7” printing paper, 4 per student (any type of paper will do) • toothbrushes for cleaning up blocks (in upper cabinet) • bandaids - there will be cutting accidents • Examples of blocks from previous classes (in the bin with the block printing inks) • Class Periods - possibly 3 • 1/sketch design, 2/cut the block, 3/printing • Set Up • be ready with lots of paper towels
Tools for Block Printing: A brayer is a roller for transferring ink to the master plate for printing. A gouge is a tool for cutting a wood or linoleum block. Block is the surface that has an image to be printed. It can be wood, linoleum or vinyl.
Tools for Block Printing: An inking tray is where ink is dispensed and rolled. A barren is a.
create a border holds the edges
the object becomes part of the border design
SEA LIFE realistic or simplified
lines create the idea of water in background
main object remains solid the background has the detail
I will not talk while carving my linoleum. I will not talk while carving my linoleum. I will not talk while carving my linoleum. I will not talk while carving my linoleum. I will not talk while carving my linoleum. I will not talk while carving my linoleum. I will not talk while carving my linoleum. I will not talk while carving my linoleum. I will not talk while carving my linoleum.
Create your design in your sketch book. Trace over that design using tracing paper and a 2B pencil. 2B is a very soft lead and will transfer easily. Transfer the image onto the block by placing the traced drawing face down on the block - hold very still - rub over the entire drawing. Use a small "V" shaped cutter to cut around the edges of the areas I will be fully cutting away. I like to do this as it helps prevent cutting errors in the next step, by stopping the run of my cutter before it reaches the shaded area I want to keep. I use a larger cutter to cut out the large areas of the block I don't wish to print. A small blob of ink is rolled out onto a glass plate with a brayer (roller). The ink is rolled out in all directions to make an even coating and makes a sticky sound when it is the correct consistency. The ink is rolled onto the block to create an even covering. Then I place the paper on top of the block and rub the back of it with a spoon or a barren to transfer the ink from the block to the paper. This process is called "burnishing". Carefully pull the paper away to reveal the print (hence the term "hand pulled print"). The first print is done on cheap paper just as a proof. Looking at the proof I note any areas I am not happy with and re-cut them. I take as many proofs as required until I am happy with the block, and then I start my final print run.
Procedure - design (print this page to teach from) TRANSFER IMAGE TO LINOLEUM BLOCK • place lino block down on table (either side) • place tracing paper with the design on top of lino block - pencil lines touching the block - lining up the design to the block • carefully hold the tracing paper in place - don’t let it slide around • use the tip of your finger to CAREFULLY AND SLOWLY rub over the entire design • without moving the tracing paper, carefully lift corners to see if the image transferred, go over the areas you may have missed • you can always redraw the lines directly onto the block GO OVER ALL LINES ON BLOCK WITH A SHARPIE • go over ALL the lines on the block with black permanent marker • allows you to see the lines better/will not smudge off • fill in (with sharpie) any solid areas • allows you to see the positive/negative spaces • makes sure you do not cut the areas you want to print • NAME ON BACK OF THE BLOCK!!!!! CREATE IMAGE To save class time, you can ask the kids, a week or so before the lesson, to find an image (from internet or magazine) and bring it with them to school. Or use iPads in class. • create a simple design in your sketch book - trace around the block to get the correct size for your design • simple - bold shapes, thick lines, no real tiny details (lines that are too thin won’t print) • to fit 4"x6" vertical or horizontal format • you should come up with a “theme” for their images - keeps them focused. This theme is “sea life.” • they can use a photo copy of something they find • STAY AWAY FROM LETTERS, TINY DETAIL, ESTABLISHED SYMBOLS • Everyone must have a border - to frame and hold the image. It can be a simple line or it could have pattern to it. (see examples) • when design is complete, trace onto tracing paper with HB or 2B pencil • you need to do this step to easily transfer the design to the block What you print will be the mirror of your drawing!
Procedure - carving the block (print this page to teach from) CARVING LINO BLOCK show example blocks from previous classes • determine what part of the image you want to print • material you cut away will not print • will be the white of the paper • everything you leave on the block will print • carving tools have different widths • practice a few strokes on the back of your block • do not cut deeply - just skim the surface • always cut away from yourself, not just away from your hand, but fingers too • this prevents you cutting your skin if you slip • hold tool almost parallel (just slightly angled) to the block • like it’s skimming the surface • push into the block and SLOWLY glide along • carve shallowly at first, deepen cuts as you go • once it’s cut away - it can’t come back • brush away scraps frequently to keep a clear view of design • remember - lines that are too fine and details that are too small - will not print • they will fill up with ink In removing the material from the block, be careful not to remove all of the material. The remaining material creates texture that is one of the identifying characteristics of a block print. You can point this out with the example blocks.
Procedure - printing (print this page to teach from) INKING THE BLOCK/PRINTING • set up color stations on each group of tables • two ink jars per table, one inking plate and brayer per color, paper to print on - practice paper and final paper • add about a quarter size of ink onto the plate (you don’t want to use too much - add more if needed) • spread ink with brayer (see video for how to) • roll one direction, then opposite direction to get an even coat of ink on brayer • listen for the “crispy” sound to tell you that you have just enough ink on the brayer (sounds like velcro) • too much ink will go into the grooves of the block, creating blobs on the print • try to keep fingers clean • roll the brayer over the block to coat with ink - in both directions - getting an even coat of ink • lay the printing paper right over the block • roll a clean barren or brayer over the paper to create pressure between the paper and the block • carefully peel paper away from the block • you may have to do several prints to get a “good” one CLEAN OFF BLOCK • carefully clean your block with water • clean out the grooves with a toothbrush • dry with paper towel (dry out the gooves) • you can’t print with another color until your block is dry • go to another color station and start again