Download
1 / 40
400 likes | 529 Views
LFCDS SkyMail & SkyDrive. Full Student Orientation 2011-04-11. Outlook Live (SkyMail E-mail) Windows Live SkyDrive (Online Storage) Office Web Apps (Online Document Editing). Outlook Live (SkyMail E-mail) Windows Live SkyDrive (Online Storage ) Office Web Apps (Online Document Editing ).

E N D
LFCDS SkyMail & SkyDrive Full Student Orientation 2011-04-11
Outlook Live (SkyMailE-mail) Windows Live SkyDrive (Online Storage) Office Web Apps (Online Document Editing)
Outlook Live (SkyMail E-mail) Windows Live SkyDrive (Online Storage) Office Web Apps (Online Document Editing)
Outlook Live (SkyMail E-mail) Windows Live SkyDrive (Online Storage) Office Web Apps (Online Document Editing)
Purpose of SkyMail & SkyDrive • School Use Only • Not for general e-mail messaging (e.g., sharing YouTube videos) • Common e-mail for approved Web services • Examples: BuzzMath, class WordPress site • Communicate with teachers for assignment clarification & updates. • Not your primary mode of communication • Don’t necessarily expect a response at night after school is over • Collaborate with other students when working on projects • Transfer files to/from school • Not your personal file storage repository (music, videos, etc.) • Not for homework submission (DropBox on Portal next year)
Student Expectations • LFCDS Honor Code • Trust – Honesty – Respect - Responsibility • Acceptable Use
SkyMail • Mailbox - UserName@Student.LFCDS.org • 10 GB (25 MB limit per e-mail) • E-mail, Calendar, Contacts, Tasks • Can only e-mail within LFCDS & from approved Web services • Access • http://SkyMail.LFCDS.org • Start Menu icon • This year:Must use this address to access • Login • School: Automatic • Home: School computer username & password • Some browsers require LFCDS\UserName
Introducing Your Inbox Navigation Pane (Folders) Navigation Menu (Mail/Calendar/Contacts/Tasks) • Search & Filter • Message Pane • Reading Pane • Outlook Live Options
Send an E-mail • To send an e-mail, click New. A compose e-mail message window will appear. • Enter the e-mail address in the To and Cc fields • In the Subject field, enter the subject of the message. Enter the text of the message in the body field below.
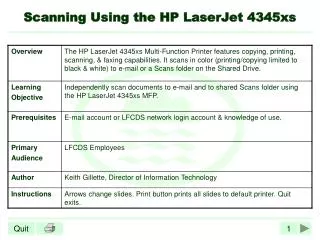
Send an E-mail with an Attachment To attach a file, click the paper clip button. Click Browse and browse to the file you want to attach, then click Open. Click Attach.
Send an E-mail with an Attachment (continued) The file will appear in the Attachments field of your e-mail. You can attach multiple files to an e-mail. Type a message. When your e-mail is complete, click Send.
Reply to or Forward an E-mail • Click Inbox, then click the e-mail to reply to and it will appear in the Reading Pane. • Click the Actions drop-down arrow list. • Click Reply or Forward.
Reply to or Forward an E-mail (continued) • Alternatively, click the Reply or Forward button. • Enter the reply or forward message and click Send.
Delete an E-mail • Click Inbox, then click the e-mail to delete. • Click the delete button (X).
Create an E-mail Folder • To create a new folder, right-click your Mailbox, Inbox,or a folder in which you want to create a new sub-folder. • Click Create New Folder.A new folder icon and field will be created. • Type a folder name into the blank field, and press Enter.
Move an E-mail Click Inbox, then click the message you want to move. Click the Move drop-down arrow list. Click Move or Copy to Folder Click the name of the new folder you just created.
Move an E-mail (continued) Click the folder to view the e-mail. Note: You can also move e-mails from one folder to another using drag-and-drop.
Create a Meeting Request Click Calendarin the Navigation Menu. Click Month to view the entire month, then click the date for the meeting. To change the month, click the arrows forward or back. Click the New drop-down arrow list. Click Meeting Request.
Create a Meeting Request (continued) • Enter e-mail addresses in the To field or click To and browse for contacts from your address book. • Enter a meeting name in the Subject field. • Enter the meeting location in the Location field. • Enter the Start Date/Time and End Date/Time. • Enter a reminder for the meeting. For example if you set the reminder for 1 day, you will receive a reminder 1 day before the meeting. • Click Send. The meeting will now be displayed in your Calendar.
Create a Group Click Contactsin the Navigation Menu. Click the New drop-down arrow list. Click Group.
Create a Group (continued) In the Group Name field, enter the name of your group. Click Membersto browse your personal Contacts folder or the Global Address List. Note: The Global Address List is the School Address Book and contains the e-mail addresses of Upper School teachers and students.
Create a Group (continued) Click on a contact and then click Members. The Members of the Group will be displayed at the bottom of the screen. Repeat this step until you have all the new members for your Group. Click OK.
Create a Group (continued) To add the selected contacts to your group, click Add to Group. The members of the group will be displayed in the middle of the group dialog box. Click Save and Close. The group will appear in your Contacts. The group will have an icon beside it indicating it is a group.
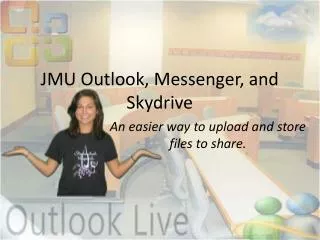
SkyDrive and Office Web Apps • SkyDrive Online File Storage • 25 GB (individual files 50 MB max) • Upload and download any type of file from any computer connected to the Internet using your Web browser • Online Document Creation & Editing • Can view and perform basic editing of: • Word, Excel, PowerPoint, & OneNote • Looks just like Microsoft Office desktop applications • Sharing & Collaboration • Can share folders with other students and teachers • Can simultaneously edit Excel & OneNote documents online • 2011-12: Simultaneously edit Word, PowerPoint, OneNote in Office
SkyDrive and Office Web Apps (continued) • Access • http://SkyDrive.LFCDS.org • Start Menu icon • This year:Must use this address to access • Login • School: Automatic • Home: School computer username & password • Some browsers require LFCDS\UserName
SkyDrive - 1st Time Logging In (continued) • Some students may need to ask us for permission • You will want to click the Ask by Email button
SkyDrive - 1st Time Logging In (continued) • Enter IT.Support@LFCDS.org
SkyDrive - 1st Time Logging In (continued) • Enter your First Name and Last Name • Click the profile button at the top right • Choose to edit your Details and click Add your name
Upload Files • Click the Add files link
Upload Files (continued) • You will then be able to upload multiple files • Click Continue once all the files are uploaded ProgressMeter
Manage Files Hover over a file to reveal the file menu. Click More. • Cannot open directly off SkyDrive until next year • Download to your computer to edit in Microsoft Office • Edit online with your browser
Office Web Apps Edit Mode • Looks just like Microsoft Office • Most basic features available
Edit Permissions By default, My Documents and any new folders you create are private folders. They are shared with: Just me To share a folder, click the Share drop-down menu, then click Edit permissions. Note: Folder permissions are configured at the top folder. All files/subfolders are governed by the permission settings of the top folder. Thus, if a folder is shared, everything in that folder is also shared.
Share a Folder with Specific People Leave the permissions slider at Me. Under Add additional people, type the e-mail address of the individuals you want to give access to the folder. As you add people, their names or e-mail addresses will appear below the name field. Use the dropdown menus to determine whether they have viewing rights or editing rights. When you’re finished adding people, click Save.
Send/Get a Link to a Shared Folder When you change permissions for a folder, you may be prompted to send a notification to the new users. Type a personal message, then click Send. If you want to share a link to a public folder or resend a link to a specific person, click Share. Click Send a link.
Get a Link for a Shared Folder Click Share. Click Get a link. Click Copy. Paste into an e-mail.
Get Help • Web: http://IT.LFCDS.org • More detailed overview • Training videos • E-mail: IT.Support@LFCDS.org • 1st entry in School Address Book • Walk To: IT Service Center