Download

1 / 25
350 likes | 1.2k Views
Performance of Serological tests for Syphilis. Learning Objectives. Know the rationale for performance of syphilis test in ICTC Know all the processes and procedures required to perform Standard tests for Syphilis ( RPR test )

E N D
Learning Objectives Know the rationale for performance of syphilis test in ICTC Know all the processes and procedures required to perform Standard tests for Syphilis ( RPR test ) Know the requirements to perform STS by following and taking into account all components of quality assurance. Know how to perform, read and interpret the test results Know which controls to include to ensure validity of test results Know how to perform the quantitative test in dilution at the testing centre.
Introduction Treponemapallidum, the etiological agent of syphilis induces 3 types of antibodies • Reagin antibodies against antigen known as cardiolipin • Antibody against the group specific antigen of treponemes (pathogenic and non pathogenic) • Specific antibody against pathogenic treponemes Syphilis increases the risk of both transmitting and getting infected with HIV
Laboratory diagnosis of Syphilis • Identification of T pallidumin lesions • Dark field microscopy(rarely used) • Direct Fluorescent antibody – Treponemapallidum DFA-TP • Serological diagnosis • Non treponemal tests (STS Standard tests for syphilis) • Treponemal tests ( e.g. TPHA, FTA-ABS)
Types of STS Serological tests for Syphilis include the following : • VDRL- Venereal Disease Research Laboratory test. • RPR- Rapid Plasma Reagin test.
RPR TEST Rapid test for Syphilis is a macroscopic, qualitative and quantitative non-treponemal flocculation test for the detection of reagin antibodies in human serum and plasma as a screening test in syphilis serology
RPR Antigen • The microparticulate carbon RPR antigen enhances the visual discrimination between reactive and nonreactive results. The reagin-type antibody binds with the antigen that is composed of a complex of cardiolipin, lecithin and cholesterol particles with activated charcoal; the result of this antigen-antibody reaction is macroscopic flocculation. • The RPR antigen suspension is a variation of the VDRL antigen containing some additives to eliminate the need for heat inactivation of serum, to enhance the stability of the suspension and to improve the visual reading of reactions.
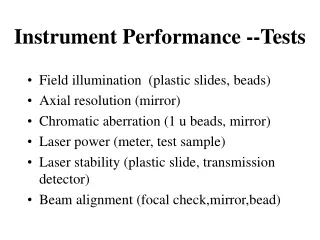
RPR Test Requirements: • Mechanical Rotator, circumscribing a circle of • 2 cm in diameter at a speed of 100 rev per minute • Timer • Light source for reading results. • Sample dispensers (pipettes) • Gloves • Marker • Reagents • RPR antigen test
Pre-test preparations Study kit insert and prepare SOP Collect blood samples Separate serum and record/log sample as per guidelines. Store in refrigerator (middle shelf and not in the freezer portion) Wear lab coat and gloves Lay down adsorbent sheet with one side plastic on the working bench Prepare 1% sodium hypochlorite in discard jar Place materials required (appropriate pipette, Powder less disposable gloves, and discards jar, etc.) on the work station
Pre-requisites of RPR test kit • The RPR test kit should be licensed and quality checked and procured by competent authority • The RPR test kit and various components of the kit should not be expired • RPR test kit should be stored in refrigerator and brought to room temperature prior to use.
Procedure of collection and serum separation • Use a sterile needle and syringe. Draw 5 ml of blood from a vein. Put in a plain test tube • Let the test tube stand for 20 minutes to allow serum to separate and centrifuge for 10 minutes at 2000–3000 rpm. • Use sampling pipette to transfer the serum. Take care not to include any red blood cells from the lower part of the separated sample. • Note: There is no need to inactivate the serum in a water bath for RPR test ( cf. the VDRL test).
Steps of performance of qualitative test Take out the test kit and samples to be tested including external control (if available) from the refrigerator and bring to room temperature Check for expiry of RPR kit on outer package Open kit, check expiry date of each component and lay components on work station Prepare and record details of kit and samples including QC sample on daily work sheet Follow the SOP and perform all steps of the test
Steps of performance of qualitative test.. • Place 50ul of unheated serum or plasma within a circle on the test card using the calibrated sampling device to fill the entire circle. • Take care not to let the serum spread beyond the circle. • Continue with the other samples using a clean spreader each time. • Add exactly one free falling drop (20ul) of the gently shaken antigen suspension to each circle. • Place the card on a VDRL rotator and rotate for 8 /4 mins.(as per kit instructions) • Read the reactions with naked eye under a light source immediately. • A brief rotation and tilting of the card by hand can help to differentiate weakly reactive from non-reactive samples. • Presence of small to large flocculated clumps indicates reactivity.
Quality Control The negative kit control should give a negative result. The positive kit control should give a positive result. Always put external positive control along side on another device When all the above conditions are met it indicates that the test performance and results are valid
Interpretation of Test Results • Positive: Characteristic black aggregates, which may be deposited at the periphery of the liquid at the end of rotation. • Negative: Complete absence of black aggregates with uniform grayish background at the end of 4 minutes of rotation.
RPR Quantitative Slide test Additional Equipment and Reagent: • Micropipette (1000ul) with blue plastic tips. • Normal Saline (0.9 %) • Test tubes or Cuvettes- 6 to 8 per reactive serum. • Rubber teats Procedure: Preparing sera in dilutions : • Take 6 test tubes (cuvette), label them from 1-6 and keep them in a rack. • Pipette 0.5 ml normal saline in each tube. • Pipette 0.5 ml of test serum in tube 1 and mix well. (Serum dilution = 1:2). • Take 0.5 ml of diluted serum from test tube 1 and add to tube 2. Mix well and transfer 0.5 ml to test tube 3, mix well and go on adding 0.5 ml of diluted serum to next tube till tube 6 is reached. The dilution obtained in these 6 tubes are 1:2, 1:4, 1:8, 1:16, 1:32, 1:64 respectively. • Dilutions can be done up to 1: 1024 levels by following above described procedure. Contd.
RPR Quantitative SlideTest Contd…. Performing quantitative testing of diluted sera: 6. Take a RPR card and add 0.5 ml of serum from the sixth tube on one circle as shown in figure 9. 7. Similarly add 0.05 ml of serum from the tube no 5, 4, 3, 2 and 1 in the remaining circles respectively. 8. In circle 1 take 0.05 ml of neat, undiluted serum as for the qualitative test. 9. Positive and negative controls for each qualitative test should be incorporated. 10. Add 1 drop (1/60 ml) of RPR antigen to each circle with a 18 gauge needle and syringe. 11. Rotate the card on a RPR/VDRL rotator for 8 min or as per manufacturers instruction making a diameter of 3/4 inch and rotating at a speed of 180 RPM. 12. Observe the card immediately under 10 x magnification of light microscope. 13. Report the titer as the highest dilution of serum that shows a reactive result.
Quantitative Test Place 50l of normal saline onto card circles 1 through 5 with the help of micropipette. Using 50l micropipette, add 50l of the sample to saline in first circle Using the same micropipette, mix the sample with saline by aspirating back and forth several times. Aspirate 50l from the 1st circle and transfer to 2nd circle. Repeat the same operation successively up to the 5th circle. Aspirate 50l from the 5th circle and discard. Carry out steps 2 through 4 described under qualitative test with each drop of diluted sample. The end point is the highest dilution showing any visible aggregation of black particles.
Reading the result Examine the result of the positive control sample. It should be reactive. Report the result as the highest dilution yielding reactivity. Internal controls (kit controls) should perform as per the kit literature. If above conditions are met, the test performance and test results are valid. If not, test is invalid and has to be repeated.
Test serum is mixed with antigen and the card is placed on appropriate rotator
Reading RPR test results for 10 undiluted sera showing reactive (1,2,3,5, 4: Borderline) and non-reactive samples (6–10). The presence of small to large flocculated clumps indicates reactivity, whereas no clumping or a very slight roughness indicates non-reactivity
Requirements for Syphilis testing laboratory (Summary) • Ensure that technician is trained to perform the tests • Ensure the materials to be used meet the laid down quality standards and are available • Ensure that environmental conditions are appropriate • Ensure that correct SOPs are available • Ensure that equipment to be used is calibrated • Ensure that standard work precautions and proper waste disposal practices are in place