Download
1 / 33
360 likes | 477 Views
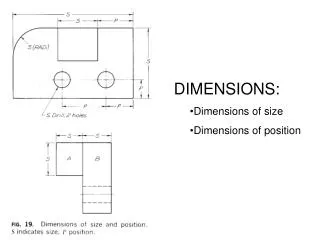
Higher Dimensions. Let's say we use a pencil to mark a point on paper. x is this point. We pick a direction and move the pencil along this direction. . x. We are not drawing a line yet, just move the pencil to a new position. And then mark another point there. . x.

E N D
Let's say we use a pencil to mark a point on paper. x is this point. We pick a direction and move the pencil along this direction. x
We are not drawing a line yet, just move the pencil to a new position. And then mark another point there. x
Now we have two points. We can connect them by drawing a line. x x
What we have done is to go from a 0-dimensional object (a point) to get to a 1-dimensional object (a line). Next we will draw a 2 dimensional object, a square.
We use similar idea as before. We put our pencil at the original point. Then pick a direction that is perpendicular to the line, and move the pencil into a new position.
And then draw a line there ... We know how to draw a line; just repeat the steps before.
We have 2 lines. We connect the corresponding end points to form a square.
A square is 2-dimensional. How do we get to 3-dimensional ? We know we can repeat the previous process. But we need to find a direction to move our pencil. This direction has to be perpendicular to all lines on the square. ? In general, to find the next higher dimension, we find a line that is not parallel to any line within the current dimension. This line must run within a new dimension. We use perpendicular here because it is easier to think about, and we are constructing a cube. Lines perpendicular to each other are called orthogonal.
Like you said, if we are a stickman, or an ant, on a piece of paper, we can never imagine how to find that direction. An ant crawling on paper only knows about directions that are within the plane of the paper. ?
From now on, we image our diagram represents space in 3-D. The “parallelogram” is really our square lying on a table. Now we have a direction that is perpendicular to all the lines on the square We just move up. table top
We repeat the same trick as before, duplicating a square at a position that is on top of our square on the table top. up table top
Connect the corresponding corners of the 2 squares, we get a cube. up table top
... there are 4 corners on each square. up table top
Of course, we have to use some imaginations, as we are trying to draw a 3-D diagram on 2-D (the computer screen is 2-D). To help a bit, we use dotted line to indicate lines that are at the back. up table top
Let's take a pause and think about what we have done so far. We are basically repeating a process to create objects in higher dimensions. The key at each step is to find a direction that is perpendicular to all the lines within the previous dimension. up table top
A line has 2 points. A square has 4 lines. A cube has 6 squares x
... our process shows why we need to add 2 at each step as we go to the next dimension. x
? So what happens if we go to 4-D. x
... like an ant on a piece of paper who cannot imagine more than 2-D, we human being cannot visualize a direction that is perpendicular to all lines in 3-D space. table top
... well, we can still use our imagination. Since we can draw a 3-D object on 2-D computer screen, we can “draw” a 4-D object in 3-D space ... table top
Image these are cubes inside our room. Let's say they are made from wires so that we can see all the edges. We use the same trick as before. We pick a direction, and move to a new position. Because we can visualize only 3-D, this direction is not really perpendicular to all the lines in our 3-D space. That's ok. We just pretend that it is.
... then connect the 8 corners of the 2 cubes. Just like we connect the 4 corners of the 2 squares before.
Yes, this looks messy. But it is just because we are 3-D people, and cannot imagine 4-D. Just like we can draw a cube on paper, if we build this figure using wires in 3-D space, this would be a correct drawing of a 4-D cube in 3-D space.
We don't know if there is really 4-D in the our physical world. But we can imagine what would look like. We can deduce that there are 8 cubes on this 4-D cube ... ... and 16 corners, and 32 edges. How many (2-D) squares are there ? This is the net diagram of a 4-D cube. It has 8 cubes.
Our 4-D diagram (drawn in 3-D space) is rather messy. Is there a better way to draw it ? Let's look more closely at how painters draw 3-D objects on a piece of paper. These are cubes. To make it to look more natural the painter draws the face that is further from us smaller. Notice that the faces are not perfectly square any more. The edges that are supposed to be parallel are not parallel.
The line marked “horizon” represents our eye level. There is a cube that lies above our eye level (left). So we can see its bottom face. There is a cube that lies below our eye level (middle). So we can see its top face. Now look at the cube that is at eye level (the one on the right). If we move our eyes towards it and look at it directly in front, we would we see ... This cube is at eye level ... the smaller square represents the face that is on the opposite side from us. Because of perspective, when drawn on paper, it is smaller and lies completely within the face that is closer to us.
Now, let's rotate the cube in space horizontally. Suppose the cube is made from wire, it is a wire frame. We can see through it and see all the edges ... ... when the wire frames are drawn on paper, they look like this. The faces and edges shift around relative to each other as the cube rotates.
We can apply similar technique to a 4-D cube. Let's say the 4-D cube is made from wire frame. We “draw” it in 3-D space. And then rotate it ...
... rotating a 4-D cube would look like this when drawn in 3-D. Notice at a certain time, the diagram appears to have two cubes, one inside the other. One is bigger, and the other smaller. The smaller one represents the “face” that is further away from us. And there are 8 lines connecting the 8 corners. This is similar to what we had when we draw a 3-D cube on paper.
We can keep going, and go to higher and higher dimensions this way. At each step, we can “draw” an n-dimension object in lower dimension. This helps us to imagine how higher dimensions would look like. But we can never truly visualize them. By the way, a 4-D cube is also called a hypercube, or a tesseract.