Download

1 / 15
150 likes | 288 Views
Installing JDK and Tomcat. Vijayan Sugumaran Department of DIS Oakland University. Downloading JDK. JDK 6 (J2SE v1.6.0) installer can be downloaded from the following url: http://java.sun.com/javase/downloads/index.jsp Click on the Download button

E N D
Installing JDK and Tomcat Vijayan Sugumaran Department of DIS Oakland University
Downloading JDK • JDK 6 (J2SE v1.6.0) installer can be downloaded from the following url: http://java.sun.com/javase/downloads/index.jsp • Click on the Download button • Click on Accept (license agreement) and continue • Click on the link for online installation: • Windows Online Installation, Multi-language • Run the installer • Accept all the default settings. It will create a new directory (C:\Program Files\Java\jdk1.6.0) and there will be a subdirectory called “bin” which contains all the jdk tools (javac, java, etc.). There will also be another subdirectory called “lib” that contains the .jar files
Setting Environment Variables • In order to access the java binary files from any directory, we should set the PATH environment variable • To access .class files from other locations, we need to set the CLASSPATH variable. • The CLASSPATH variable can also indicate where to look for .jar files
Setting Path and Classpath • Right mouse click on “My Computer” and select the “Properties” option • The system properties panel will pop up. Click on the “Advanced” tab. • Click on the “Environment Variables” button • If the Path and Classpath variables are already defined, then you can add values at the end by clicking on the “Edit” button. • The directories are separated by semicolon • If the variables don’t exist, then you can create them by clicking on the “New” button, and enter the values for those variables (see next slide) • The first value for the classpath variable should be “.;” that indicates current directory
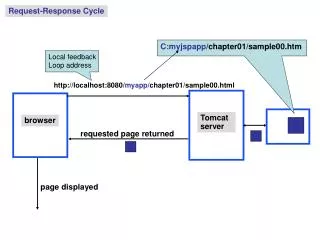
Downloading and Installing Tomcat • Download url: http://tomcat.apache.org/download-55.cgi • Scroll down to the Binary Distributions section and click on the zip link under Core to download tomcat 5.5.20. • The downloaded zip file needs to be unzipped. You can put the contents under Program Files or anywhere else you like.
Configuring Tomcat • Make sure the “JAVA_HOME” environment variable exists. If not, create this variable and set it to C:\Program Files\Java\jdk1.6.0 (or the directory where jkd resides) • For now, leave the port to 8080 (you can change it to another port number later in the server.xml file) • Turn on Servlet Reloading • Open the context.xml file (C:\Program Files\apache-tomcat-5.5.20\conf\context.xml) using notepad • In the context.xml file, change <Context> to (it is case sensitive) • <Context reloadable="true">
Configuring Tomcat (Contd) • Enable the Invoker Servlet • Uncomment the servlet and servlet-mapping elements in the web.xml file (C:\Program Files\apache-tomcat-5.5.20\conf\web.xml) • <!-- (remove this line) • <servlet> • <servlet-name>invoker</servlet-name> • <servlet-class> • org.apache.catalina.servlets.InvokerServlet • </servlet-class> • <init-param> • <param-name>debug</param-name> • <param-value>0</param-value> • </init-param> • <load-on-startup>2</load-on-startup> • </servlet> • --> (remove this line) • <!-- (remove this line) • <servlet-mapping> • <servlet-name>invoker</servlet-name> • <url-pattern>/servlet/*</url-pattern> • </servlet-mapping> • --> (remove this line)
Setting up the Application Directory Structure • Create a directory for each application within the webapps (C:\Program Files\apache-tomcat-5.5.20\webapps) directory and the necessary sub directories within it. • Example: • Create a directory called “HelloApp” for the “hello world” application within the webapps directory • Within HelloApp, create a subdirectory called “WEB-INF” • Within WEB-INF, create a subdirectory called “classes” • The compiled servlets have to reside in the “classes” directory
Creating, Compiling and Executing a Servlet • Type the code for the Hello servlet using notepad • Save it as Hello.java in the following directory: C:\Program Files\apache-tomcat-5.5.20\webapps\HelloApp\WEB-INF\classes • Add the path for the servlet-api.jar file to the classpath variable (C:\Program Files\apache-tomcat-5.5.20\common\lib\servlet-api.jar) • Compile the Hello.java file using javac • The Hello.class file will be created and it should also reside in the same classes directory • Executing the Hello servlethttp://localhost:8080/HelloApp/servlet/Hello
Creating a New Web Application • Steps to create a new web application called “anotherapp” • Create the appropriate directory structure • Restart Tomcat • Add one or more servlets to the application • Test the servlets • To control the behavior of this application add web.xml file to the WEB-INF directory • If a web.xml file is not provided for this application, the install_dir/conf/web.xml file will be used
Creating the Directory Structure (Review) • Create a folder called “anotherapp” (or any other name you choose) within the install_dir/webapps folder • Create the “WEB-INF” folder within the “myapps” folder • Create the “classes” folder within the “WEB-INF” folder • For now, make sure that you don’t have web.xml file within the WEB-INF directory
Remaining Steps • Restart Tomcat • Add one or more servlets to the “anotherapp” application • Create the servlet source file (.java file) in the install_dir/webapps/anotherapp/WEB-INF/classes directory • Compile the source file using javac • Alternatively, you can put the source file(s) anywhere you want, compile them, and then move the .class files into the install_dir/webapps/anotherapp/WEB-INF/classes directory • Test the servlet (say you created Hello.class) • http://localhost:8080/anotherapp/servlet/Hello
Deployment Descriptor File – WEB-INF/web.xml • The install_dir/conf/web.xml file controls the behavior of all the web applications that are under the webapps directory • If you want a particular web application to behave differently, then you add the web.xml file within the WEB-INF directory • It is not absolutely necessary that you should have the web.xml file for the application • Among other things, the web.xml file may contain the values of parameters that would be used during servlet initialization (calling the init() method)