Download
1 / 5
50 likes | 144 Views
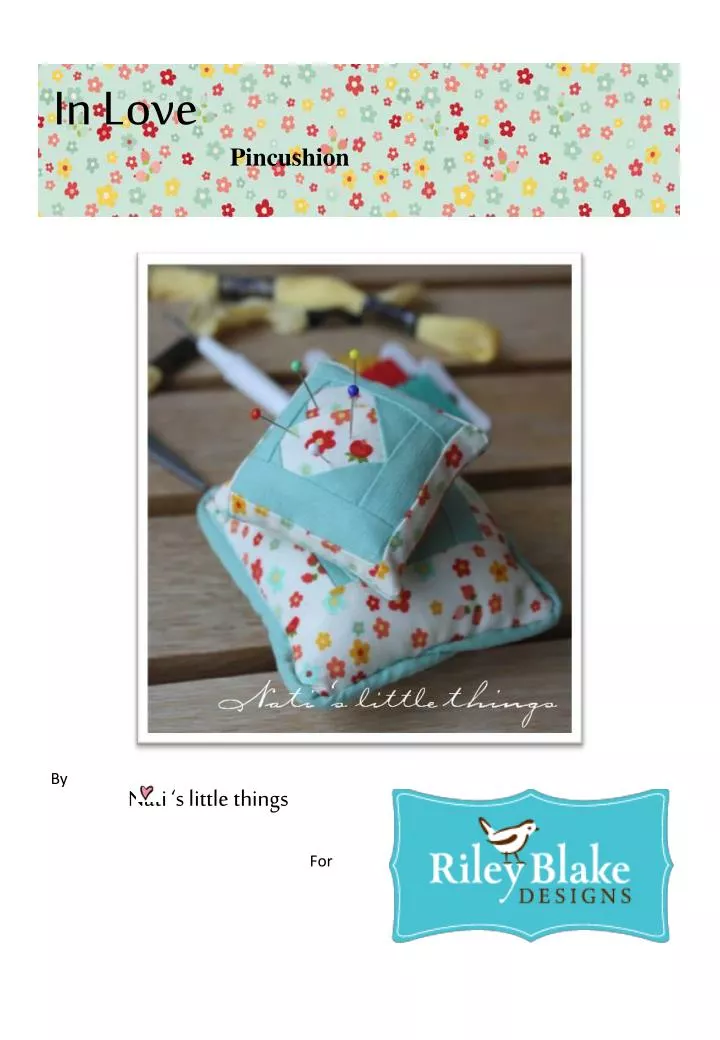
Nati ‘s little things. In Love. Pincushion. By. For. In Love. Pincushion. Materials: Two 1 1/2inch stripes (half yard long, or equivalent in scraps One 5inch square of the background fabric For piping (only if desired)

E N D
Nati ‘s little things In Love Pincushion By For
In Love Pincushion • Materials: • Two 1 1/2inch stripes (half yard long, or equivalent in scraps • One 5inch square of the background fabric • For piping (only if desired) • 1 1/2inch bias cut stripes totalling 21inch long after being assembled • Cord (or similar) for piping. • General sewing notions • Printed instructions • Polyester (or similar) filling. Instructions: We will start with the foundation paper piecing. For that cut out the template from the print-out instructions. Please note that you can adjust the size of the template when printing it out. If you do so, the fabric requirements measures will need adjusting. Fold each of the sewing lines in the template. If you are working with printer paper this is particularly important for when we want to rip the paper off. I use a thinner paper whenever I can copy the template by hand.
In Love Pincushion Cut the stripes into the pieces for the paper piecing. Ensure the pieces are big enough to cover the shape to fill. It is better to be generous at this stage. Organise the pieces in the order they will be used to ease the work. Place the first piece right side down (all the pieces after this will be placed under the template right side up). Leaving a 1/4inch seam allowance. If found easier, glue it in place to the template with washable glue. Place the second piece of the template right side up under the first piece. Secure with a pin and sew over the first sewing line.
In Love Pincushion Iron the seam open and fold the paper on the next sewing line. Trim the excess of fabric to a ¼ inch seam allowance. Place the next piece to sew right side up under the template, secure and sew as per prior steps. Continue with the same process for each piece until all pieces have been sewn in. Tear the template out and square up the pieced block, you should end up with a 5inch square or smaller. Or you may want to wait until this moment in the template to cut out your background fabric to the size of the block. Your lovely hear piece should look like this.
In Love Pincushion If desired you can use piping all around the pincushion. I used piping for my jumbo one. So to prepare the piping, attach the strips of bias cut fabric to make a long strip that measures the perimeter of the block plus a little more. Using the zip foot of the sewing machine, fold the strip over the cord (right side out) and sew in as close to the cord as possible. Prepare the pieces finish the pincushion. Start by squaring up the background fabric to the same size as the finished pieced block. Sometimes sizes can vary so it is better to double check it. Attach the piping to the background fabric, giving the pipe a nice curve at the borders. Then place the pieced fabric, right side down on top. If your fabric does not stretch nicely over the corners, you can help it out by making small cuts. Sew around the perimeter with the zip foot, as close as possible to the cord. Leaving a small opening at one side. If you are not using piping, then an all-purpose foot and a 1/4inch seam will work just fine. Turn inside out, fill in and hand sew the opening close. For the matching sewing case instructions visit the tutorial section at www.natilittlethings.blogspot.com