Download

1 / 243
2.43k likes | 2.44k Views
MAINTAIN ORGANIZATION DATA. UPON COMPLETION OF THIS COURSE, THE STUDENT WILL BE ABLE TO: PERFORM THE STEPS INVOLVED IN ADDING / UPDATING AN ORGANIZATION INTO NALCOMIS. ORGANIZATION ADD / UPDATE. Purpose : (1) Initiates into NALCOMIS those organizations for which

E N D
MAINTAIN ORGANIZATION DATA UPON COMPLETION OF THIS COURSE, THE STUDENT WILL BE ABLE TO: PERFORM THE STEPS INVOLVED IN ADDING / UPDATING AN ORGANIZATION INTO NALCOMIS
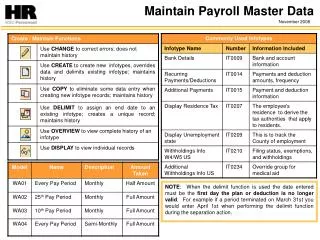
ORGANIZATION ADD / UPDATE Purpose: (1) Initiates into NALCOMIS those organizations for which maintenance actions will be performed (IMA), and or supported (SSC). (2) Updates those organizations for which maintenance actions are being performed or supported. System Action: (1) Adds organization data to the data base.
Select New Select Organization Click on Administration
Fill in Org Org Name Org Maintenance Level Service Code UIC TAC FAD Address R/R = N/A-leave unchecked S## VS-## 1 R 099## N 1 U 2 FPO AP 963##
1st Block Scroll down
NOTE: Grayed Out Click on “Apply”
Now ACTIVE Add Successful
MDP of 050 Enter WC 050 WC Title Material Control Now Select Req Cd
assign G0 First assign NM
Now assign HP Assign E0 Scroll down
Now assign LP Assign E0 Scroll down
Click on Buno/Serno Add Successful
PRIOR TO LOADING A BUNO/SERNO; TEC MUST BE LOADED ON FILE Click on “OK”
Enter TEC AEBC, BUNO/SERNO 12##00 12##01 12##02 12##03 12##04 12##05 12##06 FAD = 2 Also add TEC AEBC, BUNO/SERNO 16##00 FAD = 3
Fund Code Add Successfully
F/C F/C Ind Svc Desig UIC Sig M/s Cd TEC Y6 A N 00188 A S 2S D N 00188 A S 7L N N 00188 A S 7L V N 00188 A A ADD
Proj Code Add Successful
Prj UND A UND B UND C Work Stop Ind Prj Ind Dist Cd M/S Cd AK0 X N S AK7 / P S AK1 / / W S ZA9 / A S ZO9 / / S / Enter “Above Project Codes”
AK0 UND A Proj Code
Select Ind per Prj Code
Select S Add 2nd Proj Cd UND A P = AK7
Leave Blank Add 3rd Proj Cd UND B Select S W
Leave Blank Add 4th Proj Cd UND C Select S
Add 5th Proj Cd A = ANMCS
R-Sply Logon Add Successful
Add Serial #s (i.e. G0, E0)
Add Successful Close
ORGANIZATION ADD WORK CENTER - ADD / UPDATE
WORK CENTER ADD/UPDATE Purpose: (1) Adds work centers for specific organizations which maintenance will be performed or supported. (2) Updates work centers in the system. System Action: (1) This window enables you to update a work center's title, delivery point for its supplies, and the prime PC it is assigned to. You can also generate the SQ Update batch process (U40010) when you change the work center's prime PC.