Download
1 / 139
1.43k likes | 1.54k Views
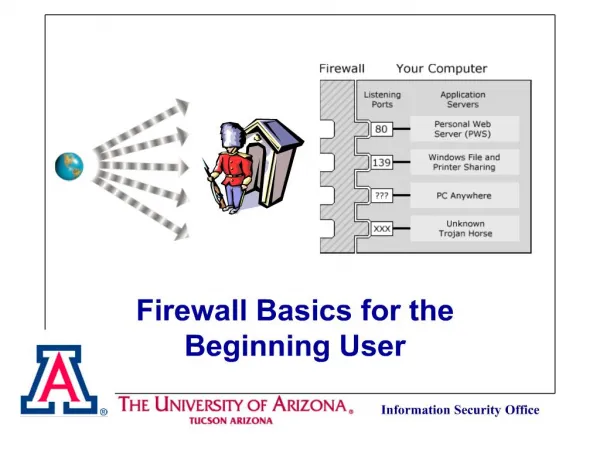
Firewall Basics with Fireware for WatchGuard System Manager v9.1. Firewall Basics with Fireware v9.1. Course Introduction. Course Introduction. Course Introduction Objectives. Understand and use the basic management and monitoring components of WatchGuard System Manager

E N D
Firewall Basics with Fireware for WatchGuard System Manager v9.1 Firewall Basics with Fireware v9.1
Course Introduction Course Introduction
Course IntroductionObjectives • Understand and use the basic management and monitoring components of WatchGuard System Manager • Understand how to configure a WatchGuard Firebox X Core or Peak e-Series device for your network environment • Understand how to create basic security policies for your Firebox to enforce • Understand how to use security services to expand Firebox functionality
Course Introduction Audience • This course is intended for network administrators who have a Firebox X Core or Peak. A basic understanding of TCP/IP networking is required.
Course IntroductionEnvironment • To use this training presentation: • It is helpful, but not necessary, for you to have WatchGuard System Manager installed on your computer • It is not necessary to have a Firebox X Core or Peak • We recommend you view or print the instructor’s notes for this presentation, as they contain additional details which may be helpful
Course Introduction Outline • This course includes sections on: • Getting Started with your Firebox X Core or Peak • Introducing Policy Manager • Using Policy Manager to Configure Network Settings • Using Policy Manager to Configure Policies • Working with Proxy Policies • WebBlocker • spamBlocker • Gateway AV/IPS • Policy Manager Intrusion Prevention • Firebox Administration • Working with Firebox Log Messages
Course IntroductionExam • The WatchGuard Certified System Professional exam is available for all WatchGuard partners. The exam is based on the contents of this course. Studying the information in this courseware can help you prepare to take the exam. • If you are a WCSP, you can find the exam at: • https://www.watchguard.com/training/CertCentral.asp
Getting Started with your Firebox X Core or Peak Getting Started with your Firebox X Core or Peak
Getting StartedManagement and Appliance Software • To configure a WatchGuard Firebox, you must install two software packages: • WatchGuard System Manager (WSM) – The management software you use to configure, manage, and monitor your Firebox. • Fireware Appliance Software – The software that is installed on the Firebox itself.
Getting StartedManagement Station • Your management station is a PC running Windows 2000, Windows XP, Windows 2000 Server, or Windows 2003 Server. • You install WSM on your management station to configure, manage, and monitor your Firebox. • You also install Fireware appliance software on your management station. Use WSM to put Fireware on your Firebox.
Getting StartedComponents of WSM • WSM includes a set of management and monitoring utilities: • Policy Manager • Firebox System Manager • LogViewer • HostWatch • Historical Reports
Getting StartedServer Software • When you install WSM on your management station, you have the option to install any or all of these server components: • Management Server – Use to manage all firewall devices and create VPN (virtual private network) tunnels using a simple drag-and-drop function. • Log Server – Collects log messages from each WatchGuard Firebox. • WebBlocker Server – Operates with the Firebox HTTP proxy to deny user access to specified categories of web sites. • Quarantine Server – Collects and isolates mail confirmed as spam by spamBlocker
Getting StartedRegistering your Firebox • Before you can begin to configure your Firebox, you must register your Firebox to your LiveSecurity account. • If you have not created a LiveSecurity profile with a user name and password, you must create it before you register your Firebox. • You must have your Firebox serial number when you log in to LiveSecurity to register your device.
Getting StartedQuick Setup Wizard • The Quick Setup Wizard works with a Firebox X Core or Peak e-Series device and allows you to: • Install Fireware appliance software on the Firebox • Create and upload a basic configuration file • Assign passphrases to control access to the Firebox
Getting StartedPreparing to use the Quick Setup Wizard • Before you start the Quick Setup Wizard, you must have: • The feature key for your FireboxWhen you register your Firebox with LiveSecurity, a feature key is created that is unique to the serial number of the device. Save a copy of the feature key to complete the Quick Setup Wizard. • Installed WSM and Fireware on your management stationDownload the latest versions from the LiveSecurity /software downloads site. Note that WSM and Fireware are separate software downloads. You must download and install both packages. • Network informationYou must know the IP address of your gateway router, and IP addresses to give to the external and trusted interfaces of the Firebox.
Getting StartedStarting the Quick Setup Wizard • For the Quick Setup Wizard to operate correctly, you must: • Assign a static IP address to your management workstation from the same subnet that you plan to assign to the Trusted interface of the Firebox. • Connect the Firebox to a power source. Hold down the down arrow on the front of the Firebox while you turn on the power switch. Hold the button until the LCD display shows “WatchGuard Technologies.” • Connect your management station’s Ethernet interface to the eth1 interface of the Firebox. • Launch WatchGuard System Manager (WSM) and launch the Quick Setup Wizard from the WSM > Tools menu.
Getting StartedStarting the Quick Setup Wizard • The QSW asks you to choose which model of Firebox you are configuring.
Getting StartedStarting the Quick Setup Wizard • If you have connected your workstation to the Firebox correctly, the QSW will automatically detect the Firebox and identify its model and serial number. Verify that this information is correct.
Getting StartedNaming Your Firebox • The name you assign to the Firebox in the wizard is used to: • Identify the Firebox in WSM • Identify the Firebox log file • Identify the Firebox when you use Historical Reports
Getting StartedAdding a Feature Key • If you have purchased additional options for your Firebox and already registered them with LiveSecurity, the feature key will reflect those features. • You can register the features laterand update your feature key using Policy Manager.
Getting StartedConfiguring the External Interface • The IP address you give to the external interface can be: • A static IP address • An IP address assigned with DHCP • An IP address assigned with PPPoE • You must also add an IP address for the Firebox default gateway. This is the IP address of your gateway router.
Getting StartedConfiguring Trusted and Optional Interface • To configure the trusted and optional interfaces, you must select one of these configuration options: • Routed Configuration – Each interface is configured with an IP address on a different subnet. • Drop-in Configuration – All Firebox interfaces are configured with the same IP address. Use drop-in mode when devices from the same publicly addressed network are located on more than one Firebox interface.
Getting StartedUnderstanding Drop-in configurations • In drop-in mode: • You must assign the same primary IP address to all interfaces on your Firebox (external, trusted, and optional). • You can assign secondary networks on any interface. • You can keep the same IP addresses and default gateways for hosts on your trusted and optional networks, and add a secondary network address to the Firebox interface so the Firebox can correctly send traffic to the hosts on these networks.
Getting StartedSetting Passphrases • You define two passphrases for the Firebox. Passphrases must be at least 8 characters long and different from each other: • Status passphrase – used for read-only connections to the Firebox. • Configuration passphrase – used for read-write connections to the Firebox.
Getting StartedCompleting the Quick Setup Wizard • The wizard is complete when it has saved a basic configuration to the Firebox. • You are now ready to put your Firebox in place on your network. • Remember to reset your management station to get its IP address in its usual way.
Introduction to Policy Manager Introduction to Policy Manager
Introduction to Policy ManagerLaunch WSM • Launch WSM from Windows Start > All Programs > WatchGuard System Manager 9.1 > WatchGuard System Manager to monitor and configure your Firebox. • From WSM, connect to the Firebox. Once connected, you can monitor the device or launch Policy Manager to configure the device.
Introduction to Policy ManagerWhat is Policy Manager? • Policy Manager is the off-line editing tool used to modify the configuration of your Firebox. • Changes made in Policy Manager do not take effect until you save them to the Firebox. • Launch Policy Manager from WSM.
Introduction to Policy ManagerNavigating Policy Manager • Use drop-down menus to configure many basic and advanced Firebox features.
Introduction to Policy ManagerNavigating Policy Manager • Security policies controlling traffic through the Firebox are represented by icons in the Policy Manager. • To edit security policies, double-click on an icon. • To display policies in list view, select View > Details.
Using Policy Manager to Configure Network Settings Using Policy Manager to Configure Network Settings
Network SettingsBeyond the Quick Setup Wizard • The Quick Setup Wizard configures the Firebox with an external, trusted, and optional network only.
Network SettingsNetwork Configuration Options • Use Policy Manager to: • Modify a configured interface’s properties • Change the interface type (from trusted to optional, etc.) • Add secondary networks and addresses • Enable DHCP server on the Firebox • Configure additional interfaces • Configure WINS/DNS settings for the Firebox • Add network or host routes • Configure NAT
Network SettingsInterface Types • You can identify each interface as external, trusted, or optional. In most cases, these terms refer to: • External – Connects to your gateway router. • Trusted – Connects to your LAN of desktop computers or workstations, not accessible from the public internet • Optional – Connects to a network of servers that need to be physically separate from the trusted network and accessible from the public internet, such as web and mail servers.
Network SettingsInterface Independence • You can change the interface type of any interface configured with the Quick Setup Wizard. • You can choose the interface type of any additional interface you enable.
Network SettingsSecondary Networks • A secondary network is a network that shares one of the same physical networks as one of the Firebox interfaces. • A secondary network adds an IP alias to the interface. This IP alias is the default gateway for all the computers on the secondary network.
Network SettingsSecondary Addresses • If your external interface is configured with a static IP address, you can add an IP address on the same subnet as a secondary network. • For example, configure an external secondary network with a second public IP address if you have two public SMTP servers.
Network SettingsEnabling DHCP Server • The Firebox can act as a DHCP server for clients on any interface configured as trusted or optional. • To configure DHCP server on a Firebox interface, identify the first and last IP addresses in the range you want the Firebox to assign.
Network SettingsWINS/DNS • The Firebox needs WINS/DNS information to: • Resolve names to IP addresses for IPSec VPNs and for the spamBlocker, Gateway AV and IPS features to operate correctly. • Allow DHCP clients on the trusted or optional networks, MUVPN users, and PPTP RUVPN users to resolve DNS queries.
Network SettingsNetwork or Host Routes • Create static routes to send traffic from a Firebox interface to a router. The router can then send the traffic to the correct destination from the specified route. • If you do not add a route to a remote network or host, all traffic to that network or host is sent to the Firebox default gateway.
Configuring Policies Using Policy Manager to Configure Policies
Configuring PoliciesWhat is a Policy? • A rule to limit access through the Firebox • Can be configured to allow traffic or deny traffic • Can be enabled or disabled • Applies to specific port(s) and protocols • Applies to specific internal hosts or subnets and external hosts or subnets
Network SettingsFirebox Dynamic NAT • Dynamic NAT: • The Firebox applies its public IP address to the outgoing packets for all connections or for specified services • Is used to hide the IP addresses of internal hosts when they get access to public services • Is enabled by default for valid RFC 1918 networks to any external interface
Configuring PoliciesAdding Policies • To add a policy, select Edit > Add Policy. • Add a policy from the pre-defined Packet Filters list, the Proxies list, or create a Custom policy.
Configuring PoliciesChanging Source and Destinations • You can: • Select a pre-defined alias, then click Add. • Click Add User to select an authentication user or group. • Click Add Other to add a host IP address, network IP address, or host range.
Configuring PoliciesPacket Filters and Proxies • Packet Filter – Examines the IP header of each packet. Works at the network and transport protocol packet layers. • Proxy – Examines the IP header AND the content of a packet (at the application layer of a packet). If the content does not match the criteria you set in your proxy policies, it denies the packet, or removes disallowed content.A proxy: • Removes all the network data • Examines the contents for RFC compliance and content type • Adds the network data again • Sends the packet to its destination
Configuring PoliciesWhen do I use a custom policy? • Use a custom policy: • If none of the pre-defined policies include the specific combination of ports that you want. • If you need to create a policy that uses a protocol other than TCP or UDP. • Note: A custom policy can be either a packet filter or proxy policy.
Configuring PoliciesModifying Policies • To edit a policy, double-click the policy icon. • By default: • A new policy is enabled and allowed. • It allows traffic on the port(s) specified by the policy. • It allows traffic from any trusted source to any external destination.
Configuring PoliciesChanging Source and Destinations • To modify the default source and destination, click Add and define a new source or destination.
Configuring PoliciesPolicy Properties • The Policy Properties tab lets you: • See the ports and protocols defined in the policy. • Set logging and notification rules for the policy. • Auto-block the source of denied traffic (if the policy is configured to deny traffic). • Set a custom idle time out for the policy.