Download

1 / 53
530 likes | 654 Views
Design Process. Definition of the Design Process. The engineering design process is the set of steps that a designer takes to go from first, identifying a problem or need to, at the end, creating and developing a solution that solves the problem or meets the need. ABET Definition of Design.

E N D
Definition of the Design Process • The engineering design process is the set of steps that a designer takes to go from first, identifying a problem or need to, at the end, creating and developing a solution that solves the problem or meets the need.
ABET Definition of Design • Engineering design is the process of devising a system, component, or process to meet desired needs. • It is a decision-making process (often iterative), in which the basic sciences and mathematics, and engineering sciences are applied to convert resources optimally to meet a stated objective. • Among the fundamental elements of the design process are the establishment of objectives and criteria, synthesis, analysis, construction, testing, and evaluation.
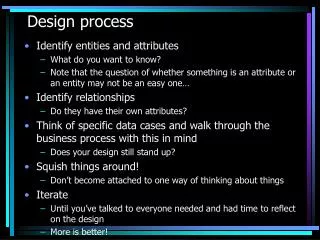
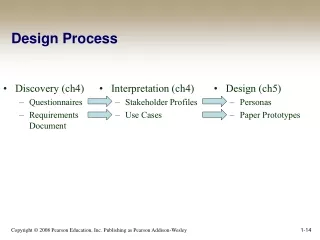
The steps of the engineering design process • Define the Problem • Do Background Research • Specify Requirements • Create Alternative Solutions • Choose the Best Solution • Do Development Work • Build a Prototype • Test and Redesign
How does it work? • During the engineering design process, designers frequently jump back and forth between steps. • Going back to earlier steps is common. • This way of working is called iteration, and it is likely that your process will do the same!
Define the Problem • The engineering design process starts when you ask the questions below about problems that you observe: • What is the problem or need? • Who has the problem or need? • Why is it important to solve? • [Who] need(s) [what] because [why].
Define the Problem – Detailed Help • Define the Problem • Design Notebook • Mind Mapping • Engineering Project Proposal Form
Key Info • Finding an idea for your engineering project requires you to identify the needs of yourself, another person, or a group of people. The act of looking at the world around you to identify these needs is called need finding. • To help you find an idea for your engineering project: • Create a list of all the things that annoy or bother the people around you. Record this bug list in your Design Notebook. • Mind Map possible design problems, ideas, or areas of interest to you.
Key Info (Cont.) • Once you have found an idea for your engineering project, describe the problem by writing a problem statement. Your problem statement must answer three questions: • What is the problem or need? • Who has the problem or need? • Why is it important to solve? • The format for writing a problem statement uses your answers to the questions above and follows these guidelines: • Who need(s) what because why. • _____ need(s) _________ because ________.
Key Info (Cont.) • Before moving forward with an idea for your engineering project, be sure to evaluate your problem.
Design Notebook • The design process takes days, weeks, sometimes even months or years, to complete and involves many different steps and phases along the way. • If you recorded all of your work in different places, • it would be almost impossible to find important thoughts when you need to refresh your memory. • it would be difficult to gather all your work to present your final solution. • To avoid being disorganized, designers and engineers keep design notebooks, where they record every detail of their projects along the way.
Mind Mapping • Mind mapping refers to a technique that designers and engineers use to express and generate ideas. • All that mind mapping really is, however, is a way to get all of the ideas in your head down onto paper. There is no right or wrong way to mind map. It is simply a visual representation of the thoughts in your head, and it often looks like organized chaos.
Why Mind Map? • Mind mapping helps you to release all of the ideas in your head and gives you the opportunity to see those ideas visually. It is a fast and simple way to get your creative juices flowing, and the only tools you need are a pen or pencil and your design notebook.
How to Mind Map • To start a mind map, write down one, central idea or theme in the middle of a blank page. • All mind maps have this common starting point. • Then, stem off of the central idea by writing down anything that comes to your mind when thinking about the idea. You can include drawings, questions, comments, solutions, problems, etc. There are no limits. Simply write down everything that relates to the central theme or anything that enters your mind.
When and What to Mind Map • You can create a mind map at any stage in your design process and for absolutely any purpose. • You can mind map at the very beginning before you have even decided what problem you are going to solve. • You can also mind map to generate possible solutions to your problem or to identify different types of users for your project. • Mind map whenever you feel the need to empty the thoughts in your head or whenever you feel stuck during the design process.
Engineering Project Proposal Form • Will be handed in by each group of students at the request of the instructor.
Do Background Search • Learn from the experience of others rather than blunder around and repeat their mistakes. So, for an engineering design project, do background research in two major areas: • Users or customers • Existing solutions
Do Background Search – Detailed Help • Background Research Plan for an Engineering Design Project • Finding Information • Bibliography • Research Paper • Background Research Plan Worksheet
Background Research Plan for an Engineering Design Project • Background research is especially important for engineering design projects, because you can learn from the experience of others rather than blunder around and repeat their mistakes. • To make a background research plan— a roadmap of the research questions you need to answer – there are five steps you have to follow.
Necessary Steps for Background Research Plan 1.Identify questions to ask about your target user or customer. 2.Identify questions to ask about the products that already exist to solve the problem you defined or a problem that is very similar. 3.Plan to research how your product will work and how to make it. 4.Network with other people with more experience than yourself: your mentors, parents, and teachers. Ask them: "What should I study to better understand my engineering project?" and "What area of science covers my project?" Better yet, ask even more specific questions. 5.Use a Background Research Plan Worksheet to help you develop your own plan.
Finding Information • You will be required to find at least three sources of information. • When you find information, evaluate if it is good information
Finding Information (Cont.) • How to find information: • Find and read the general information contained in an encyclopedia, dictionary, or textbook for each of your keywords. • Use the bibliographies and sources in everything you read to find additional sources of information. • Search periodical indexes at your local library. • Search the Internet to get information from an organization, society or online database. • Broaden your search by adding words to your search phrases in search engines. Narrow your search by subtracting words from or simplifying your search phrases.
Bibliography • Make a list to keep track of ALL the books, magazines, and websites you read as you follow your background research plan. Later this list of sources will become your bibliography. • Most instructors want you to have at least three written sources of information. • Write down, photocopy, or print the following information for each source you find.
Research Paper • As you do your research, follow your background research plan and take notes from your sources of information. These notes will help you write a better summary. • The purpose of your research paper is to give you the information to understand why your experiment turns out the way it does. The research paper should include: • The history of similar experiments or inventions • Definitions of all important words and concepts that describe your experiment • Answers to all your background research plan questions • Mathematical formulas, if any, that you will need to describe the results of your experiment
Research Paper (Cont.) • For every fact or picture in your research paper you should follow it with a citation telling the reader where you found the information. A citation is just the name of the author and the date of the publication placed in parentheses like this: (Author, date). This is called a reference citation when using APA format and parenthetical reference when using the MLA format. Its purpose is to document a source briefly, clearly, and accurately. • If you copy text from one of your sources, then place it in quotation marks in addition to following it with a citation. Be sure you understand and avoid plagiarism! Do not copy another person's work and call it your own. Always give credit where credit is due!
Research Paper (Cont.) • Most instructors want a research paper to have these sections, in order: • Title page (with the title of your project, your name, and the date) • Table of Contents • Your report • Bibliography • Pages, Figures, Graphs and Tables have to be numbered
Specify Requirements • Design requirements state the important characteristics that your solution must meet to succeed. • One of the best ways to identify the design requirements for your solution is to analyze the concrete example of a similar, existing product, noting each of its key features.
Specify Requirements – Detailed Help • Design requirements state the important characteristics that your design must meet in order to be successful. • One of the best ways to identify the design requirements for your solution is to use the concrete example of a similar, existing product, noting each of its key features. • To complete the requirements step of the design process, you should write a design brief— a document that holds all of the key information for solving your problem in one place.
Design Requirement Examples • The design requirements for your project will differ from those of anyone else, because yours will apply to your specific problem statement and the product, system, or experience that you are designing. • Following are a few examples of design requirements. Your requirements will be more specific and directly related to meeting the needs of your project's users.
Design Requirement Examples (Cont.) • If you are designing a baseball bat, your design requirements might be that the bat needs to be: • Less than 1.5 pounds. • Made out of a material approved by the league. • Able to hit a baseball without breaking.
Design Requirement Examples (Cont.) • If you are designing a better form of transportation for students to get to school, your design requirements might be that the transportation needs to be: • Free for students. • Quick: less than one hour round-trip. • Safe.
Design Requirement Examples (Cont.) • If you are designing a website for a faculty to post homework assignments online, your design requirements might be that the website needs to: • Allow faculty to upload documents. • Provide a login for teachers. • Be accessible from schools and teachers' homes.
How to analyze a physical product • When you start to identify your design requirements, you already know what problem you are trying to solve. But what does "solving" your problem really mean? Your design requirements are the specific needs that must be met in order to call your design a solution. • For a physical product, your problem is likely making a task possible or easier for a user to complete. • 1.From the problem statement, you can start asking the right questions to create a list of design requirements. Pull the major need or needs of your solution from your problem statement.
How to analyze a physical product (Cont.) • 2.For each need, ask yourself: "What is absolutely essential to satisfy this need?" Right now, do not brainstorm. Instead, figure out what MUST happen to meet the need in your future solution. Your answers to these questions are your first design requirements. (Note: if you can remove your answer to the question and still meet the need, then your answer is not a design requirement.) • Major Needs from Step 1 What is Essential to Meet the Need (Possible Design Requirements) • These answers are all design requirements, because they MUST be a part of your solution in order to meet the need. • 3.What are the physical requirements/limits of the product you are designing? The answers to this question are your next design requirements.
How to analyze a physical product (Cont.) • 4.What are the conceptual requirements/limits of the product you are designing? These are requirements that are not related to the physical nature of the product, but still must be met in order to make your solution successful. Examples often include cost and the timeline of the project. • 5.What other products exist that serve a similar function to solving your problem? • Examine these products. If possible, obtain the products themselves and take them apart. Otherwise, research everything you can about the products. Identify every individual piece of the product in addition to any features of the product. In your design notebook, draw a vertical line down the middle of the page. On the left, write down all of the component parts and features that you see. On the right, write down the purpose for each component or feature. Why is it present?
How to analyze a physical product (Cont.) • 6.Look at the right side of your table from Step 5. Which functions listed here will your product need to fulfill? Circle these functions, and look at the feature on the left for each. Is the feature absolutely essential in meeting the need on the right? If it is, then this is a design requirement, and you should circle it. If it is not, it is a possibility that could contribute to your design, but not a requirement. • 7.Is the product that you are designing going to have to compete with the other products you listed in Step 5? If the answer is "yes," look more closely at the features on the left side of your table. If you feel that your design needs to include the feature in order to keep up with current products, then that feature becomes another design requirement.
How to analyze a physical product (Cont.) • 8.Will you include any features that are not present in the competing product? What are they? If they are features that you consider to be "must haves" in order to make your design successful, then they can be considered your final, additional design requirements
How Many Design Requirements? • How many requirements should you have? That's a really good question without a good answer. You should have neither too many nor too few. (Big help!) • What is "too many" depends on the product. An airliner might have thousands of design requirements, and that could be just right. For a project that you have time to complete for school, two or three, or maybe five design requirements are appropriate.
How Many Design Requirements? (Cont.) • The reality is that experience is very important in deciding how many design requirements are important. It's another good time to ask your mentors, parents, and teachers for advice, but do so by asking specific questions. Tell them the design requirements you are considering, and ask them which ones you might be able to do without. • Here are some other thoughts to help you. If you have too many design requirements, it can become very difficult to actually design and build a product. Imagine having a friend whose parents have set ten times as many rules as your parents. Such an imaginary friend might have difficulty doing things because he or she would always be violating one of the rules. Having too many design requirements (requirements are a type of rule) creates a similar situation. With too many requirements, the number of design trade-offs increase, and many design decisions become unnecessarily complex.
How Many Design Requirements? (Cont.) • Why might too few design requirements be a problem? If you have too few requirements, you might get a result that you don't really want. Let's say that you do not specify a cost requirement. You might end up designing something that costs many times more than what people would be willing to pay for it. Your design would be a failure. So, don't be a slacker on your design requirements. • By the way, professional engineers call a design with too many requirements over constrained (as if it had too many rules) and one with too few requirements under constrained (as if it had too few rules).
Create Alternative Solutions • #1 Rule when creating alternative solutions: DON'T SETTLE FOR YOUR FIRST IDEA! • Good designers try to generate as many possible solutions as they can before choosing one that they feel is the best. This creative process of developing ideas is called ideation. • Methods of ideation include: • Examining existing solutions • Creating and using analogies • Conducting brainstorming sessions • Sketching and doodling
Choose the Best Solution • First, look at whether each possible solution met your design requirements. • Consider solutions that did a much better job than others, and reject those that did not meet the requirements.
Choose the Best Solution (Cont.) • Some criteria apply to virtually every design. Good designers consider these universal design criteria when choosing which possible solution to implement: • Elegance • Robustness • Aesthetics • Cost • Resources • Time • Skill required • Safety
Choose the Best Solution (Cont.) • It helps to compare solutions in a decision matrix—a chart with the requirements and criteria on one axis and the different solutions on the other. • If your requirements and solutions are relatively simple, you can sometimes just list the pros and cons for each solution. Pros are good things about a solution and cons are bad things.
Development Work • Development involves the refinement and improvement of a solution. • The goals of development work are to: • Make it work! • Reduce risk. • Optimize success. • Methods of development work include: • Drawings • Modeling • Prototyping • Storyboards • Analysis
Prototyping • A prototype is an operating version of a solution. It is often made with different materials (cheaper and easier to work with) than the final version. • Prototypes allow you to test how your solution will work and even show the solution to users for feedback. • Creating prototypes may involve using readily available materials, construction kits, storyboards, or other techniques that help you to create your solution quickly and with little cost. Keep in mind that these are mockups of your final solution, not the real thing!
Test and Redesigning • The design process involves multiple loops and circles around your final solution. • You will likely test your solution—find problems and make changes—test your new solution—find new problems and make changes—and so on, before settling on a final design.
Test and Redesigning (Cont.) • At this point, you have created prototypes of your alternative solutions, tested those prototypes, and chosen your final design. So you're probably thinking that your project is finished! But in fact, you have yet to complete the final and most important phase of the engineering design process—test and redesign.
Test and Redesigning (Cont.) • Test and redesign requires you to go out and test your final design with your users. • Based on their feedback and their interaction with your solution, you will redesign your solution to make it better. • Repeat this process of testing, determining issues, fixing the issues, and then retesting multiple times until your solution is as successful as possible. • Keep in mind that minor changes this late in the design process could make or break your solution, so be sure to be thorough in your testing!
Final Report • At this point, you are in the home stretch. Except for writing the abstract, preparing your science fair project final report will just entail pulling together the information you have already collected into one large document.