Download
1 / 5
50 likes | 222 Views
3D Printing. A new frontier w ith Sonia Spadafora. Getting Started…. Download the newest version of Google SketchUp or Layout at www.sketchup.com Go through the downloading procedure until finished. Your desktop should now have two icons, one labeled SketchUp , the other Layout

E N D
3D Printing A new frontier with Sonia Spadafora
Getting Started… Download the newest version of Google SketchUp or Layout at www.sketchup.com Go through the downloading procedure until finished. Your desktop should now have two icons, one labeled SketchUp, the other Layout For my project I used Layout, which is simpler and easier to learn and understand.
Using SketchUp & Layout -Tutorials can be viewed on YouTube or www.sketchup.com/learn/videos -Using Layout I created my 3D printed name card on which I had “SONCHASKA” printed (my nick-name). Process Double click the Layout icon on your desktop. Select a workspace depending on the type of object you wish to design. Using a series of lines, shapes, lifts and pulls, design your object. For precise measurements use the measuring tape tool to measure already drawn lines and perimeters.
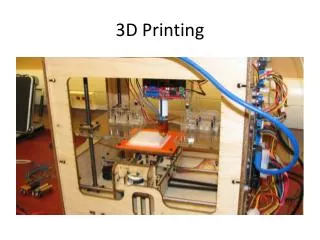
Using the 3D Printer Export the STL file of your design. Save it on your desktop with a recognizable name. Close that file and open Makerware. Using Makerware open the file you previously saved. Click “scale” to format the size of your design. Be sure to keep the object in your cylinder and make sure it is on the platform. Click the “make” button that looks like a ‘M’. Go over questions in a window that pops up regarding the printer and your object such as color type, type of printer and type of plastic. Click export. You have now created an X3G file that is compatible with the 3D Printer! Close Makerware, save your work as a .Thing file. Put the X3G file on an SD card by simple drag and drop. Place the SD card in the 3D Printer, press M, let it print!
Final Product! Front, Reversed Back, “SONCHASKA” Final product was roughly 1.5 x 2.5 inches. Some letters did not come out such as the H and K, possibly due to lack of precision in this model. Small burn on the back top right edge. Edges could be smoother. First letter A has a free-floating dot that was not built into the design, however, O and the second A lack free-floating dots. Overall, a successful build for a first-timer.