Download
1 / 26
260 likes | 391 Views
A Seminar for MI Squadron of MSTA. Accessorizing Your Electrical System. Paul Duffy Bob Kiessel. Outline. Key Terms Typical Electrical Loads Sources of Electrical Power Two items requiring attention: System Capacity Wiring it Together. Who Are We?.

E N D
A Seminar for MI Squadron of MSTA Accessorizing Your Electrical System Paul Duffy Bob Kiessel
Outline • Key Terms • Typical Electrical Loads • Sources of Electrical Power • Two items requiring attention: • System Capacity • Wiring it Together
Who Are We? • Paul Duffy has 30 years experience with Ford Motor in Electrical Engineering and Manufacturing. He presently heads Electronic/Electrical Engineering for a fuel cell manufacturer. • Bob Kiessel has 30 years experience with Ford Motor. He retired as Chief Electrical Engineer and presently is COO of a small software company.
Key Terms • Electrical Potential (EMF or Voltage) • Volts • Measure of the force causing electricity to flow in a conductor • Electrical Current • Amps • Measure of the amount of electricity flowing in a conductor • Electrical Power • Power (Watts) = Voltage (volts) x Current (amps) • Energy per time - the rate that energy is used • 745 watts = 1 hp
The WaterAnalogy • A Battery provides current (amps) at a specified “pressure” (volts). • The accessory load determines how much current is drawn from the battery based on its resistance. • I (amps) = V (volts) / R (ohms) • Amount of water= Pressure/resistance of pipe • A wire carries the current like a pipe in a water system. • If too thin or too long, you get a pressure drop (voltage drop) and… • The accessory may not be able to operate properly. • With electricity, you also can burn up the thin pipe!
Typical MC Electrical Loads • Lighting • Headlights • Taillights • Marker lights • Instrument Cluster & Turn Indicator lights • Turn/Brake Signals • Electric Cooling Fan • Engine Control/Ignition System • EFI (on some bikes) • In order to determine whether your charging system has enough capacity for your accessory, it’s important to know the duty cycle of a load.
Sources of Electrical Power • Battery • Limited capacity – typically sized for starting • Alternator • Converts mechanical energy into electrical energy • Limited Output – based on size of alternator and rpm of engine • Sized based on average load in worst case conditions (with more or less margin). • Information in owner’s manual – FZ1 • Battery – 12 Ah (amp-hours) • Alternator – 365w @ 14 volts > 26 amps peak
Battery is charging in this region! Battery is discharging in this region!
What Can You Do When Power Is Limited? • Conserve—energy diet! Manage loads wisely. • Shut off one headlamp • Use PWM controllers for heated gear • Use LED’s for some lighting loads • Raise idle speed a few hundred rpm or rev at stoplights • Shift down a gear if at low speed • Please note: increasing battery size only delays the inevitable; alternator upgrade is very expensive and may affect regulator
Wiring Accessories • I will present how to approach a wiring project—installation of an accessory. • I’ll provide some guidelines on “Best Practices” -- reasons behind these are from a lifetime of scars.
For power distribution, we’ll suggest that you use: • A “star” architecture for power and grounds (a common point of origin for all power leads and all ground leads). This minimizes the risk of system interactions. • Always use a return ground wire —i.e., don’t rely on chassis or frame ground. • Separate signal & power grounds when you have sensors in a system. Don’t ever tap into a sensor ground.
Wiring AccessoriesA wiring system has a capacity just like a charging system. To size it: • First figure out the accessory load in amps [or if you have power: I (amps) = P (watts) / V (volts)] • Next choose the wire gage to handle the total current expected in the wire. • Fuse the wire to prevent the smoke from leaking out—a fuse is used to protect the wiring from fire. • Smaller fuse is OK (eg, 20 amp for 14g) • Ensure return ground wire gage is sized for sum of all return currents
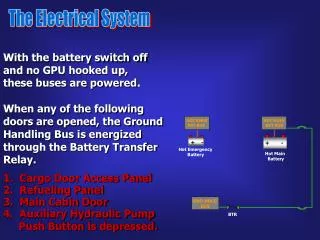
Power Always On • This is the simplest way of adding an accessory. • Attach a fused wire to the battery and use the accessory’s switch to turn power on and off. But: • You can run down your battery if you forget to turn it off. The Ignition key does not shut it off. • A variant is to add a switch external to the accessory, but you still have to remember to turn it off.
Using The Ignition Switch • You can ensure that an accessory is shut off by wiring the accessory downstream of the ignition switch. Then turning off key shuts off the power. • Unfortunately, you can exceed the current rating of the ignition switch – an expensive repair. • To prevent this failure, use a relay to handle the current.
Using a Switched Relay • Above is shown a wiring diagram of how to attach a relay to power your accessories. • A relay has an electromagnetic coil and a switch inside. When the electromagnet is energized, the switch closes. • Ignition-keyed power is used to energize the coil (uses 0.1 amp), and the relay contacts switch the high current (typically up to 10 - 30 amp capacity) directly from the battery.
And for Multiple Accessories • Combine Relay with Star circuits. • Use fused heavy gage wire (sum of all currents) to Star near battery • Use light gage to accessory—each device must be fused separately because gage changes • With heavy gage wire to accessories, added fuses are not required. • Ground/return wire gages are same as power wires.
Connector types • When connections in the wiring are required (most times), one must choose a proper connector based on: • Current Loads • Environmental factors (water, heat, salt, vibration) • Ease of use • Frequency of use (some connectors fatigue quickly) • The connector is usually the weakest point in the system.
Connector types • Some sample connectors will be available at the meeting. • You can buy connectors at Radio Shack, hardware and auto parts stores. • Another source is to buy a “donor” motorcycle harness from a parted out bike and “cut and splice” connectors. Also the harness is a good source of appropriately colored wires so you can figure out what’s what after a year.
Cautions • Solder any wiring connections to terminals or pins (or even in-line splices). Crimp terminals are not reliable—the wires pull out. Solder after crimping. • Never twist and tape. Extremely unreliable. • Always tie strap wiring & connectors to limit movement. The vibration experienced in normal use will destroy the terminals of connectors and fatigue copper wire over time if left to flop around. • Never use solid copper wire—always stranded. Solid fatigues very quickly.
Cautions • Never cut into lighting circuits!! Too many ways to cause failure & you don’t want these at night. • Wiring is very susceptible to corrosion, so always seal connections exposed to elements. • Electrical tape is not a good seal – Liquid Tape is. • For splices, sealant works well if used under heat shrink. • Wiring will wick moisture and transport it to other areas, corroding the wire internally. • Always try to keep splices and connectors in drier areas of the bike. Grease can be used as a moisture barrier on connectors (but grease washes off and attracts conductive dirt). • Always fuse close to the battery. • Look for abrasion sources and protect the wiring with convolute (ribbed, hard plastic casing you can buy at Radio Shack.)
Sneak Circuits • So you’ve wired in your new LED turn signals and now the turn indicator is always lit---you’ve created a sneak circuit. • A sneak circuit is an unintended interaction of various circuits. • When this happens, get an expert involved!
THE END • Questions? • Future clinics • Training in splicing and soldering? • Any projects?