Download
1 / 40
410 likes | 607 Views
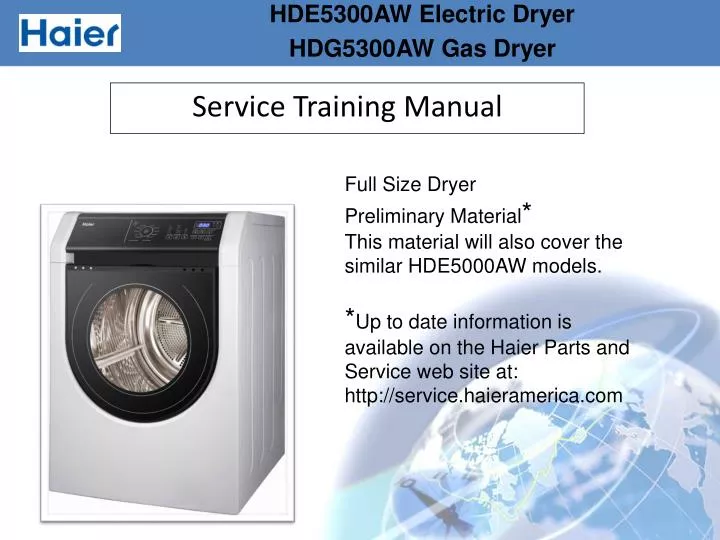
Full Size Dryer Preliminary Material * This material will also cover the similar HDE5000AW models. * Up to date information is available on the Haier Parts and Service web site at: http://service.haieramerica.com. Service Training Manual. 2.-Appearance brief instruction. Contents.

E N D
Full Size Dryer Preliminary Material* This material will also cover the similar HDE5000AW models. *Up to date information is available on the Haier Parts and Service web site at: http://service.haieramerica.com Service Training Manual
2.-Appearance brief instruction Contents 1. -Model information 3.-Product specification 4.-Control panel 5.-Major Components 6.-Troubleshooting 7.- The disassemble instruction 8.-Wiring circuit
1.-Model information 1). Model name explanation H D E 5300 A W White A edition Electric Dryer Haier
2). Serial number explanation CF05V0E0200 C R 9A9 0001 Date of manufacture Product line laundry Product code Date of manufacture: 9 A 9 Date Month Year
2-Appearance brief instruction 1). Name of parts Top cover Control pannel Front control plate Control plate Door switch Back plate Whisk leaf Front door Exhaust duct Front plate Drum assembly Lint filter Adjustable foot Lock bady
2). Net dimension front front
4-Control panel A B C D E F G H I J K L M • Power • Start/Pause • Manual dry cycles • Dry level • Temperature • F. Singnal G.Digital display H. Anti Bacteial I. Wrinkle saver J. More time&Less time K. Damp dry signal M. Function linght indicator L. Custom program
5-Major Components 1. Power board 2. Motor
3. Display board 4. Computer sequencer
5. Broken belt 6. Door Switch
7. Temperature-Regulating Thermostat 8. Guide cord component HDE5300AW HDG5300AW
9. Temperature sensor 10. tempreture fuse HDE5300AW: HDG5300AW:
6-Troubleshooting If you replace the thermal limiter or program controller without checking the other componentd carefully, the thermal limiter or program controller may be damaged again. Therefore, please first check if the other components working normally before replacing the thermal limiter or program controller in maintenance. 1) No action Confirm that there’s no power failure the power down-lead is connected reliably and the switch is on Check if the computer program panel is on No Check and replace the computer program panel the wire are connected well Yes
Yes Deal with it bases on the signal E3: belt switch is damaged or broked E5: the heating thread broken or hi-limit thermostat is damaged F5: hi-limit themostat or wire unit is damaged. Check if the display shows wrong signal No Check the computer and the relay of motor are well, the voltage between the output of the relay and L1 and 0 after the dryer works No Check and replace the computer program panel Yes No Check if the control thermostat and hi-limit thermostat are normal Replace the thermostat and hi-limit thermosat are normal Yes
Check if the wire unit is well(if the voltage is 120 between the liveline and the neutral line of motor) No Replace the wire unit Yes Check if the motor is good No Replace the motor 2) The tub rotates but does not dry Switch on the power, push down the start button Set timed drying(about 15 min)
No Check if the wire unit, the acentric switch is well, the resistance is 0 when it works Check the wire unit Replace the motor The resistance is infinite 3) The machine dries but the tub does not rotates No
No Check if the tensive arm unit is installed well Reinstall the tensive wheel unit and try rotating the tub manually Yes No Check if the belt switch is installed wll Reinstall the belt switch No Check if the acenttic switch is well (the resistance is 0 when it works, or is infinite) Replace the motor belt switch: On the bracket of motor tensive arm unit
7-The disassemble instruction Important:1.Make sure the washing machine plug is separate from electricity and the machine is powered off absolutely before the operation ,avoid electric shock! 2.Please wear gloves to avoid injured when doing operation
2 1
Control Panel Removal 4 screws Release the wiring harness Push locking tabs down across top while pulling out at bottom
CONTROL PANEL DISSASSEMBLY Remove screws and clips Access to Touch Pad Assembly Remove wire harness
8-Wiring circuit For the unit
A. Power On/Off Button: Press the button to power on the dryer. To power off press button again. B.Start/Pause Button: • Press the button to turn the dryer ON. Press this button once to start the dry process. Press this button once again to pause the activity during the dry cycle.
C.Cycle Selection: Select from the Auto Dry cycles (Bulky Items, Heavy, White, Normal, Delicate and Press Free) or Manual Dry cycles (Touch Up, Timed Dry, Rack Dry or Speed Dry). D. Dry Levels: Used to set drying levels of auto programs. There are 3 selections: More, Normal, and Less
E. Temperature Button: Used to set drying temperatures. There are four available drying temperatures to choose from: High, Medium, Low, and Air Dry. F. Signal: This feature selects the buzzing volume or turns off the buzzer entirely. Thereare three choices: Louder, Softer or Off. H.Anti Bacterial: This function can be selected only in certain cycles. Here the heat temp is raised to the highest dry level. This option can only be used with heavy, bulky items, white and normal cycle. Note: Do not use on delicate fabrics
I. Wrinkle Saver Button: This convenient feature helps keep wrinkles from setting when you cannot unload the dryer at the end of a cycle. The dryer will stop and then tumble for a brief period every few minutes. Press the wrinkle saver button to activate. This feature will work for 1 hour after the drying program is completed. Stop the setting at any time by pressing the wrinkle saver button or opening the dryer door. J. More Time & Less Time Button: • Used to set time from 0 to 2 hours when Timed Dry, Rack Dry, Speed Dry or Touch Up cycle is selected. K.Damp Dry Signal If activated the dryer will beep when the load is 80% dry. This will allow you to remove light weight or other items that you may wish to iron.
L. Custom Program: This allows you to save a favorite cycle,set the desired settings and touch press “custom program”button for 3 seconds. A beep will sound to indicate the cycle has been saved. To recall your custom cycle ,press the “custom program”button before drying a load. To change the saved cycle,set the desired settings and “custom program”button for 3 seconds. You can also program Anti-Bacterial, Wrinkle Saver and Damp Dry Signal. Press custom program and press start/pause button to activate. G. Digital Display • Indicates the remaining time (min) during cycle operation. Note: If the dryer has any problems, it will display an error message.