Download

1 / 9
90 likes | 103 Views
The need for waterproofing wet areas is due to its high frequency in which these areas get wet, including balcony and shower area. Water ingress through leaks and cracks, either due to lack or failure of waterproofing membrane needs timely repair to avoid any expensive and severe damages. Buy a shower tray kit to waterproof the shower area

E N D
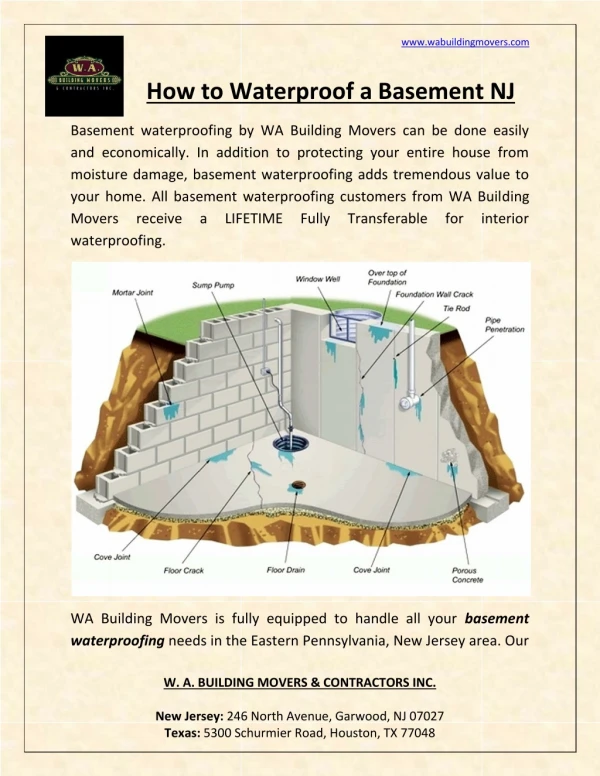
REMEDIAL MEMBRANES How do you waterproof a tiled shower area
The need for waterproofing wet areas is due to its high frequency in which these areas get wet, including balcony and shower area. Water ingress through leaks and cracks, either due to lack or failure of waterproofing membrane needs timely repair to avoid any expensive and severe damages. Buy a shower tray kit to waterproof the shower area and follow the following steps:
Take a knife and cut the edges of the silicone sealant then, scratch it out from the surface of your balcony using a scrapper. Ensure to remove it completely from the surface.
After removing the sealant, clean the shower area with a Chlorine to kill mold. Completely wet the surface first, then mix 1:1 Chlorine:Water and spray it on the surface. Leave the solution on the surface for a few minutes followed by scrubbing the surface and thoroughly removing the Chlorine off the surface, removing any excess water.
Dry the surface we recommend using a small convection heater with a halogen heat light for the quickest period. If you have stone tiles we recommend you use these to mediums to dry the surface for a couple of days and then apply the sealer over the surface the day prior to installing the membrane.
Examine the shower area tiles attentively and check for any missing grout. If find any, fill it matching grout adhesive which will attached the recommended cure time or you can fill the section using clear or matching joint adhesive for immediate application. (Grout will look better if you have the time to wait). Seal the edges of the surface tiles with joint adhesive. Make sure to fill in the junction between walls and walls, floor and walls, area connecting the pipe with joint adhesive to ensure no water that washes down the drain comes in contact with the screed.
Mix the Clear Waterproofing Membrane part 1 & 2 together using a blender and make a smooth and thick mixture. Start applying the mixture using a paintbrush or a small roller on the surface and the walls only up to 4 inches in height. Apply one coat of the mixture allow to dry and go clear.
Mix the slip resistant aggregate in the remaining mixture. Apply the second coat with the new mixture in the same way as the first coat. Make sure to give it timely stirs to avoid the aggregate from settling at the bottom of the container. Leave the area to dry for the next 24 hrs and then the area can be used but wipe it dry for 7 days until full cure
Get in touch ABN: 59 611 253 117 Postal: Po Box 87 BONVILLE NSW 2450 Email: info@remedialmembranes.com.au Tel: 1300 025 327 1300 0 CLEAR Website: https://www.remedialmembranes.com.au/