Download
1 / 20
200 likes | 316 Views
Remote & Collaborative Visualization. TACC Remote Visualization Systems. Longhorn – Dell XD Visualization Cluster 256 nodes, each with 48 GB (or 144 GB) memory, 8 cores, 2 NVIDIA Quadro FX 5800 GPUs with 4 GB graphics memory each Spur – Sun Visualization Cluster

E N D
TACC Remote Visualization Systems • Longhorn – Dell XD Visualization Cluster • 256 nodes, each with 48 GB (or 144 GB) memory, 8 cores, 2 NVIDIA Quadro FX 5800 GPUs with 4 GB graphics memory each • Spur – Sun Visualization Cluster • 8 nodes, each with 128 GB (or 256 GB) memory, 16 cores, 4 NVIDIA Quadro FX 5600 GPUs with 1.5 GB graphics memory each • Available for use by TACC and XSEDE users • Both mount Ranger’s filesystems
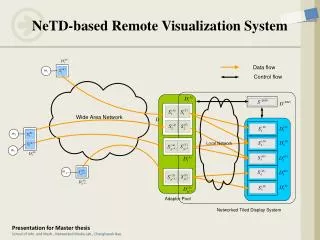
Remote Visualization Model Pixels Large-Scale Visualization Resource HPC System Display Mouse Data Archive Wide-Area Network Remote Site Local Site
Methods of Remote Access • SSH • Basic command-line interface, useful for managing files, submitting jobs, etc. • Longhorn Visualization Portal • Simplified web-based interface for: • Viewing your allocations • Submitting jobs • Interacting with remote vis sessions (VNC or EnVision) • Direct VNC connection
SSH Access • Start the “Secure Shell Client” application • Click “Quick Connect” • Host Name: longhorn.tacc.utexas.edu • User Name: <your training account> • Click “Connect”
SSH Access • You’re now on a Longhorn login node • Can run usual shell utilities • Manage data, etc.
SSH Access • For later reference (more details in Longhorn User Guide): • Can submit a remote VNC job from here • qsub /share/doc/sge/job.vnc • tail -f vncserver.out • Connect to address in output file with a VNC viewer
Longhorn Visualization Portal • http://portal.longhorn.tacc.utexas.edu • A web-based interface that lets you: • View your allocations • Submit jobs • Interact with remote VNC or EnVision sessions • Avoids the hassle and complexity of manually managing your jobs • For many users this can be the primary method of interacting with Longhorn • Advanced users may still use SSH
Running Vis Applications through VNC • To see available applications: • module avail • Examples: • Run ParaView: • module load python paraview • vglrun paraview • Run VisIt • module load visit • vglrun visit
Accessing your VNC session with a stand-alone viewer • Navigate to the Jobs tab • Copy the server address
Accessing your VNC session with a stand-alone viewer • Navigate to the Jobs tab • Copy the server address • Run the “TightVNC Viewer” application • Enter the server address from the Jobs tab • Click Connect • Enter your VNC password set previously • Click Okay
Accessing your VNC session with a stand-alone viewer • Navigate to the Jobs tab • Copy the server address • Run the “TightVNC Viewer” application • Enter the server address from the Jobs tab • Click Connect • Enter your VNC password set previously • Click Okay • You can now interact with your VNC session (and share this session with your collaborators)
Parallel Visualization • You can specify how many nodes (or slots) to use during job submission • Run vis applications in the parallel environment