Download
1 / 4
60 likes | 305 Views
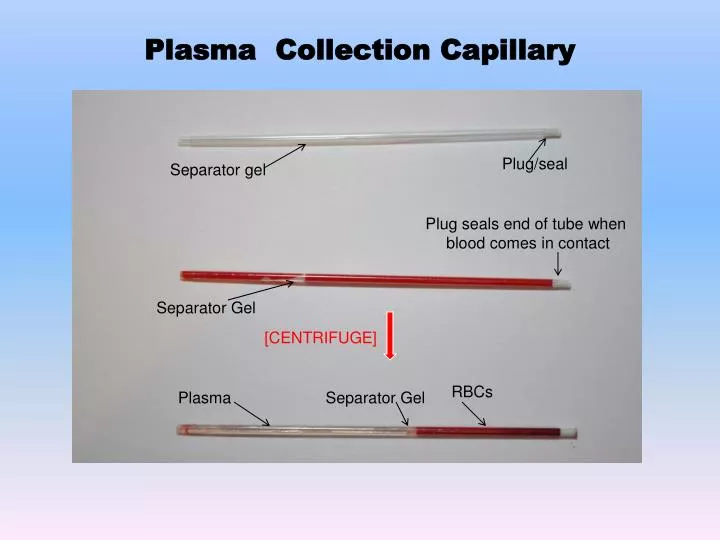
Plasma Collection Capillary. Plug/seal. Separator gel. Plug seals end of tube when blood comes in contact. Separator Gel. [CENTRIFUGE]. RBCs. Plasma. Separator Gel. Operating Instructions for Plasma Capillaries. Collect Sample

E N D
Plasma Collection Capillary Plug/seal Separator gel Plug seals end of tube when blood comes in contact Separator Gel [CENTRIFUGE] RBCs Plasma Separator Gel
Operating Instructions for Plasma Capillaries Collect Sample Collect blood sample into the open end of the capillary tube. When filled completely, the tube contains approximately 70uL of sample. To collect smaller sample volumes you may choose to partially fill the tube. Use the black calibration lines imprinted on the tube as a guide for sample volume: First line: ~20uL of sample Second line: ~30uL of sample Third line: ~40uL of sample Fourth line: ~50uL of sample Activate Self-sealing Process Once the desired sample volume is collected, hold or place the tube in the upright position, i.e., with the white plugged end of the tube down) to insure that the blood flows down to contact the white plug. [Important! The blood must come in contact with the white plug to activate the sealing process] . Maintain the tube in the upright position for approximately 45 seconds to allow the self sealing process to complete. Centrifuge Place the sealed capillary containing the sample into a centrifuge (either directly or into a secondary holding container that fits your centrifuge configuration) and spin for 8-10 minutes @ ~3,000x g, or until the RBCs and plasma phases are well separated. During centrifugation, the separator gel (pre-loaded within the tube) migrates to the RBC/plasma interface to form a barrier. This barrier serves to keep the phases separated until the plasma can be dispensed from the tube. Prior to dispensing plasma, visually check for the formation of the gel barrier. The barrier should be at least ~1mm in width to ensure that centrifugation has resulted in thorough separation of the phases. Dispense Plasma Insert the Wiretrol®Plunger (Drummond Catalog No. 5-000-1000-3) into the white plugged (sealed) end of the tube, causing the seal to break free and the contents of the tube to move toward the open end. Continue pushing the Wiretrol® Plunger until the desired amount of plasma is dispensed from the open end of tube. If you have enquiries, please contact: Joe Siple610-353-0200 jsiple@drummondsci.com or info@drummondsci.com
To Dispense Plasma After centrifugation, insert Wiretrol® Plunger into sealed end of Plasma Capillary and push (Plasma) (RBCs) Wiretrol® Plunger (5-000-1000-3)
For Quantitative Plasma Dispensing [1] After centrifugation, insert Plasma Capillary into 3 x 10uL Plasma Multi-Dispenser Plasma Capillary [2] Push in Purge Button Purge Button 3 x 10uL Plasma Multi-Dispenser [3] Depress Plunger to dispense 10uL plasma aliquots Plunger