Download
1 / 9
90 likes | 290 Views
Digital photography. Manipulating pictures. B asic needs for your Digital darkroom. For adjusting you digital photos you need the best computer with the latest operation system, the fastest processor, the most RAM, the biggest hard drive,

E N D
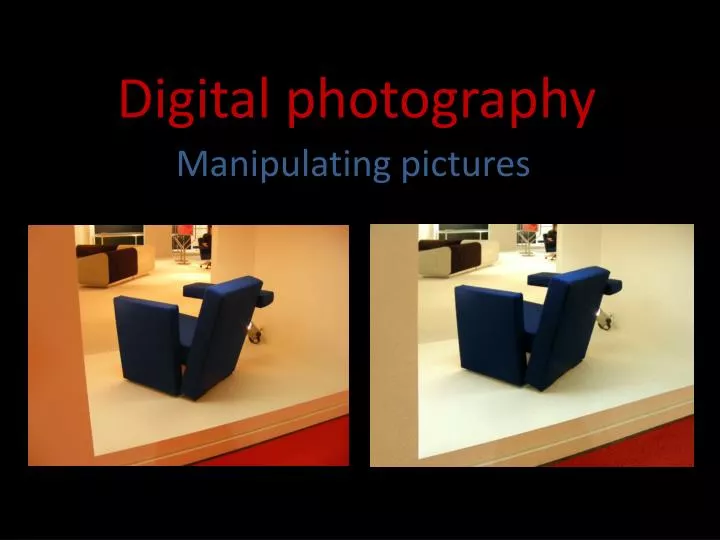
Digital photography Manipulatingpictures
Basic needs for your Digital darkroom • For adjusting you digital photos you need the best computer with • the latest operation system, • the fastest processor, • the most RAM, • the biggest hard drive, • the best types of connections (USB, FireWire, Bluetooth, etc.) for the peripherals, • the best quality screen– well calibrated • and a photo-editing software • you can afford. • If you wish to work with older, printed pictures, then you also need a • good quality scanner. • If you wish to print the pictures, you need a • good quality printer • and good quality paper in it.
Photo editing programmes Picture formats • Usually for all digital cameras you get their own photo editing software by which you can edit your taken pictures later but there are some you can buy and take professional manipulations: • the best known is Adobe Photoshop – the latest version is CS4; • Corel Paint Shop Pro, • Corel Photopaint, • Roxio PhotoSuite, • The Gimp, etc. • Probably the best known and most used format is • JPG (=JPEG)you can set the compression level of it; • TIFF (=TIF) is the other best known and uncompressed format , • RAW – using it is the most professional way of shooting – uncompressed, available plenty of spaces in your hard disc; every manufacturer has its own RAW file extension – and own software to adjust the pictures; • BMP • GIF • EPS • PSD • PNG, etc.
Toolbar of thePhotoshop CS3 • Marker • Lasso tool • Crop tool • Red eye/healing brush tool • Clone stamp • Eraser tool • Blur tool /Sharpen/Smudge tool • Pen tool • Path selection tool/Direct selection • Notes tool • Hand tool • Move tool • Magic wand tool • Slice tool • Brush tool/Pencil tool • History brush tool • Gradient tool/Paint bucket tool • Dodge tool/Burn/Sponge • Type tool • Rectangle tool • Eyedropper tool/Sampler, Ruler • Zoom tool • Color settings • Edit in quick mask mode • Change screen mode
Altering Lips In this photoshop tutorial, we will learn how to use the liquify tool to easily change the expression of the lips in a photograph. This is very useful for those photos that are perfect, except there is one person who is not smiling. This way, you can easily change their non-smile into a smile. You can also make someone who is smiling look like they are frowning. The possibilities are endless with the liquify tool.1. Open Photoshop and open the photograph of the person whose lips you want to alter.2. Goto Filter > Liquify. 3. Select a large size brush, but not too large. Just the right size to change the shape of the lips and some of the surrounding area of the face.4. Click on the corners of the lips and carefully push. If you move the lips too much,you will get obvious effects that look like the image has been photoshopped. The key to this technique is to make subtle changes.5. When you are done shaping the lips into the expression you want, simply click OK and you should now have your altered lips. 6. As you can see from the photo change, we made this woman look like she is smiling, when before she had a bland face expression.
Eyecolourchanging • 1. Open up the photo in Photoshop that you want to change the eye color on. • 2. Click the "Edit in Quick Mask Mode" toggle button. • 3. Select an appropriate brush size and choose black as your foreground color. • 4. Zoom in on the iris of the eye and begin painting over the entire eye. The appearance willcome out as a transparent red tone to indicate where you are applying a mask.
5. Click the "Edit in Standard Mode" toggle button.6. Goto Select > Inverse. Only the iris of the eye should now be the selected area. 7. Goto Image > Adjustments > Color Balance.8. When the Color Balance pop-up appears, adjust the sliders to get the color of the eye that you want.
9. Click OK and you will have changed the color of the iris to the color you chose. 10. However, the color of the iris is sometimes too bright. So goto Image > Adjustments > Hue/Saturation.11. Adjust the Saturation slider to the left to decrease the brightness intensity of the color.
12. Click OK to accept the changes and you should now have your new realistic eye color change! The eyebeforechanging…