Download
1 / 20
200 likes | 210 Views
Learn how to use the display settings in PubMed to customize the format, items per page, and sorting options for your search results. Also, discover how to send citations to file, collections, clipboard, and email.

E N D
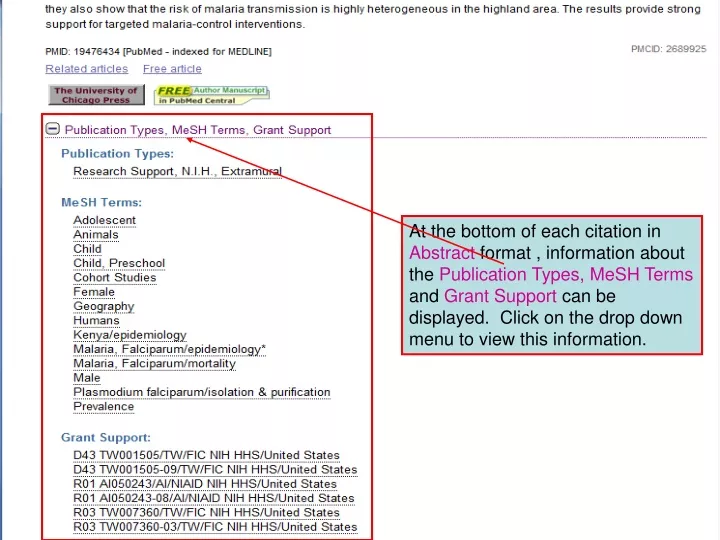
At the bottom of each citation in Abstract format , information about the Publication Types, MeSH Terms and Grant Support can be displayed. Click on the drop down menu to view this information.
We now view the Display Settings drop down menu for the Medline Format, 20 Items per Page andRecentlyAdded Sort by options. To display click on the Apply box.
Note the listing of Medical Subject Headings (MeSH) terms in the Medlineoption. These MeSH terms are assigned by the National Library of Medicine for the indexing in PubMed. The terms can be used to make searches broader or more precise.
We now view the Display Settings drop down menu for the Summary Format, 200 Items per Page andRecently Added Sort by options. To activate, click on the Apply box.
The larger listing of citations is useful in low-bandwidth situations.
We now view the Display Settings drop down menu for the Abstract Format, 50 Items per Page and Sort by Titleoptions.
By using the Sort by Titleoption, this list of citations begins with A.
From the Send To drop down menu, we will be able to select the File, Collections, Order, Clipboard and E-mail options.
You must place check marks in the boxes to the left of the citations that you wish to send toFile, Collections, Order, Clipboard and E-mail options. If you do not place check marks in the boxes, the entire search will be sent to the option you choose. Note how PubMed lists the # of citations you have checked.
From the Send To drop down menu, we will click on Create File, with the Abstract andPub Date options. This will be a document to be downloaded from your Web Browser.
Open the file in Notepad and give it a .txt file extension.Click on Save File. You now can view this file with word processing software or Notepad.
We now view the text from a downloaded .txt file usingthe Send To Fileoption. You can save this file to the C:/ drive or a flash drive or a CD-Rom. Once saved, you can print the document.
From the Send To drop down menu, we have selected to E-mail a file, with the SummaryandRecently added options. This will be a document to be sent to the e-mail address you entered as the recipient.
In the green message, PubMed has noted that an E-mail has been sent to the e-mail address you entered as the recipient.
From the Send To drop down menu, we have selected to send a citations to the Clipboardoption. Note that 5 checked items will be sent to the Clipboard .
In case, we have not checked the boxes in any of the citations, the first 500 items will be added to the Clipboard.
The green message confirms that 500 items have be added to the Clipboard.
` In the Display Settings, a green Item in clipboard message is noted for all the items you have selected. Also note the number of records that has been sent to the Clipboard .
To remove items from the Clipboard, click on Clipboard. The PubMed search will re-appear and, using the green hypertext links, you can Remove all items orRemove from clipboard individual citations.
The green message notes that 5 items have been removed from the Clipboard. This is the end of Module 4 Part 1. There is a workbook to accompany this part of the module. The workbook will take you through a live session covering the topics included in this demonstration with working examples. Updated 10 2009