Download
1 / 22
220 likes | 229 Views
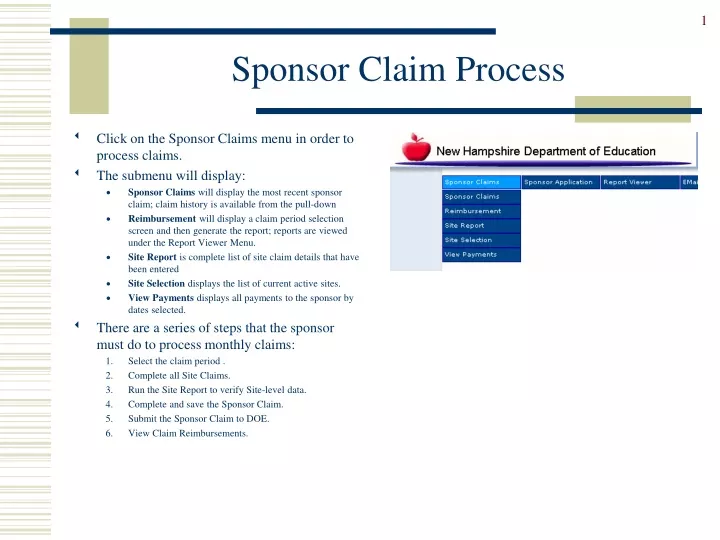
Sponsor Claim Process. Click on the Sponsor Claims menu in order to process claims. The submenu will display: Sponsor Claims will display the most recent sponsor claim; claim history is available from the pull-down

E N D
Sponsor Claim Process • Click on the Sponsor Claims menu in order to process claims. • The submenu will display: • Sponsor Claims will display the most recent sponsor claim; claim history is available from the pull-down • Reimbursement will display a claim period selection screen and then generate the report; reports are viewed under the Report Viewer Menu. • Site Report is complete list of site claim details that have been entered • Site Selection displays the list of current active sites. • View Payments displays all payments to the sponsor by dates selected. • There are a series of steps that the sponsor must do to process monthly claims: 1. Select the claim period . 2. Complete all Site Claims. 3. Run the Site Report to verify Site-level data. 4. Complete and save the Sponsor Claim. 5. Submit the Sponsor Claim to DOE. 6. View Claim Reimbursements.
Select a Claim Period and Site (slide 1) • Click on the Site Selection submenu option to display the Site Search screen. • Select the claim period • All Site data is managed within a claim period that is accessible via the Claim period drop-down, which lists completed claim periods as well as New claim periods to be entered. • Select the claim period to be processed. • Press the SELECT button. The name for each Site and claim status will display.
Select a Claim Period and Site (slide 2) • Click on the site name to enter the claim data • Only sites with approved applications for the selected claim period will be displayed • A Site claim can have one of four statuses: • DONE – The Site claim was entered and saved; no errors exist (although warnings may exist). The claim is ready for inclusion in the Sponsor Claim. • ERRORS – The Site claim was entered, saved, and errors exist. • IN PROCESS – The Site claim was entered and saved but is not done. • NOT ENTERED – The claim for this Site has not yet been entered • Please refer to back of this document for the list of claim errors and warnings.
Select a Claim Period and Site (slide 3) • To search for Sites: • If desired, narrow the search by entering search criteria. • To select an individual Site: • Enter the Site name or partial name using the wildcard character (%) - %Street% • Or, enter the Site number or partial number - %002 • Press SELECT. The screen will refresh with the search results, based on your new search criteria. • To select a claim by claim status: • Highlight the status in the list. • Press SELECT. The screen will refresh with the search results, based on your new search criteria. • To select a Site claim, click on the Site link.
Enter Site Claims (slide 1) • In this example, a February Claim is shown. • Site data has been entered and saved. • The top section of the Site claim contains data that is display only, carried forward from the Site Application. • The other sections contain data that is entered by the user. • Avg Daily Participation is calculated on SAVE
Claim with Errors • Claim Data is validated against the Site Application and other business rules • Error 514 is due to the Site not approved for breakfast • Error 782 on CAP is caused by the breakfasts being claimed • CAP for enrolled sites = # Eligible Enrolled times days open; for breakfast #Eligible Enrolled is zero. • Claim Status will be set to ERRORS • Please refer to the Claim Warnings and Error lists for a complete list.
Correct the Claim Errors • Claims with ERRORS cannot be submitted for payment • Correct the errors and click SAVE until you are confident that the numbers are correct • Click the if no more changes • Click SAVE • Claim Status will be set to DONE
Enter Site Claims (slide 2) • To navigate to the next Site claim: • Click the NEXT button. The next Site Claim record from the Site Search results will display. This is the easiest way to navigate through the claims.OR • Click the Site Selection button to return to the Site Search screen and select a Site from the list.
Enter Site Claims (slide 3) • The next Site Claim is shown here. • All fields are defaulted to 0 because this is a new claim. • To enter a Site claim: 1. Enter days open • Enter meal counts for First and Seconds • Click • Click SAVE. • CANCEL and VERIFY buttons: • The CANCEL button will discard any changes that have been made since the most recent save. A warning message will display asking the user to verify that their changes should be discarded. • VERIFY. You do not need to use the VERIFY button when entering a Site (or Sponsor) claim. The SAVE and VERIFY buttons have the same functionality. VERIFY is useful when reviewing historical data, to view the warnings that existed on the claim.
Enter Site Claims (slide 5) • The completed claim is shown here. • The status of the claim is DONE and the claim is read-only. • Continue entering all Site claims for this claim period. NOTE: Once the claim has been saved with the the claim becomes read-only for Site-level users. However, Sponsor-level users can uncheck Done and make edits to the claim.
Run the Site Report(slide 1) • Prior to entering the Sponsor Claim, the Site Report should be generated and reviewed. A sample Site Report is shown below. Only 2 sites have been entered.
Run the Site Report(slide 2) • Select Site Report from the Sponsor Claims menu. Select the claim period from the Claim drop-down box and click SELECT. • The Site Report lists the details of all Site-level data (one row per Site). The details are grouped into two sets: Sites that are error free and Sites that have errors or have no claim data entered. • In the prior example, two Sites have been entered for the Feb 2007 claim and are DONE (error free). Three sites are not entered.
Run the Site Report(slide 3) • The Site Report can be used to: • Review the status of all unsubmitted Site-level claims for the month, to quickly identify which Site claims still need action – those that have errors, are still in process, or have not yet been entered. Once changes have been made to the Site Claims, the Site Report should be generated and reviewed again. • Compare the values on the Site Report to the values that are summarized on the Sponsor Claim.
Complete and Submit the Sponsor Claim (slide 1) • Select Sponsor Claims from the Sponsor Claims menu. • Select the claim period from the drop-down and click SELECT. • The Sponsor Claim includes all Sites for the Sponsor. • The top section contains general information about the Sponsor that cannot be changed. • Remarks is a free form text area that the sponsor can use to send messages to DOE • The meal count data has been automatically aggregated from the Site claims and cannot be changed here. These numbers should reflect the Site report. Any changes must be made at the Site level.
Complete and Submit the Sponsor Claim (slide 2) • Sponsor (with SUBMIT privileges) must review the claim, and check the I certify box • Click Submit • Claim status will change to SUBMITTED • Claim is ready for DOE approval payment.
Submit Claim • Sponsor Claim cannot be submitted until the I certify box has been checked. • Sponsor will click the Certify box, and then click SUBMIT • Claims submitted with no warnings are automatically Approved by the system, and ready to be paid in the next Payment Batch. • Claims with Warnings are reviewed by the DOE staff for Approval. Claims with errors cannot be submitted.
View Sponsor Reimbursement • Select Reimbursement on the Sponsor Claims menu. • Select Claim period from the pull down or • Select the month and year for a 12 month period report • The Reimbursement Statement is generated in the background and viewable from the Report Viewer menu option • Reports are available ONLY to the user that generated it.
Report Viewer • Select Report Viewer from the Menu bar • List of the most recent generated reports will display in descending date order • Click on the Report Name; it will be displayed as a PDF. • Select PRINT from the Adobe window to obtain a hard copy of the report
View Payments • Select View Payments on the Sponsor Claims menu. • Select the StartDate and End Date for the payment history • Select DateType of Payment (date paid) or Transaction (claim month) • The Payment History willdisplay in a new form.
Payment History Report • Select the printer icon from the browser to print report • Payments include all CNP programs that the sponsor participates in
Data Validation & Verification • There are three basic types of messages that can display when a Site or Sponsor claim is saved: data validation errors, verification errors, and verification warnings. • Data Validation – These are conditions that prevent the record from being written to the database. For example, a Site claim where the default values of 0 have been deleted from one or more fields or a non-numeric has been entered for a meal count value. These errors must be corrected before the claim can be saved. • Data Verification (errors and warnings). • Errors prevent the claim from being completed or submitted. In the case of a Site claim, the claim cannot be marked DONE. In the case of a Sponsor claim, the claim cannot be submitted. • Warnings do not prevent the claims from being completed or submitted. Warnings are potential or likely errors on the claim, even though the values reported could, in fact, be accurate. Because values that generate warning messages can potentially mask other more serious errors on a claim, warnings should be reviewed carefully before deciding whether to allow a claim to be submitted. • When warnings exist on a Sponsor or Site claim, a message will display asking the user if they want to proceed with submitting the claim even though there are warnings.