Download
1 / 66
660 likes | 875 Views
Network Router Setup Network Printer Setups. July 2013. Network Adding a Router. Topics Adding a Router Adding a Wireless Network Printer Adding a Wired Network Printer Adding a Shared Printer. Network Router Setup. Router / Wireless Router Setup Router setup consists of two parts

E N D
Network Router SetupNetwork Printer Setups July 2013 2013 SMT/TCS Training - Dallas
NetworkAdding a Router Topics • Adding a Router • Adding a Wireless Network Printer • Adding a Wired Network Printer • Adding a Shared Printer
NetworkRouter Setup Router / Wireless Router Setup • Router setup consists of two parts • Basic Router Setup • Router Gateway IP Address • DHCP IP Address Range • Static IP Address Range • Saving Basic Router Address Changes to Router • Wireless Router Setup • …
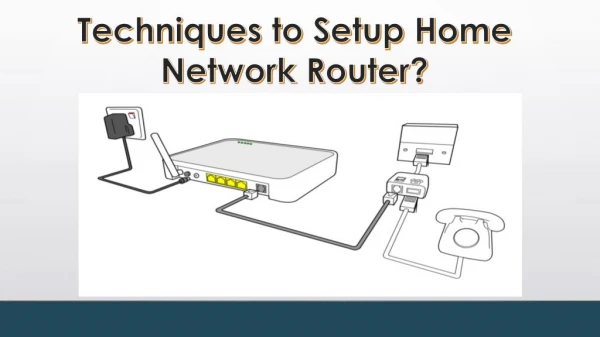
NetworkRouter Setup • Connect PC to a Router switch port using CAT5 cable • Login to router using • Router Supplied Software • Browser (IE, etc.) • IE Address 192.168.1.1 • Router Menu provides access to • LAN & Wireless Setup
NetworkRouter Setup Router Setup • Set Router IP Address • Set Subnet Mask • Enable DHCP Server • Set Dynamic IP Address Range • Static IP address range is set to 192.168.1.100 to 109 • Save Router Changes
NetworkWireless Router Setup Router / Wireless Router Setup • Router setup consists of two parts • Basic Router Setup • … • Wireless Router Setup • SSID • Encryption • Wireless Protocol • Pre-Shared Key (PSK) • Saving Wireless Router Setup
NetworkWireless Router Setup • Wireless Router Setup • Service Set ID • SSID • Router broadcasts SSID to wireless PCs and printers
NetworkWireless Router Setup • Security • Authentication • Encryption • Pre-Shared Key (PSK)
NetworkWireless Router Setup • Wireless Access Point will normally be disabled for typical wireless router setup • Save wireless changes to router
NetworkRouter Setup • Routers are program driven devices and require periodic checking for software updates • Before the start of the tax season, verify that your router has the most current Firmware software release • This is most easily accomplished using the router supplied software to check for updates • Optionally, use IE and go to the manufacturer’s web site and search for the specific router model
Wireless Printer SetupHP 1102w July 2013
HP 1102w Setup • Start printer installation with printer in a known state • Plug in the printer power and turn on • Reset printer to factory defaults by: • Press and hold the “X” and the Wireless button • Turn on the printer and hold the two buttons for about 10 seconds. • Print out a test page • Hold the “X” button until it starts printing to ensure it reset.
HP 1102w Setup • Connect the USB cable to the PC • The printer will install a virtual DVD drive on the computer and it will automatically • Load printer setup software into its virtual drive • Display the contents of the folder and the setup icon.
HP 1102w Setup • Click the HP Smart Installicon. • The driver will start to load.
HP 1102w Setup • When the choice comes up select • Configure to Print Over Wireless Network
HP 1102w Setup • When the choice appears, choose • Manual SSID find • A list of SSIDs will be displayed • Select SSID you want to connect to
HP 1102w Setup • Wi-Fi Protected Setup • Elected NOT to use this option • Not all routers support this option
HP 1102w Setup • Enter the router wireless password • The printer wizard will instruct you when to remove the USB cable • The computer will complete setup • At the conclusion • Printer drivers are installed on PC • Printer is connected to the network using dynamic IP address
HP 1102w Setup • Configure printer to use Manual (static) IP address • Determine dynamic (DHCP) printer IP address either by • Holding printer X button down for several seconds to printout network information • Alternately, output router DHCP address table • Your router may not have this option
HP 1102w Setup • Access printer with IE using printer DHCP IP address from printout • Default tab
HP 1102w Setup • On printer Networking tab • Change printer IP address configuration from dynamic to static • Change IP mode to Manual (static) • Enter printer static IP address • Generally not necessary to change subnet mask and gateway IP address as these are preconfigured with appropriate values • Save changes • Print a test page from Start->Devices and Printers->Select HP 1102w->Printer properties – General tab
HP 1102w Setup • Access printer using DHCP IP address • Select Networking tab • Note Automatic IP mode
HP 1102w Setup • Navigate to printer static IP address using IE • Note Manual IP mode
HP 1102w Setup • IE access of printer using Static IP address wireless settings
HP 1102w Setup • The installation software was able to determine network • Protocol (WPA/WPA2) • Encryption (default included in • WPA (AES/TKIP) • WPA2 (AES) • No choice offered (other printers setup offers an AES/TKIP choice) • Wireless router pre-shared key (entered during printer wizard program) • Manually input required printer static IP address (192.168.2.102) after installation • Save changes to printer
HP 1102w Setup • During HP 1102w printer installation, there was continuous printing of printer test pages • Virtual drive printer drivers dated 4/7/2010 • Went to HP web site (www.hp.com) • Saw a number of updated drivers and setup programs • Downloaded Firmware update (Feb, 2012) • Using USB connection, successfully applied Firmware update • Downloaded Updated Full HP 1100 series printer installation program (May, 2012) • Applied driver updates • This corrected continuous test page printing
Adding a Network Printer July, 2013
NetworkAdding a Network Printer Shared Printer Network Printer /Switch\
NetworkAdding a Network Printer Setup of a Network Printer • Advantages • No PC associated with Network Printer • Replaces multiple printers with a single printer • Results in use of fewer Toner Cartridges • Most network printers have a sleep mode • Conserves energy when not in use • Automatically awakes when data is sent to printer • Disadvantages • Requires knowledge of a network setup • Requires print server if printer is not equipped with a LAN port
NetworkAdding a Network Printer • Setup of a Network Printer • Four Steps • Router Configuration • Determine Current Dynamic Printer IP Address • Printer Static IP Address Configuration • Install Printer on PC • Installing Printer Drivers on PC • Configure Printer Port
NetworkAdding a Network Printer Router Configuration • Establish a Router Login and Password • Connect CAT 5+ cable between PC and Router • User Internet Explorer (IE) to login to Router and set router IP address (192.168.1.1) • Typical Router DHCP Range 192.168.1.100-199 • Adjust DHCP Range to 192.168.1.110 to 199 • This results in a establishment of Static IP Range of 192.168.1.100 to 109 • Save results of Router setup
NetworkAdding a Network Printer Router Configuration • Set Router IP Address • Set Subnet Mask • Enable DHCP Server • Set Dynamic IP Address Range • Static IP resultant range is set to 192.168.1.100 to 109 • Save Changes to Router
NetworkAdding a Network Printer Attaching a Network Printer • Attach Network Printer LAN port to Router Switch Port using a CAT5 cable • Ensure Printer is powered on • If your router supports DHCP table option • Using IE, from the router, output the Router DHCP table and note printer IP address • Alternately, obtain same IP address from printer menus and subsequent printer parameter printout
NetworkAdding a Network Printer • Determine Current Dynamic Printer IP Address
NetworkAdding a Network Printer • Printer IP Address Configuration • Access Printer Dynamic IP Address using IE • Login to printer over network • See Users Manual if a password is required • Select Networking tab
NetworkAdding a Network Printer • Printer IP Address Configuration • Using IE, Access Printer using Dynamic IP address • Configure printer to static IP address • Set printer to Static IP address of 192.168.1.100 • Set IP Configuration Method to Manual • Brother Printers use term: Static verses Manual • Save configuration changes to printer
NetworkAdding a Network Printer Printer IP Address Configuration • Change IP Configuration Method to Manual • Change IP Address to a Static IP Address • If necessary, change Subnet Mask
NetworkAdding a Network Printer Install Printer on PC • Install Printer driver on PC • During Initial Setup, Configure Printer to use LPT1 port • Recommend NOT to use Vendor Automatic Printer Network configuration
NetworkAdding a Network Printer Install Printer on PC • Access printer properties using Windows Devices & Printers, select the printer just added, select printer properties, Ports Tab • Add a new TCP/IP port to printer and set newly added printer port to printer static IP address • Or alternately, Select an Existing TCP/IP port • Save printer port setup changes to PC • Port added / selected will be checked • Use General tab of printer properties for printer just added to print a test page
NetworkAdding a Network Printer • Select Printer added • Select Printer Properties
NetworkAdding a Network Printer • Select Ports tab • Select Add Port
NetworkAdding a Network Printer • Select TCP/IP Port • Click New Port
NetworkAdding a Network Printer • Input Printer Static IP Address • Click Next
NetworkAdding a Network Printer • Resulting Printer TCP/IP Port
NetworkAdding a Network Printer • Verify Printer just added is checked • Click Apply
NetworkAdding a Network Printer • Click on General tab • Click on Print Test Page • Verify Page is printed
NetworkAdding a Network Printer Trouble Shooting Techniques • Verify both Printer and Router are plugged in and turned on • Verify PC is connected to Router and Router is connected to Printer • Verify LAN physical connectivity between all three devices (e.g. LAN LEDs if available) • Verify correct IP port is checked in Printer properties Port Tab • How would verify that your PC can see the added printer?
NetworkAdding a Network Printer Trouble Shooting Techniques • Using Windows Command Prompt (DOS screen) • Ping Router (e.g. ping192.168.1.1) • Ping Printer (e.g. ping192.168.1.100) • Some Anti-Virus software will block a port • Enable port if blocked using Anti-Virus software • Verify printer is able to print a test page • If using wireless, ensure wireless connectivity is enabled and set to proper protocol, security, encryption, login (SSID), and wireless password