Download

1 / 7
80 likes | 148 Views
In this tutorial, you will learn how to deploy a Django application on Nginx & Gunicorn & brief about Creating an instance in Amazon Web Server.<br>

E N D
HOW TO DEPLOY DJANGO ONNGINX & GUNICORN you will learn how to deploy a Django application on Nginx & Gunicorn & brief about Creating an instance in Amazon Web Server.
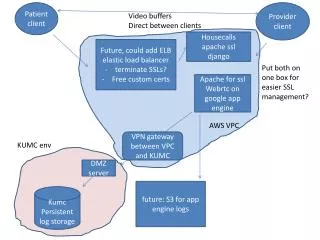
Creating an instance in Amazon Web Server • Go to https://aws.amazon.com and create a new account. • Click on Services and go to the Compute section and select EC2. • Go to Create Instance section and click on Launch Instance. • Now choose an Amazon Machine Image (AMI), here I have used Ubuntu Server 16.04. • Now choose an Instance Type then click on Review and launch button. • Finally, your instance is launched. For viewing it, go to Services>Compute >EC2 and select "Running Instances". • Now under the inbound tab, select edit and further click on "Add Rule". • Now again select your instance from the dashboard and copy Public DNS(ipV4) and IPV4 Public IP.
Connect with your instance and upload files in it • Now select your instance and click on the "Actions" button and then select connect. • When your terminal user name is converted to ubuntu @ip-XXX-XX-XX-XX it means you are connected to your instance. • Download Filezilla. • Now open Filezilla. First, go to Edit and select preferences and go to SFTP and click on add key file. Here you have to add your key pair (.pemfile ). Paste IPV4 Public IP in the host, enter the user name "ubuntu" and leave the password blank, then enter port number 22. Finally, click on quick connect and then press ok. Now your server is connected to your local system. • Open your project on your computer. • Now on the left side of Filezilla dashboard is your local pc directories and on the right side is your.
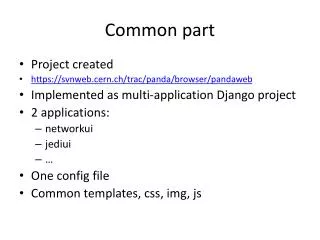
Configure your remote server, setup gunicorn, and Nginx. • Installing a virtual environment. • Creating a virtual environment. • Activating virtual environment Now you can see your terminal user is connected with the prefix of (myenv), this means your virtual environment activated successfully. • Now create a text file with name "requirements“ paste the following details they're and save it. • Before executing this file, type pip3 freeze. • It will display installed packages in the virtual environment. Now we need to install requirements.txt file through terminal. First go to file location and run pip3 install -r requirements.txt.
Edit setting.py file in the remote server • Open the project folder in your remote server • Now, comment the following lines if they are present #STATIC DIR=(os.path.join(BASE DIR,'static')) #print(STATIC DIR) #STATICFILES DIRS = [ # STATIC DIR, #] • then paste these two lines at the end of setting.py file STATIC URL = '/static/' STATIC ROOT = os.path.join(BASE DIR, "static/") • Copy your IPV4 Public IP from amazon instance and paste it in "ALLOWED HOST" in setting.py file. • Put your IPV4 Public IP in it. • Now press ctrl+o for saving and hit enter. For exiting, press ctrl + x.
Configuring Gunicorn • Run this command to open gunicorn.socketfile</p>. sudonano/etc/systemd/system/gunicorn.socket • Run this command to Open gunicorn.service file sudonano /etc/systemd/system/gunicorn.service • WorkingDirectory= is your pwdof project folder ExecStart = gunicorn directory. • Now we have to check status of gunicorn sudosystemctl status gunicorn.socket • Check the existence of gunicorn.sockfile /run/gunicorn.sock
For More Info : https://blog.paradisetechsoft.com/django-deployment-on-nginx-and-gunicorn/