Download
1 / 21
380 likes | 1.05k Views
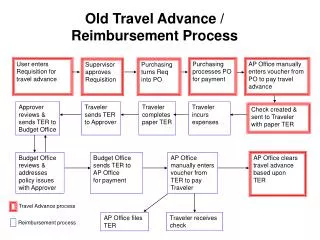
Payment Order (PO). R-FA. Payment Order (PO). Payment Order or PO are created when we need to do payment to some party against Bill or Invoice etc. After its approval from the branch in charge its payment is done either by Cash or Cheque.

E N D
Payment Order (PO) R-FA Designed by Ashwan Saini (EDP) Ahmedabad
Payment Order (PO) • Payment Order or PO are created when we need to do payment to some party against Bill or Invoice etc. • After its approval from the branch in charge its payment is done either by Cash or Cheque. • In PO entry we will create reference which are later used in the Payment Voucher (Cash) or Payment Voucher (Bank). Designed by Ashwan Saini (EDP) Ahmedabad
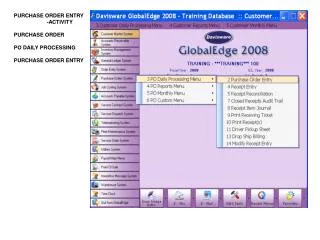
To start click on Transaction on the main screen Now click on Payment Order in the displayed menu then from the sub menu select Payment Order Designed by Ashwan Saini (EDP) Ahmedabad
Like all other form here is search option available using various fields and a + New Record button to create new records. To search for any record select any option and then click on search button. Designed by Ashwan Saini (EDP) Ahmedabad
For this example I have entered NRL and clicked on search button. All Payment orders made from this Narol branch(as NRL is branch short code) are shown. We can click on view or edit buttons against voucher numbers to see the voucher details. Designed by Ashwan Saini (EDP) Ahmedabad
To create new record click on +New Record button Designed by Ashwan Saini (EDP) Ahmedabad
We will start by selecting the branch. In this example I am selecting NYT-Ahmedabad, Date, Ref No, Sign(Cr /Dr) Now select the General/Control Ledger name. if the ledger comes under Control ledger then we have to enter Sub Ledger name also as in this case we will enter Laser World. Designed by Ashwan Saini (EDP) Ahmedabad
Now we will enter the credit amount. For this example I am entering ₹1000. Designed by Ashwan Saini (EDP) Ahmedabad
Enter Narration Always Enter Narration as it helps in explain why this expense was done and also shows in printout of this voucher After Narration we will click on “B” for bill wise entry. Using this we are going to make a reference which will be shown in Payment Voucher (Cash), Payment Voucher (Cheque) entry so that they can be linked together and we will knock off the entry as paid. Designed by Ashwan Saini (EDP) Ahmedabad
By clicking on “B” new window will open. Here in Type of Ref column we will select New Ref to create a new reference which will be later used in Payment Voucher(Cash) or Payment voucher(Cheque) entry and will help in linking of these two vouchers. Designed by Ashwan Saini (EDP) Ahmedabad
Now we will enter the Reference Name. I have entered “NYT-383-Test” as reference name as it will help me in remembering that this is of NYT branch and the PO number is 383 which we are entering at the moment. Enter the credit amount in this case it is ₹1000. then click on add button. We can also make two references of ₹500 each and can use them for 2 different types of payment methods like one can be for cash and other can be for cheque. Click Add button to accept the entry Designed by Ashwan Saini (EDP) Ahmedabad
Here I have split the entry in two entries of ₹500. Now system will make two references name NYT-383-Test-1 and NYT-383-Test-2 The Total amount should always be same as Total Amount on top else the entry will not be saved. Now click on the Save button and the Bill Wise Details will be saved in the voucher Designed by Ashwan Saini (EDP) Ahmedabad
Click on Add button to add the credit side entry. Now we do the Debit side entry. Select the ledger where this expense will come under. In this case it will come under ledger PRINTING & STATIONERY EXPENSES Designed by Ashwan Saini (EDP) Ahmedabad
Enter the Debit amount here it is ₹1000 same as credit amount. Narration on top is automatically copied, user can change it if required. Now we will click on “A” to enter the Analysis Head details. Analysis head’s are used to bifurcate/ explain the expense. A new window will open where we will enter the details. Designed by Ashwan Saini (EDP) Ahmedabad
Enter the Analysis head name in this example we are selecting Nyt-Printer to tell that the printer is of NYT branch for which this expense was done. Enter the amount for this Analysis Head and click the add button ones this is added. Designed by Ashwan Saini (EDP) Ahmedabad
Click the Save button so that the entry is linked in this voucher Designed by Ashwan Saini (EDP) Ahmedabad
Click Add button to enter the Debit side entry in this voucher Designed by Ashwan Saini (EDP) Ahmedabad
On clicking the Add button a new windows will open which requires the TDS Details to be entered. Designed by Ashwan Saini (EDP) Ahmedabad
Here different types of Payment types given. Depending on them the TDS percentage is auto selected. Designed by Ashwan Saini (EDP) Ahmedabad
For this example I am entering ₹10 for TDS Taxable amount. Then click the Save button Designed by Ashwan Saini (EDP) Ahmedabad
Total Debit, Total Credit at the bottom should always tally else entry will not save. Now click on Save button to save the entry. Designed by Ashwan Saini (EDP) Ahmedabad