Download
1 / 20
200 likes | 354 Views
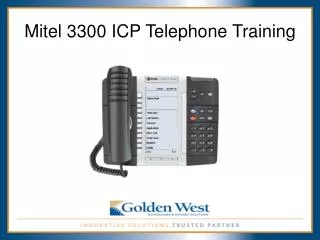
Telephone Training. M3904 Telephone Set. IT Support Center 8-6565 or 305-284-6565 www.miami.edu/network www.miami.edu/it/howto. Table of Contents. Getting to Know Your Phone Dialing Procedures Your Intercom Last Number Redial Call Hold Call Transfer Conference Call Join

E N D
Telephone Training M3904 Telephone Set IT Support Center 8-6565 or 305-284-6565 www.miami.edu/network www.miami.edu/it/howto
Table of Contents • Getting to Know Your Phone • Dialing Procedures • Your Intercom • Last Number Redial • Call Hold • Call Transfer • Conference • Call Join • Call Forwarding • Auto Dial • Your Personal Directory • Add a Personal Directory Entry • Dialing from Your Call Log • Add an Incoming Phone Number to Your Personal Directory • Delete or Edit a Directory Entry • Telephone Etiquette • Questions or Problems • Reference Guide
Your Intercom • Each telephone has its own individual intercom number and you can receive and make calls to other telephones within your intercom group. To call another telephone within your intercom group: • Press your intercom button • Dial the 2-digit intercom number To answer an intercom call: • Press your intercom button • Note: Calls to your intercom will not go to voice mail
Last Number Redial This feature allows you to automatically redial the last number you dialed. • Get a dial tone • Press the line button twice (line button is the small green button)
Call Hold To place a call on hold • Press the HOLD button located above the numeric button pad (The LCD indicator flashes beside the line on hold) To retrieve the call on hold • Press the line button beside the flashing indicator
Call Transfer To transfer a call to another extension: • Press the Trans softkey (The other party is put on hold) • After you hear a dial tone, dial the extension that you want to transfer the call • When the party answers, announce your call • Press the Connect softkey (You will be disconnected from the call) *If your party doesn’t answer, press your extension to return to the original line.
Conference You can set up a conference for up to 6 parties, including yourself. To set up a conference: • While on a call, press the Conf softkey and wait for a dial tone. (Puts the party on hold) • When you hear a dial tone, dial the extension or 9+10-digit phone number • When the call is answered, you may talk privately with the third party * • Press the Connect softkey to include all three parties. • Repeat the procedure until all 6 parties are in the conference. *If your party doesn’t answer, press your extension to return to the original line.
Call Join To join two calls on separate lines on the same set • While one a call is on hold, go to the other call and press the Conf button (listen for dial tone) • Press the line where the second call is on hold • Press Connect(The two calls are joined)
Call Forwarding • The Call Forward feature allows you to direct your calls to ring at another line. To forward your calls to another extension: • Press the FORWARD softkey • Enter the 5-digit extension • Press the DONE softkey to activate Call Forward (Example- If you would like to forward calls to your voicemail, press the Forward button, dial 8-3888, and press the DONE softkey To cancel a Call Forward • Press the CheckFW softkey • Press the CancelFW softkey
Auto Dial This feature allows the caller to program a specific number for one touch dialing. You can program up to 8 Auto Dial numbers on your phone. This depends on the number of lines you have on your phone set. To Re-name the Auto Dial number: • Press the OPTIONS button located next to the green headset button • Press the “down arrow” on the navigation buttons and scroll to “Change feature button label” • Press the SELECT softkey “Change feature key label”. • At the “Change feature key label” Press the SELECT softkey • The prompt will ask you to select the button you want to change. From here select the AUOTDIAL button you want to rename; press the SHIFT button to display the second page where there are more AUTODIAL buttons. • You should see the word “AutoDial” with the cursor underneath the “A”. Press delete until it is clear. • Enter the new name using the characters on the dial pad • Press the DONE softkey to save the changes • Press the QUIT softkey located next to the navigation buttons to exit To Program a number on the AutoDial button: • Select the button you just re-named • Enter the UM extension or 9 + 10 digit phone number • Re-select the button you just renamed- this will save the programmed number To dial from the AutoDial button: • Get a dial tone • Press the AutoDial button you renamed and programmed.
Your Personal Directory The personal directory provides a personalized directory of names and telephone numbers. The personal directory allows you to add, delete and edit entries. This feature can hold 100 entries. To Access the Personal Directory • Press the Directory/Log button • At the highlighted option “Personal Directory” press the SELECT softkey
Add a Personal Directory Entry To add a Personal Directory Entry: • Press the Directory/Log button • At the highlighted option “Personal Directory” press the SELECT softkey • Press the ADD NEW softkey • Enter the name using the touchtone pad (similar to what you do with a cell phone) • Press the NEXT softkey • Enter the telephone number • Numbers outside UM enter 9 + the 10-digit phone number • Long distance numbers enter 1 + the area code + number + press the PAUSE button + long distance code • Press the DONE softkey to save the changes • Press the QUIT softkey located next to navigation buttons to exit
Dialing from Your Call Log You can display the call log for all calls, for unanswered calls, or to not display the call log at all. To dial from your Call Log: • Press the Directory/Log button • Using the navigation button, scroll down to Call Log • Press the SELECT softkey • Use the navigation buttons to scroll down through your calls • Use the right navigation button to view the phone number • Press DIAL or if it’s a 10-digit number, Press the EDIT softkey and enter 9 + Done then DIAL
Add an Incoming Phone Number to Your Personal Directory To Add an Incoming Call to Your Personal Directory: • While you’re on a call Press the DIRECTORY/LOG button • Press the COPY softkey located next to the navigation button (the display shows the message “Copy to”) • Press the DIR/LOG softkey • Press the NEXT softkey to copy the incoming call without editing the name or press CLEAR button if you would like to make changes to the name • Press the NEXT softkey • Make changes to the telephone number, if required • Press the DONE softkey to save the entry in your directory
Delete or Edit a Directory Entry To Delete an entry in your Personal Directory: • Press the Directory/Log button • At the highlighted option “Personal Directory” press the SELECT softkey • Scroll down to the entry you’d like to delete • Press the DELETE softkey to delete the currently highlighted entry in your Personal Directory • Press the YES softkey to confirm the deletion To Edit an entry in your Personal directory: • Access the Personal Directory • Press the EDIT softkey to change the telephone number or the name • Use the navigation buttons to highlight the character you want to change • Use the dial pad to enter the text • Press the NEXT softkey • Edit the number if necessary • Press the DONE softkey to save the changes • Press the Quit softkey to exit Use the navigation buttons to highlight the entry you want to edit or delete
Telephone Etiquette • BE ALERT - Show you are wide awake and willing to help the person calling. • BE FRIENDLY - Put a smile in your voice. • SPEAK DISTINCTLY - Use your natural voice. Pronounce words clearly, paying particular attention to word endings and numbers. • BE EXPRESSIVE - Let the caller know that their call is important. Use a moderate rate and volume of speech and avoid a monotone delivery; no one wants to feel like they are speaking to a computer. • BE CONSIDERATE - DO NOT try to carry on two conversations at once. A caller should not feel he/she is competing for your attention. • BE COURTEOUS - Use common courtesy words such as, "Thank you", "Please" and "You're Welcome". Remember your telephone is the doorway to the University of Miami. Callers will judge the U of M by the welcome they receive and the helpfulness of your telephone attitude.
Questions or Problems The Department of Telecommunications provides a wide array of voice communication services to fulfill the needs of faculty, staff and departments at the University of Miami. If you have any questions, please feel free to call our IT Support Center at (305) 284-6565, option 2.
Reference Guide For more information click on the Meridian User Guide