Download
1 / 17
170 likes | 244 Views
B1 Strip Application. Apply in book spine Adhesive on one side Peel the liner Attach to the bayonet Insert with adhesive toward the book cover Apply pressure to secure the strip Pull to release the bayonet. B1 Strip Application. Apply in book spine Adhesive on one side Peel the liner

E N D
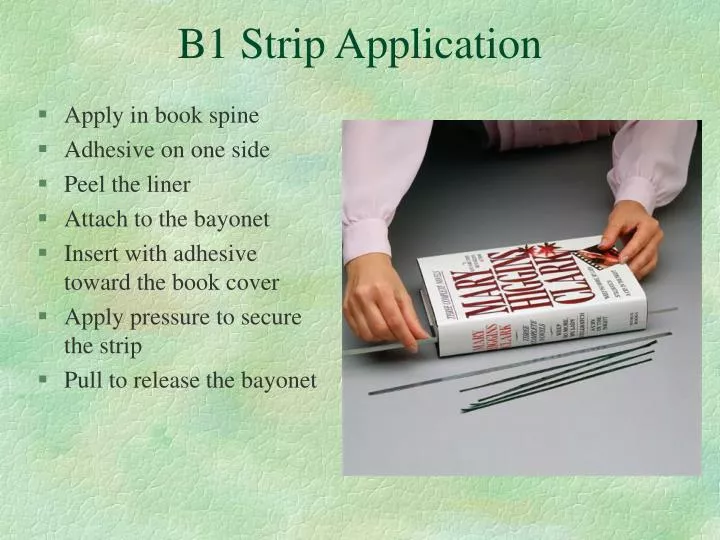
B1 Strip Application • Apply in book spine • Adhesive on one side • Peel the liner • Attach to the bayonet • Insert with adhesive toward the book cover • Apply pressure to secure the strip • Pull to release the bayonet
B1 Strip Application • Apply in book spine • Adhesive on one side • Peel the liner • Attach to the bayonet • Insert with adhesive toward the book cover • Apply pressure to secure the strip • Pull to release the bayonet
B2 Strip Application • Remove the short liner • Apply deep into the book gutter • Apply pressure to secure in place • Remove the long liner • Apply pressure to secure
B2 Strip Application • Remove the short liner • Apply deep into the book gutter • Apply pressure to secure in place • Remove the long liner • Apply pressure to secure
DAC1 Strip Application(for audio cassettes) • Remove the liner • Apply along the top of the cassette • Apply pressure to secure in place • Apply the cover label • Apply pressure to secure
DAC1 Strip Application(for audio cassettes) • Remove the liner • Apply along the top of the cassette • Apply pressure to secure in place • Apply the cover label • Apply pressure to secure
DVM1 Strip Application (for video cassettes) • Remove the liner • Apply near the edge of the recessed area - NOT in the center of the recessed area • Apply pressure to secure in place • Apply the cover label • Apply pressure to secure
DVM1 Strip Application (for video cassettes) • Remove the liner • Apply near the edge of the recessed area - NOT in the center of the recessed area • Apply pressure to secure in place • Apply the cover label • Apply pressure to secure
DCD2 Strip Application for CDs and DVDs Cleaning • Clean the label side of the CD or DVD before applying the DCD-2, even if the disc is new. • To avoid leaving fingerprints on CD/DVD surfaces, handle the disc only by the edges. • Use a soft, lint-free cloth moistened with common rubbing alcohol.
DCD2 Strip Application (for CDs) Cleaning 2.Gently wipe (but do not rub) the entire label side of the disc, working from the center hole outward to the edge. • Do not wipe in a circular pattern around the disc. • Avoid scratching either side of the disc during cleaning/handling. 3.Allow the disc to dry completely.
DCD2 Strip Application for DVDs & CDs CDs only – NO DVDs • DVD data density is significantly higher than for CDs. Because of this, proper DCD-2 application process is very important. See the NEW application instructions for use with DVDs. • Any scratches, smudges or fingerprints can cause DVD playability problems. • To avoid leaving fingerprints (or scratching) the CD/DVD surfaces, handle the disc only by the edges.
DCD2 Strip Application (for CDs) • Place a DVD on the new APPLICATION MAT to prevent: • Bending or scratching the DVD when the DCD-2 is applied • See the NEW DVD application instructions – copy on this cd. • DO NOT use a CD Jewel case when applying DCD-2 labels. • Lift and remove the small liner • Adhere the overlay to the CD surface • Remove the large liner • Adhere the overlay to the CD • Rub the entire overlay to secure it to the CD
DCD2 Strip Application (for CDs ONLY) • Center the DCD2 on the CD • Lift and remove the small liner • Adhere the overlay to the CD surface • Remove the large liner • Adhere the overlay to the CD • Gently rub the entire overlay to secure it to the CD
DCD2 Strip Application (for CDs ONLY) • Center the DCD-2 on the CD • Lift and remove the small liner • Adhere the overlay to the CD surface • Remove the large liner • Adhere the overlay to the CD • Gently rub the entire overlay to secure it to the CD
DCD2 Strip Application (for DVDs) • Do not apply the DCD-2 on a DVD that is in a jewel case. • The DVD must be firmly laying on a FLAT RIGID surface while the DCD-2 is being applied. • Place a DVD on the new APPLICATION MAT to prevent: • Bending or scratching the DVD. • See the NEW DVD application instructions – copy on this cd. • DO NOT use a CD Jewel case when applying DCD-2 labels on a DVD. • Center the DCD-2 on the DVD • Lift and remove the small liner • Adhere the overlay to the CD surface • Remove the large liner • Adhere the overlay to the CD • Gently rub the entire overlay to secure it to the CD
DCD2 Strip Application (for DVDs) • Review the NEW DVD application instructions for specific application details. • Center the DCD-2 on the DVD • Lift and remove the small liner • Adhere the overlay to the CD surface • Remove the large liner • Gently rub the entire overlay to secure it to the DVD
R2 Strip Roll • 7500 + strips/roll • Will become the strip of choice • Faster more consistent application • R2 use encourages conversion to 3M