Download
1 / 32
320 likes | 456 Views
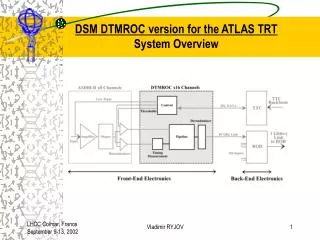
Design and Construction of the ATLAS Barrel TRT Chiho Wang Duke University. Design Parameters. Straw based tracking chamber with TR capability for electron identification.

E N D
Design and Construction of the ATLAS Barrel TRT Chiho Wang Duke University
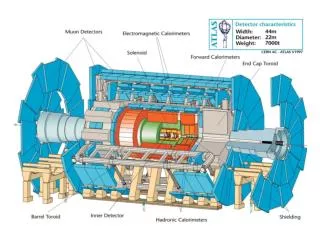
Design Parameters • Straw based tracking chamber with TR capability for electron identification. • Straws run in parallel to beam line. • Active gas is Xe/CO2/O2 (70/27/3) operated at ~2x10⁴ gas gain • Counting rate ~ 6-18 MHz at LHC design luminosity 1034 cm-2s-1 Barrel TRT
Design is modular for: reduced risk distributed production to multiple sites Basic Design of the Module: Straws are embedded in Radiators and supported by Dividers and Endplates which are connected across the module by a carbon-fiber shell
Entire barrel is divided into 3 rings of 32 modules. Straws are distributed for a Continuous tracking geometry 52,544 straws, 105,088 readout channels Average Number of straws crossed by a track = 36, out of 73 layers Average number of TR-hits for 20GeV Pt electron = 7
Splitting the Wires • Sense wires are split in half to reduce counting rate. • This is not enough for the 11 inner most layers of wires! • ±40cm from the center of these wires are deadened by using 2 wire joints. • All straws are the same, but there are 2 different kinds of wires: “Single joint” & “Double Joint” Regular Wires Single Joint Wire Support Wire Support Wire Joint Wire Support 80cm Inner Wires Double Joint Wire Joint Wire Joint
Components • Every component has its own QC process to go through when received from manufacturer, or when it’s prepared (pre-assembled) for installation
Straw is made by spirally winding and fusing 2 bands of aluminized kapton. The aluminized surface is protected by carbon-polyimide coating. Outside surface of straw is laminated with 4 bundles of carbon-fiber filament to improve electrical/thermal conductivity and mechanical strength. Straw material has been tested in for radiation hardness in nuclear reactor up to : g : 800kGy (100 LHC years) Fast n: 4x1014 cm-2 (20 LHC years) Slow n: 1.7x1015 cm-2 (30 LHC years) Anode ageing was tested to withstand: 18 C/cm(20 LHC year) Straws Enforcement carbon-fiber bundle
Wire & Wire Joint • Wire: • 30 ± 0.3 mm gold plated tungsten wire • Wire joint: • Glass capillary tube: • Length: 6mm • OD: 250 um • ID: 125 um • Melted at center to isolate 2 wire segments • Insert wire segments. • Sliding torches fuse glass to wire segments • Stronger than wire itself Wire/Glass fusion Center-melt Glass Holder Torch
Radiator • Stacks of polypropylene fiber sheets • Fiber is 15 mm diameter • Packed to 66 mg/cm3 density • Somewhat oriented and orthogonal to incident particle Optimal TR threshold Foil Fiber 200um
Divider & Radiator patterns • Kapton-foam sandwich • Align straws along module every 25 cm “Divider Ear” Fixation hole to assembly frame. Trimmed off later
Carbon-Fiber Shell • Structural support for module. • Heat exchanger for module cooling Cooling Tubes Kapton lamination Holes for Divider ears
High Voltage Plate • Made of 3 parts: • Precision machined FR4 tray • Kapton circuit in the back • Thin HV circuit pattern in the front • Bring HV to straws • Position straws in the module • Mount module to support structure • Individual traces tested to 3kV
Tension Plate • Double sided PC board • Holds wire tension • Connect wires to electronics • House gas fittings for gas system Gasfitting
Small Parts Mid-Wire Support Twister • Centers wire at middle of the straw End Plug • Center wires at the end of the straw • Electrically connect inside and outside of a straw through conductive glue Taper Pin Eyelet • Wire fixation on tension plate Capacitor Barrel • Isolate capacitor from gas volume so that it can be replaced • Partially transfer wire tension from Tension plate to HV plate
Construction of Barrel Modules • Starts with checking alignment elements • Shell, HV plates, Dividers are pre-assembled in the calibrated assembly frame on optical table. • 9 fiducial straws inserted, and their straightness along the module measured with laser alignment system.
Insert Radiator + Divider into shell & attach HV plate Assembly Frame Radiator Alignment Rods Guiding Platform Divider Fixation Pins 3kV tested between HV plate & Shell
Insert Straws • Use straw insertion bullet: • Guide straws through holes in HV plate, radiator & divider • Protect straw re-enforcement carbon fiber strips from de-lamination • To avoid deforming radiator: • Spiral insertion sequence, from center outward • Alternate insertion direction every straw • After insertion • Test Individual straw group to 2.5kV Short straw buffer Mylar Sleeve Delrin Head
Conductive Glue • Use endplug to glue straws from inside to outside and to HV plate • Measure straw resistance after gluing each side • HV test each straw group to 2.5kV before and after gluing each side Glue dispenser Rotor End Plug A ring of Conductive glue End plug holder After gluing one side After gluing both sides
Seal around straw end-plug and HV plate surface with AY103 Pot back side of HV plate 2.4 mm thick with Stycast 1266. Seal between High Voltage Plate and Straws 3” plastic syringe tip Glue Divider
Clean up: Check cooling tube holes with gauge rod (rim/clean as needed). Clean capacitor socket for blockage Clean excessive glue on HV plate walls Clean gas fitting seats on HV plate Check: HV test (last at 2.5kV): 2.5kV through each individual straw group Module leak test: < 1 mBar / Bar / min End of “Mechanical Assembly” Leak test system Gas seal plate & fitting for leak test HV Tester HV Relay box
Assemble/Attach Tension Plate • Tension plate assembly: • Thousands of components assembled each plate = thousands of possible leak • Eyelets, Sockets, Capacitor barrels, Gas fittings. • Seal inner surface with a layer of glue (AY103) for gas tightness • After tension plate attached, check HV paths continuity between Kapton traces and Capacitor pins. HV trace Capacitor barrel pin
Stringing Sense Wire Ultrasound bath Wire Joint Stop • Prepare sense wire • Pre-set sense wire length for wire joint positioning in the straw. • Stringing process • Blow a lead wire through straw. • Tie lead wire with sense wire (a knot) • Pull sense wire into straw through an ultra-sound cleaner • Apply weight and pin wire on eyelet Crimp on wire length setting anchor Wire Spool 65 gm Preset length 60 gm Air Air Motorized Lead Wire Spool Weight applying pulley Lead Wire
Tension Measurement & HV Test • While stringing • Measure wire tension. • Re-string if out of range (55gm-85gm) . • After stringing • HV test 1700V each wire • Re-string if failed or drawing > 10 mA • Rework until all wires pass HV & tension requirements. Ultrasound bath Speaker DAQ Electronics Wire natural resonant frequency scan
Mobile16-Channel Tension Tester • After re-work • Measure wire tensions on both sides. • Re-work if low tension (<50gm ) • Re-work if |front – back| > 5gm (wire joint hits mid-wire support) Front side Back side
Finishing Up Module Conductive gluing ground wire to shell Seal taper pin/eyelet Seal tension plate edge to HV plate Ground Wire Seal Shell holes with Kapton disks Solder Ground wire To tension plate ground
On X-ray Scanner Signal test: to ensure every channel functional, or documented if otherwise. Gain map: 25 positions each wire segment. Gain variation < 5% or documented HV soaking during signal test & gain mapping (2-3 days) identifies/remove unstable wires & record current draw Re-work wires if removed wires > 1%. Measure ionization volume leak rate Measure purging volume leak rate Measure wire tensions. Check Dimension & Envelope Test module mounting Module Passport Verification
X-ray system for signal test & gain mapping W target X-ray Slit & Cu foil filter Fe55 DAQ Rotation Mounting Ring Slides
Signal Test Example Wire shorted across wire-joint A normal channel but picking up noise from the shorted wire
Gain Mapping Examples • DG/G > 8% wires require action Front Back Front Back No Action Low gain point Dirty wire High gain point between dividers Bent straw Remove wire Front Back Front Back Replace wire High gain point at wire end Wire hung at end plug twister Replace wire High gain point at wire end Wire hung at mid twister
Summary • QC procedures are in every step of production procedures. • A QC “passport” is generated before a module leaves production site. • Module production is near its completion. ~ 10 modules have been completed and shipped to CERN in the past month or so. • In early 2004, modules will begin to assemble into barrel support structure.