1 / 32

WELCOME Elmo and Video Projector Training

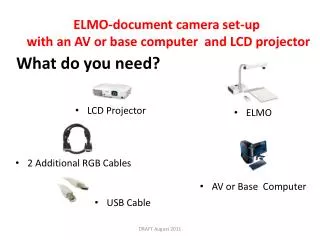
WELCOME Elmo and Video Projector Training. Adapted from http://springfieldpublicschoolsmo.org/depts/edtech/Resources/elmosprojectors/Elmo%20Training.ppt. Your Elmo box includes. Power . to Projector. from Computer. Video Output. USB to Computer. Behind Your Elmo.

oakley
Download Presentation

WELCOME Elmo and Video Projector Training

An Image/Link below is provided (as is) to download presentation Download Policy: Content on the Website is provided to you AS IS for your information and personal use and may not be sold / licensed / shared on other websites without getting consent from its author. Content is provided to you AS IS for your information and personal use only. Download presentation by click this link. While downloading, if for some reason you are not able to download a presentation, the publisher may have deleted the file from their server. During download, if you can't get a presentation, the file might be deleted by the publisher.

E N D

Presentation Transcript


  1. WELCOMEElmo and Video Projector Training Adapted from http://springfieldpublicschoolsmo.org/depts/edtech/Resources/elmosprojectors/Elmo%20Training.ppt

  2. Your Elmo box includes...

  3. Power to Projector from Computer Video Output USB to Computer Behind Your Elmo

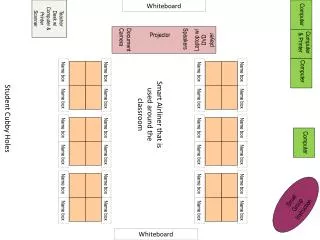
  4. Use cord that comes with Elmo to connect from here to your computer where you just unplugged the “black box” cord. Use PC button for projector to see computer. Use the camera button for projector to see Elmo. Elmo has to be powered on at ALL TIMES for you to be able to use your computer. Disconnect cord from computer (that goes to the black box) and plug in here. Electric The USB cord here if you use the Elmo to take pictures and need to save on computer.  You only use the software that comes with Elmo for that purpose. OSD means “On Screen Display” when you hit the menu button. Image rotation is suppose to be located on that menu.

  5. If your projector is mounted…

  6. If your projector is on a cart…

  7. Your projector from behind From Elmo Power

  8. Cleaning your filter Filter

  9. Pull filter out

  10. Clean filter with canned air or mild soapy water at least once a month

  11. FYI on the remote… Freeze

  12. The Elmo controls

  13. Focus Zoom Zoom and auto focus

  14. Another wiring option (w/USB)

  15. Installing the software(w/o USB)

  16. Click Utility_Software

  17. Click Setup

  18. Click Next

  19. Click ‘accept’ and Next

  20. Click Next

  21. Click Install

  22. Click Finish

  23. To open your software…

  24. Drag and drop to…

  25. Create a shortcut on the desktop

  26. If you see this… connect the USB

  27. If you see this, you are… Ready

  28. Click to turn on Live Monitoring

  29. Or use the menu for more options

  30. Live Monitoring is now running

  31. Click to capture the current image

  32. Use file menu to save as .jpg or .bmp

More Related