Download
1 / 21
210 likes | 296 Views
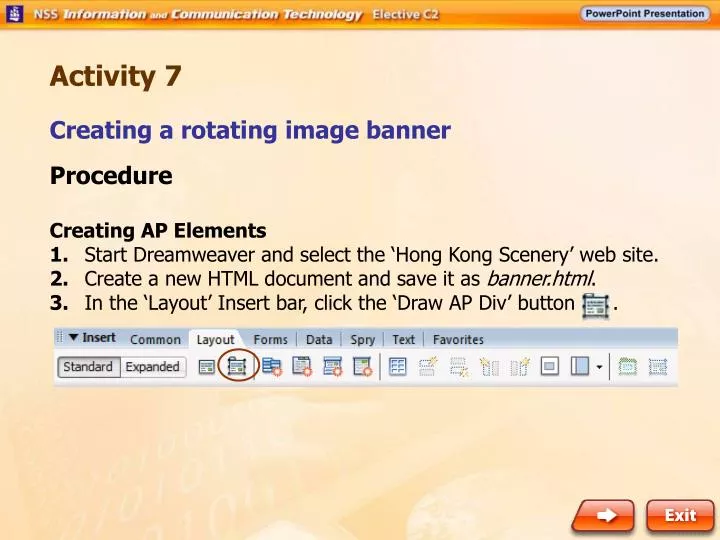
Activity 7. Creating a rotating image banner. Procedure Creating AP Elements 1. Start Dreamweaver and select the ‘Hong Kong Scenery’ web site. 2. Create a new HTML document and save it as banner.html . 3. In the ‘Layout’ Insert bar, click the ‘Draw AP Div’ button. Activity 7.

E N D
Activity 7 Creating a rotating image banner Procedure Creating AP Elements 1. Start Dreamweaver and select the ‘Hong Kong Scenery’ web site. 2. Create a new HTML document and save it as banner.html. 3. In the ‘Layout’ Insert bar, click the ‘Draw AP Div’ button .
Activity 7 Creating a rotating image banner 4. Draw an AP Element on the web page.
Activity 7 Creating a rotating image banner 5. The AP Element is automatically named ‘apDiv1’ with z-index ‘1’. Set its size to 720 × 100 pixels, which has the same resolution as the banner images to be added in step 7. Set the left ‘L’ and top ‘T’ margins to both 8 pixels.
Activity 7 Creating a rotating image banner 6. Click the ‘Browse’ button to select the background image for ‘apDiv1’.
Activity 7 Creating a rotating image banner 7. Locate the image banner_cable.jpg from the Learning CD-ROM.
Activity 7 Creating a rotating image banner 8. The image is set as the background image of ‘apDiv1’ Element.
Activity 7 Creating a rotating image banner 9. In the CSS Inspector, select the ‘AP Elements’ tab and click the ‘apDiv1’ Element until the closed eye icon is displayed.
Activity 7 Creating a rotating image banner 10. Draw another AP Element ‘apDiv2’ in the same location as ‘apDiv1’ by clicking the ‘Draw AP Div’ button . Set the size and margins of ‘apDiv2’ Element to be the same as ‘apDiv1’ so that they can overlap with each other. Note that the ‘z-index’ of ‘apDiv2’ is ‘2’, which means it is one layer above ‘apDiv1’.
Activity 7 Creating a rotating image banner 11. Select the image banner_central.jpg from the Learning CD ROM as the background of the ‘apDiv2’ Element.
Activity 7 Creating a rotating image banner 12. Repeat steps 10 to 11 to create the third AP element ‘apDiv3’ which overlaps with ‘apDiv1’ and ‘apDiv2’. Select banner_ferry.jpg as its background image.
Activity 7 Creating a rotating image banner Animating AP Elements in Timeline 13. Select ‘Window’ → ‘Timelines’ to display the Timeline. With ‘apDiv3’ Element visible, drag it to the Timeline. It will last 15 frames by default.
Activity 7 Creating a rotating image banner 14. Drag the last frame (which is a keyframe) to Frame 60, so that the animated banner will last for 4 seconds.
Activity 7 Creating a rotating image banner 15. Drag the Elements ‘apDiv2’ and ‘apDiv1’ to the Timeline and increase the number of frames for each Element to 60.
Activity 7 Creating a rotating image banner 16. In the Timeline, select Frame 1. In the Tag Inspector, select the ‘Appear/Fade’ behavior.
Activity 7 Creating a rotating image banner 17. Select the ‘apDiv3’ as the target element and set the duration of the ‘Appear’ effect to ‘0’ millisecond.
Activity 7 Creating a rotating image banner 18. A mark will be displayed in Frame 1 and the ‘Appear/Fade’ behavior is displayed in the Tag Inspector.
Activity 7 Creating a rotating image banner 19. In the Timeline, select Frame 20 and add the following ‘Appear/Fade’ behavior: Element : apDiv3 Effect : Fade Duration : 0 millisecond Element : apDiv2 Effect : Appear Duration : 0 millisecond
Activity 7 Creating a rotating image banner 20. In the Timeline, select Frame 40 and add the following ‘Appear/Fade’ behavior: Element : apDiv2 Effect : Fade Duration : 0 millisecond Element : apDiv1 Effect : Appear Duration : 0 millisecond
Activity 7 Creating a rotating image banner 21. In the Timeline, select Frame 60 and add the following ‘Appear/Fade’ behavior: Element : apDiv1 Effect : Fade Duration : 0 millisecond
Activity 7 Creating a rotating image banner 22. Check both the ‘Autoplay’ and ‘Loop’ check boxes. 23. Save and test the web page in a browser. The images in the banner should rotate one by one.
Activity 7 Creating a rotating image banner 22. Check both the ‘Autoplay’ and ‘Loop’ check boxes. 23. Save and test the web page in a browser. The images in the banner should rotate one by one.