Download
1 / 10
110 likes | 358 Views
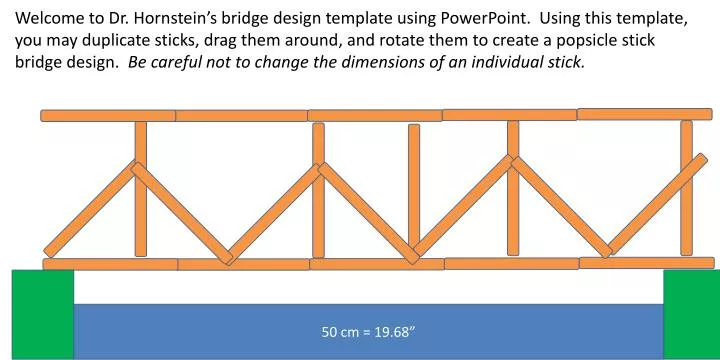
Welcome to Dr. Hornstein’s bridge design template using PowerPoint. Using this template, you may duplicate sticks, drag them around, and rotate them to create a popsicle stick bridge design. Be careful not to change the dimensions of an individual stick. 50 cm = 19.68”. Purpose.

E N D
Welcome to Dr. Hornstein’s bridge design template using PowerPoint. Using this template, you may duplicate sticks, drag them around, and rotate them to create a popsicle stick bridge design. Be careful not to change the dimensions of an individual stick. 50 cm = 19.68”
Purpose • Purpose: To introduce students to civil engineering concepts in a team building environment. Students will form teams of 2-4 individuals that will combine their effort to construct a single bridge capable of the following specifications. At the conclusion of the task each team member will be required to submit a separate reports.
Specifications The test load will be applied to the center of the arch, see figure below. The bridge must allow for easy addition and subtraction of test weights. The bridge must be able to support 20 kg. The bridge cannot consist of more then 200 sticks. The bridge must withstand minor twisting effects as weight is added and subtracted. The bridge cannot extend below the level of the “shore”. • The bridge must span a 50 cm gap (i.e. your bridge will have to be larger then 50 cm in length) • The bridge must be between 3 and 14 cm wide to support the test bracket. • 99% of the mass of the bridge must come from the sticks provided in class. (i.e. you may add string or paper, but no nails or steel)
Task • Task: Documentation should be done through out the bridge building project. This documentation should be done in a lab book and should include sketches and calculations used in the design process. The more you document during the process the easier it will be to complete the final report.
Choose a strategy • Choose a Strategy: Individually research at least two types of bridges and outline the pros and cons of each. As a group, determine which type of bridge your team will construct.
Gather information • Gather Information: Determine what building materials you will use and document it’s properties. • Measure and document how much force it takes to deform a popsicle stick using the provided weights. • Measure and document how much force it takes to break a popsicle stick. • Measure and document how much force it takes to break the joint between two popsicle sticks held together via glue.
Design loop Test sections to verify that they perform as expected. Construct the complete bridge. Verify that the bridge will meet the minimal requirements. Any popsicle sticks broken during the design and test phase will not count towards the final total. Design Loop: Perform “Back of the hand” calculations to see if your design will meet the required specifications. Then: • Construct the bridge in stages. • Test each stage to verify that the elements will perform as expected. • Combine sections into larger pieces.
Technical Communication Project • We will spend several weeks on the bridge lab. • The bridge lab will be written up as the “Technical Communication” Project. • It will count as 10% of your grade (see syllabus). • The project will be a lab report done in PowerPoint. We will discuss the details at a later date. • Make sure that you document your progress in your lab book during each lab meeting and take photographs. These will be essential for your final report. • Even though you are working in groups, you are expected to produce one report per person.
References http://bridgecontest.usma.edu/download.htm http://www.tryengineering.org/lessons/popsiclebridge.pdf http://andrew.triumf.ca/andrew/popsicle-bridge/ http://www.google.com/url?sa=t&rct=j&q=&esrc=s&source=web&cd=9&cts=1331248822323&ved=0CHUQFjAI&url=http%3A%2F%2Fwww.involver.com%2Fassets%2Ffile_uploads%2F75721%2F001-1023-11-WIPGMK-2011%2520POPSICLE%2520STICK%2520BRIDGE%2520BUILDING%2520COMPETITION%2520000%2520FD3.pdf%3F2011&ei=7z1ZT43dKovZiQL_6pGECw&usg=AFQjCNGPRCSbIhhDhgz4uJzPG3IOV2ZyOA • http://www.garrettsbridges.com/popsicle-stick-bridges/ • http://www.garrettsbridges.com/building/how-to-build-a-popsicle-stick-bridge/ • http://www.garrettsbridges.com/design/trussdesign/ • http://www.garrettsbridges.com/category/popsicle-bridges/ • http://www.google.com/#hl=en&client=firefox-a&rls=org.mozilla:en-US%3Aofficial&q=popsicle+stick+bridge+designs&oq=popsicle+stick+bridge+designs&aq=f&aqi=&aql=&gs_sm=3&gs_upl=0l0l0l1162l0l0l0l0l0l0l0l0ll0l0&gs_l=serp.3...0l0l0l1163l0l0l0l0l0l0l0l0ll0l0&bav=on.2,or.r_gc.r_pw.,cf.osb&fp=75088d172d6db3cc&biw=1280&bih=860 • http://engineering.tufts.edu/cee/bridges/presentation.asp
Technical Communication Project • 1 report per person, due 1 week after bridge crushing event • Report should be written in PowerPoint or OpenOffice