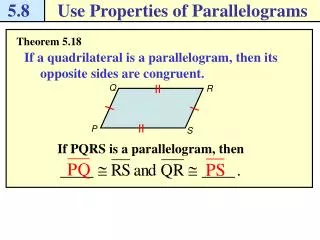
Download

1 / 33
461 likes | 1.39k Views
Roller Hemming. DYNAFORM 5.8 Training Tutorial. Tutorial. This tutorial illustrates how to setup roller hemming simulation. 2. Open Database. Start eta/DYNAFORM For PC users: double click the icon on desktop to start eta/DYNAFORM

E N D
Roller Hemming DYNAFORM 5.8 Training Tutorial
Tutorial This tutorial illustrates how to setup roller hemming simulation 2
Open Database Start eta/DYNAFORM For PC users: double click the icon on desktop to start eta/DYNAFORM For Linux and UNIX users: enter df58 in the command line and press Enter button to start eta/DYNAFORM. Click File menu and select Open… submenu (See Figure 1). Select the hemming.df and click Opento open the DF file. (See Figure 2). Figure 1 Figure 2
Open Database Figure 3 4
Enter Roller Hemming • Click AutoSetupmenu and select Roller Hemming submenu (See Figure 4). • Default title is untitled, change it to Roller Hemming (See Figure 5). Figure 4 Figure 5
Define Outer Panel • Click Outer panel page. • Click Define geometry to enter Blank generator (See Figure 6). • Click Add part in blank generator (See Figure 7). • Select the part OUTER,FLANGE and clickOKto exit(See Figure 8). • Click Exit to exit Blank generator (See Figure 9). Figure 6 Figure 7
Define Outer Panel Click BLANKMATto define Outer panel material (See Figure 10). Click Material Libraryto select the material(See Figure 11). Select the material: BH180 (See Figure 12). Click OKbuttonto exit the Material dialog box (See Figure 13). Figure 10 Figure 8 Figure 9
Define Outer Panel Figure 11 Figure 12 Figure 13 8
Define Outer Panel Input OUTER Thickness: 0.8 (See Figure 14) Use the same material parameter for FLANGE. Figure 14 9
Define Inner Panel • Click Inner panel page. • Click Define geometry to Enter Preparation. • Click Define tool icon in Preparation (See Figure 16). • Click Add part in Define geometry dialog box (See Figure 17). • Select the part INNER and clickOKto exit(See Figure 18). • Click Exit to exit define geometry (See Figure 19). • Click Exit to exit Preparation. 10
Define Inner Panel Figure 17 Figure 15 Figure 16 11
Define Inner Panel Click BLANKMATto define inner panel material (See Figure 20). Click Material Libraryto select the material(See Figure 21). Select the material: BH180 (See Figure 22). Click OKbuttonto exit the Material dialog box (See Figure23). Figure 19 Figure 20 Figure 18 12
Define Inner Panel Figure 20 Figure 21 Figure 22 13
Define Inner Panel Input INNER thickness: 0.8 (See Figure 24). Figure 24
Define Roller • Click Tools page. • Select Roller as current tool. • Click Define geometry to enter Preparation (See Figure 25). • Click Define tool icon in Preparation. • Click Add part in Define geometry dialog box (See Figure 26). • Select the part PREROLL and clickOKto exit(See Figure 27). • Click Exit to exit Define geometry dialog box (See Figure 28). 15
Define Roller Figure 25 16
Define Roller Figure 26 Figure 27 Figure 28 17
Define Hem Bed • Click Hem Bed as current tool in Preparation. • Click Define tool icon in Preparation (See Figure 29). • Click Add part in Define geometry dialog box (See Figure 30). • Select the part HEMBED and clickOKto exit(See Figure 31). • Click Exit to exit Define geometry dialog box (See Figure 32). • Click Exit to back setup. Figure 29
Define Hem Bed Figure 30 Figure 31 Figure 32 19
Define Trajectory • Click Process page . • Click Edit todefine roller trajectory(See Figure 33). Figure 33
Define Trajectory • Click Create path in Define Roller dialog box (See Figure 34). • Click Element in Create Path dialog box (See Figure 35). • Select all FLANGE elements in select elements dialog box and click OK to exit (See Figure 36). Figure 34 Figure 35 Figure 36 21
Define Trajectory • Click Start Node in Create Path dialog box (See Figure 37). • Select a node as start node in graphic displayed area (See Figure 38). • Click OK to exit (See Figure 39). Figure 37 Figure 38 Figure 39 22
Define Trajectory • Click End Node in Create Path dialog box (See Figure 40). • Select a node as end node in graphic displayed area (See Figure 41). • Click OK to exit (See Figure 42). Figure 40 Figure 41 Figure 42
Define Trajectory • Check the direction of roller trajectory (See Figure 43). • Toggle on Create Line to create the trajectory as a line (See Figure 44). • Click Apply to define the trajectory. Figure 43 Figure 44 24
Define Trajectory • Check the Rotate a (taper angle) and Rotate b (lead angle). • Check the velocity of roller. • Click OK to exit Roller Define dialog box. Note: Use default value in this case. Figure 45 25
Define Trajectory • Toggle on Springback seamless if user want to run a springback after hemming simulation (See Figure 46). Figure 46 26
Constraint • Click Outer panel tab. • Click Edit to define SPCs (See Figure 47). • Select All and click New to select nodes (See Figure 48). • Select Near Line type. • Select the line (create line when the definition of roller trajectory) in graphic display area and click OK in Tolerance to Line dialog box (See Figure 49). • Click OK to exit Select Node dialog box (See Figure 50). • ClickOKto exitSPCs dialog box(See Figure 51). Figure 47 27
Constraint Figure 49 Figure 48 Figure 51 Figure 50 28
Constraint • Click Inner panel tab. • Click Edit to define SPCs (See Figure 52). • Click New to select nodes (See Figure 53). • Select some nodes in graphic display area (See Figure 54). • Click OK to exit Select Node dialog box (See Figure 55). • ClickOKto exitSPCs dialog box(See Figure 56). Figure 52 29
Constraint Figure 54 Figure 53 Figure 56 Figure 55 30
Define Control Click Control tab. User can click button, the program will automatically calculate the time step size according to material parameters and element size of outer panel and inner panel. Set the time step as -1.2e-007 (See Figure 57). User can toggle on Refining meshes to define refinement frequency and refinement levels. Figure 57
Animation Click Previewmenu andAnimationsubmenu (See Figure 58). Click Play Button to show the animation, and user can also select the Individual Frames option to display the incremental roller movement (See Figure 59). Figure 58 Figure 59
Input Deck Click Job LS-DYNA Input Deckbutton (Figure 60). The program popup a Save As dialog box, and click Save to output input deck (Figure 61). The input deck can be submitted to Job Submitter to run. Figure 60 Figure 61