Download
1 / 55
570 likes | 768 Views
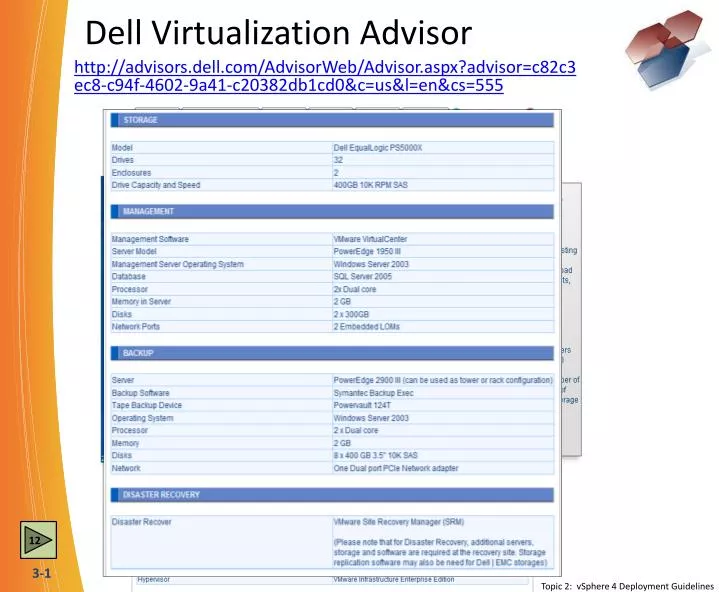
Dell Virtualization Advisor. http://advisors.dell.com/AdvisorWeb/Advisor.aspx?advisor=c82c3ec8-c94f-4602-9a41-c20382db1cd0&c=us&l=en&cs=555. 12. Topic 2: vSphere 4 Deployment Guidelines. ESX 4.0 Installation. Non-VMFS formatted LUNs appear as unpartitioned

E N D
Dell Virtualization Advisor http://advisors.dell.com/AdvisorWeb/Advisor.aspx?advisor=c82c3ec8-c94f-4602-9a41-c20382db1cd0&c=us&l=en&cs=555 12 Topic 2: vSphere 4 Deployment Guidelines
ESX 4.0 Installation • Non-VMFS formatted LUNs appear as unpartitioned • Unplug SAN if LUNs not needed during ESX Install 27 Topic 3: ESX Installation
Resetting root Password • If the root password for ESX Server is lost, you can change the it on ESX Server without re-installing • Power On or Reboot the ESX host and at the GRUB menu, press 'a'. • Type “single” at the end of the line (after the word “quiet”). • The ESX host will boot to a # prompt. • Type 'passwd' and enter a new UNIX password twice for root. • Type 'reboot' 3 Topic 6: Troubleshooting ESX Server
Configure Physical NICs esxcfg-nics –s 1000 –d full vmnic0 esxcfg-nics –s 100 –d full vmnic1 esxcfg-nics –s 1000 –d full vmnic2 esxcfg-nics–s 100 –d full vmnic3 esxcfg-nics –l 5 Topic 2: Creating & Modifying Virtual Networks using CLI
Configure Virtual Switches esxcfg-vswitch–a vSwitch4:64 esxcfg-vswitch–A PortVLAN101 vSwitch4 esxcfg-vswitch–A PortVLAN102 vSwitch4 esxcfg-vswitch –v 101 –p PortVLAN101 vSwitch4 esxcfg-vswitch –v 102 –p PortVLAN102 vSwitch4 esxcfg-vswitch–L vmnic2 vSwitch4 esxcfg-vswitch–L vmnic3 vSwitch4 VMNIC4 7 Topic 2: Creating & Modifying Virtual Networks using CLI
Configure the VMkernel Port esxcfg-vswitch–a vSwitch4:16 esxcfg-vswitch–A VMotionvSwitch4 esxcfg-vswitch–L vmnic2 vSwitch4 esxcfg-vswitch–L vmnic3 vSwitch4 esxcfg-vmknic–a –i 172.16.10.1 –n 255.255.0.0 VMotion vimsh -n -e “/hostsvc/vmotion/vnic_setVMotion” esxcfg-route 172.16.1.1 esxcfg-route –a 10.0.0.0 255.255.0.0 172.16.1.254 esxcfg-route –l 9 Topic 2: Creating & Modifying Virtual Networks using CLI
Adding a second Service Console esxcfg-vswitch –a vSwitch4:16 esxcfg-vswitch –L vmnic2 vSwitch4 esxcfg-vswitch–L vmnic3 vSwitch4 esxcfg-vswitch–A SCon2 vSwitch4 esxcfg-vswif–a –i172.16.9.1 -n 255.255.0.0 -p SCon2 vswif1 esxcfg-vswitch–A IPStorage vSwitch4 esxcfg-vmknic–a –i 172.16.10.1 –n 255.255.0.0 IPStorage esxcfg-vswitch –v 33 –p SCon2 vSwitch4 esxcfg-vswitch –v 33 –p IPStorage vSwitch4 9 Topic 2: Creating & Modifying Virtual Networks using CLI
Viewing Multipathing • Path States: • Active (I/O), Active, Disabled, and Dead • Preferred path is designated with an * • Active (I/O) is the current path being used under Fixed and MRU 4 Topic 1: Storage Concepts
Discovering iSCSI Targets • Enter the IP address/Port of each iSCSI target • Maximum targets: 64 • Static Discovery • Enter iSCSI Target Name • Dynamic Discovery • Uses “Send Targets” to discover LUNs and all available paths 2 Topic 2: iSCSI Storage (GUI & Command Line)
Configure Software Initiator: CHAP Authentication • CHAP can be set for each target individually • Challenge-Handshake Authentication Protocol (CHAP) is disabled by default • To authenticate the ESX Server to the iSCSI Target, enable CHAP and enter CHAP name and CHAP secret 1 Topic 2: iSCSI Storage (GUI & Command Line)
Viewing and Creating a VMFS Datastore 6 Topic 4: VMFS Datastores (GUI & Command Line)
Add an Extent to your existing VMFS • The list of possible extents to add will not include LUNs with an existing VMFS, or an RDM mounted to a VM 6 Topic 4: VMFS Datastores (GUI & Command Line)
Expanding your SAN LUN 5 • You can expand a SAN LUN using Mfg. software • ESX 3 cannot stretch the VMFS partition on the LUN • Same as adding an extent, results in multiple partitions combined • ESX 4 can perform dynamic expansion of VMFS volumes Process used here: Use SAN software to add another 200 GB to an existing 500 GB LUN Rescan from Storage Adapters shows 700 GB LUN Capacity Properties of existing 500 GB VMFS LUN shows Capacity of 700 GB but Primary Partition of 500 GB Choosing Add Extent allows adding the extra 200 GB extent The final VMFS will be 700 GB with two extents, not one large primary partition 1 2 3 4 5 Topic 4: VMFS Datastores (GUI & Command Line)
Manage vSphere Licenses 8 Topic 1: Licensing
Guided Consolidation • Select which systems to analyze • Consolidation phase converts physical machines to VMs 2 Topic 4: Managing vCenter Server
vCenter Server 4 Database Sizing In vCenter 4 go to the Administration Menu & choose vCenter Server 4 Settings Use different numbers to produce estimates 4 Topic 5: Planning vCenter Server Deployment
VMware Tools Configurable Features • Time Synchronization • Tools on the taskbar • Upgrade Availability • Connected Devices • Preconfigured Scripts • Shared Folders and Shrink are not available on ESX 3 Topic 1: Create a VM
Deploy VM from Template 6 Topic 2: Create Multiple VMs, Templates & Clones
Customization Specification Manager • Specifications can be created, saved, copied, imported, exported or edited 16 Topic 2: Create Multiple VMs, Templates & Clones
Import Virtual Appliances • Select host or cluster • Import from VA marketplace, file, or URL • Appliance is validated for ESX prior to import 8 Topic 3: Virtual Appliances
Enterprise Converter Usage • vCenter Server 4.01 Plug-in enables Converter • Enterprise Converter is an optional component during vCenter Server installation 11 Topic 4: VMware Converter (P2V – V2V
VMware Converter Standalone • vCenter Converter Standalone can be installed on any computer • Client / Server architecture allows client and server to be on different computers 21 Topic 4: VMware Converter (P2V – V2V
VM Properties - Hardware tab ON = VM Powered On OFF = VM Powered Off * = Can not have snapshots Remainder Shown as Powered Off Shown as Powered On 11 Topic 5: Manage VMs
VM Properties - Options tab 14 Topic 5: Manage VMs
Web Access Tasks When logged into vCenter, Datacenter and Alarm information is available 13 Topic 8: Web Access
Generate Virtual Machine Shortcut • Provides a way to access a VM through a URL • Useful for including in an instant message or an e-mail message • Similar to the MMC Taskpad 4 Obfuscate will encrypt the link so that it’s options are not obvious Without either check box, the link points to the top of Web Access With the top checkbox, all VMs show, but tabs for Alarms, Tasks, and Events are not shown With the second checkbox, only one VM will show with the tabs With both checkboxes, the view is limited to a single VM with no tab options Topic 8: Web Access
How VMotion Works 1 Step One: 1 VM1-1 • Users currently accessing VM1-1 on ESX1 • Initiate migration of VM1-1 from ESX1 to ESX2 while VM1-1 is up and running ESX Server 1 ESX Server 1 Step Two: 4 • Pre-copy memory from ESX1 to ESX2 • Log ongoing memory changes • Copy changed memory, Log new changes • Repeat copying changed memory until remaining changes are small enough to copy during the quiesce 2 3 3 2 Memory Virtual Disk and Config files Step Three: VM Motion Network CorpNet Network • Quiesce virtual machine on ESX1 • Copy remaining memory to ESX2 • Copy VM State information (registers, etc) Shared Storage Remaining Memory VM state – Registers, etc Step Four: • Start VM1-1 on ESX2 • Users now access VM1-1 on ESX2 4 ESX Server 2 4 VM1-1 Step Five: • Delete VM1-1 from ESX1 after migration is successful 4 Topic 1: Configuring VMotion
Cluster Map View:Host to Network and Datastore Host Map View Cluster Map View:Host to Network Cluster Map View:Host to VM Cluster Map View:VM to Network Cluster Map View:VM to Datastore Cluster Map View Cluster Map View:Host to Datastore Topic 1: Configuring VMotion
Storage VMotion in vSphere 4 • Built-in to the Migrate Wizard • VMotion or Storage VMotion, not both at once • Can cold migrate both at once • Can reprovision (thin/thick) the disk while migrating (hot/cold) Topic 2: Storage VMotion
Dynamic Balancing / History • Dynamic balancing • Monitor VM, resource pool, and ESX host statistics • Balances and maintains resources for pools and VMs • DRS Recommendations of which VMs to migrate Topic 3: Distributed Resource Scheduler (DRS) Cluster
Resource Shares • Dynamic resource management • Only used if there is resource contention • Prevents a single VM from utilizing all the resources • Prioritizes specific VM resource usage during contention Number of Shares Equal (each has 25%) Changing Share Values(% varies on # of shares) 1000 Shares – 25% 2000 Shares – 22% Starting a VM changes resource allocation 1000 Shares – 11% 1000 Shares – 25% 2000 Shares – 20% 1000 Shares – 10% 2000 Shares – 22% 1000 Shares – 25% 2000 Shares – 20% 4000 Shares – 45% 4000 Shares – 40% 3 1000 Shares – 25% 1000 Shares – 10% Topic 4: Resource Pools and Monitoring Turning off VM changes resource allocation 2000 Shares – 22% 1000 Shares – 11% 2000 Shares – 22% 4000 Shares – 45% 1000 SharesTurned off
Expandable Reservations • Allow use of available parent resources when a Resource Pool’s Reservation for a resource has been reached • Maximum of up to 12 levels of resource pools allowed • Events that trigger Expandable Reservation use: • Power on VM • Create child resource pool • Change resource pool reservation • What is necessary to start VM67-1 below? 718 MB - 512 MB = 206 MB overhead 3 Topic 4: Resource Pools and Monitoring
Creating a Distributed Virtual Switch • Created in Inventory Networking Select which hosts are going to use this switch. Only unallocated NICs can be selected. A default Portgroup called dvPortGroup can be created. Topic 5: vNetwork Distributed Switches
Edit dvSwitch Settings Physical NICs can only be changed on the configuration tab of the ESX host. Topic 5: vNetwork Distributed Switches
Edit dvSwitch Policy Settings Security Policies can only be set at the Portgroup level The uplink ports always support trunking. VLAN tags are only placed on packets if VLAN are defined at the portgroup level. Filter what VLANs are allowed on this screen NIC Teaming can not be changed at the dvSwitch level Both outbound and inbound traffic shaping can be set at either the dvSwitch level or the portgroup level Topic 5: vNetwork Distributed Switches
Edit dvSwitch Port Group Settings Port binding defines when port numbers are assigned to a VM for use by Teaming policies Same options as Standard vSwitches Topic 5: vNetwork Distributed Switches
Create Host Profile • Host Profiles Screen or Hosts and Cluster Screen Topic 6: Host Profiles
Edit Host Profile Hosts attached to the profile are checked for compliance to the Configuration settings by default. Each configuration option can be set as fixed or to prompt the user for specific settings when the profile is applied such as hostname. Topic 6: Host Profiles
Create a Linked Mode Group • During the vCenter Install Process • After Install use the programs menu Topic 7: Linked Mode Group of vCenter Servers
Update Manager Baselines • Created for VM, VA, and Host patches • Choose which patches to apply • Patches are selected from the Patch Repository • Patch metadata must be downloaded prior to creating a baseline 6 Topic 2: Patching with Update Manager
Update Manager Tab • Integrated into Virtual Center for hosts and VMs • Attach a baseline to scan or remediate (patch) host or VM • Scans and patching can be run immediately or can be scheduled 2 Topic 2: Patching with Update Manager
Update Manager Remediation Defaults and Configuration Options • Guest Settings - Snapshot a VM prior to installing a patch, can auto delete the snapshot • ESX Host Settings - Maintenance mode failure options • Port Settings configuration 4 Topic 2: Patching with Update Manager
Update Manager Downloads • Schedule the download of patches • Repository Location • Set during Install • C:\Documents and Settings\All Users\Application Data\VMware\VMware Update Manager\Data (Default) • Configured After Install • Modify <patchStore> tag in C:\Program Files\VMware\Infrastructure\Update Manager\vci-integrity.xml file 2 Topic 2: Patching with Update Manager
Remediation • ESX Hosts use the Hosts and Clusters View • VMs use the Virtual Machines and Templates View Now Remediate a Host 8 Topic 2: Patching with Update Manager
ESX Upgrade using Update Manager • Use Host Upgrade option in New Baseline Wizard • Attach Baseline and Remediate as usual • Can be used to upgrade 3.x to 4.x ISO only needs to be uploaded one time per version 7 Topic 3: Upgrades and Migrations
VMware Ultimate BootcampTM Learn IT! Do IT! Know IT! 1 - Course Introduction and Methodology 2 - Virtualization Overview 3 - Planning and Installing ESX 4 - Using Tools to Administer a VMware Environment 5 - Configuring Networking 6 - Configuring Storage 7 - vCenter Server and Licensing 8 - VM Creation, Configuration, and Snapshots 9 - Security and Permissions 10 - Advanced ESX and vCenter Management 11 - Patching and Upgrading ESX 12 - Disaster Recovery and Backup 13 - Server and VM Monitoring 14 - Installing and Configuring ESXi
VMware HA in Action Virtual Machine A Virtual Machine B HA ESX Server VC Server Virtual Machine B Virtual Machine C Virtual Machine D HA ESX Server Virtual Machine A Virtual Machine E Virtual Machine F HA ESX Server 2 Topic 2: High Availability (HA)
Host Isolation • Network problems can create host isolation conditions • Two Isolation Response Choices • Power Off VMs so new host(s) can power them on or • Leave VMs Powered (locked) Virtual Machine A Virtual Machine B HA ESX Server Switch Virtual Machine B Virtual Machine C Virtual Machine D HA ESX Server Virtual Machine A Virtual Machine E Virtual Machine F HA ESX Server • VMware HA waits 15 seconds before determining host isolation • This interval is configurable in Advanced Options under HA Settings (das.failuredetectiontime = # of milliseconds, 15000 is the default) 3 Topic 2: High Availability (HA)
HA VM Monitoring • Will restart a VM if the VMware Tools Heartbeat is not seen for a specified period of time. 3 Topic 2: High Availability (HA)
Configure Virtual Appliance • Configure Network via Console or Web Interface • Login to console to change root password • Default password: vmw@re 1 Topic 7: VMware Date Recovery