Download
1 / 20
240 likes | 358 Views
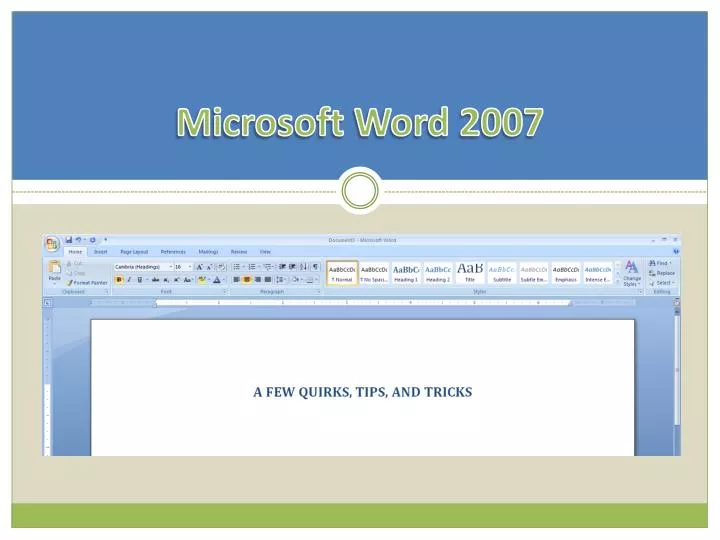
Microsoft Word 2007. For future reference…. These are Microsoft Word’s tabs:. Changing Margins. Click the “Page Layout” tab Click “Margins” Choose margins needed OR choose “Custom Margins…” if your margins needed are not listed Use the different arrows to change the margins Click “OK”.

E N D
For future reference… These are Microsoft Word’s tabs:
Changing Margins • Click the “Page Layout” tab • Click “Margins” • Choose margins needed • OR choose “Custom Margins…” if your margins needed are not listed • Use the different arrows to change the margins • Click “OK”
Adding Page Numbers • If adding page numbers to the header, do so before adding anything else to the header. Same applies if adding page numbers to the footer. • When adding page numbers, the header or footer (depending on the placement of the page numbers) will be empty except for the number. • After adding page numbers, the header or footer can be edited to contain other information, such as your last name or part of the title of your document. • Continue for how to insert page numbers…
Inserting Page Numbers • Click the “Insert” tab • Choose “Page Number” • Decide on the general location of page numbers (top, bottom, etc.) • Choose specific type
Formatting Page Numbers • Click “Insert” tab • Choose “Page Number” • Click “Format Page Numbers…” • Use the arrows to choose where the page numbering starts • Click “OK”
Editing Simple Headers & Footers • For many papers, especially MLA style, headers are simple (like the one pictured below) and can be added and/or edited simply by double clicking on the header region of the paper. • A dotted line will appear and you will be able to type in the header region. • The same applies to footers as well, and can be done even if the header/footer contains page numbers.
Using Word’s Built-In Headers • Click the “Insert” tab • Click “Header” • Choose your header • Headers can also be edited or removed under the “Header” drop-down menu
Word’s Built-In Footers All of the directions for headers applies to adding footers as well, except click “Footer” instead of “Header” in the “Insert” tab.
Hanging Indentations • Highlight citations • Right click the highlighted text • Click “Paragraph…” • Under “Special:”—click the arrow and choose “Hanging” • Click “OK”
A Few Key Shortcuts Left indent: Ctrl L Center indent: Ctrl A Right indent: Ctrl R Bold: Ctrl B Italic: Ctrl I Underline: Ctrl U Copy: Ctrl C Cut (removes selected text to be pasted elsewhere): Ctrl X Paste (inserts copied or cut material): Ctrl V Undo: Ctrl Z Redo: Ctrl Y Print: Ctrl P Open: Ctrl O Save: Ctrl S • To highlight a word, DOUBLE CLICK on it. • To highlight a paragraph, TRIPLE CLICK on it. • To highlight an entire document, use Ctrl A.
International Characters Here are a few of the most common ones… *For a longer list of Word 2007’s key shortcuts for international characters, go to: http://office.microsoft.com/en-us/help/HP012303781033.aspx
Inserting Symbols • Choose “Insert” tab • Then “Symbol” • Next, “More Symbols…” (unless your symbol is shown) • Find/click symbol, then “Insert” *Many international characters(accents, etc.) can also be found in the symbol menu.
Creating Tables • Click “Insert” tab, then “Table” • Highlight cells needed, then left click
Columns • Highlight all text you would like in columns • Click “Page Layout” tab • Choose “Columns” and the number or type of columns • Choose “More Columns…” if more than 3 are needed • Insert column breaks if necessary
Page or Column Breaks • Have portions of a document you want to start on a new page even if you make changes to the rest of the document? • Want your columns to start at a certain point even if you add information? • This can be done by adding breaks.
Page or Column Breaks • Click where the new page will begin • Click the “Page Layout” tab, then select “Breaks” • Choose “Page” • Column breaks: Click where new column would begin. Same directions as page breaks, but choose “Column”
Printing Only a Section of a Document • Highlight the portion of the document you wish to print • Either click the Office Button and select “Print” or press Ctrl P • Choose “Selection” • Click “OK”