Download
1 / 4
40 likes | 55 Views
The NPi-200 is designed to integrate into all hospital Electronic Medical Record (EMR) systems by interfacing through the hospital information technology (IT) infrastructure using the NeurOptics SmartGuard Reader. Please contact your IT department to identify the next steps required to integrate the NPi-200 into your hospital EMR system.

E N D
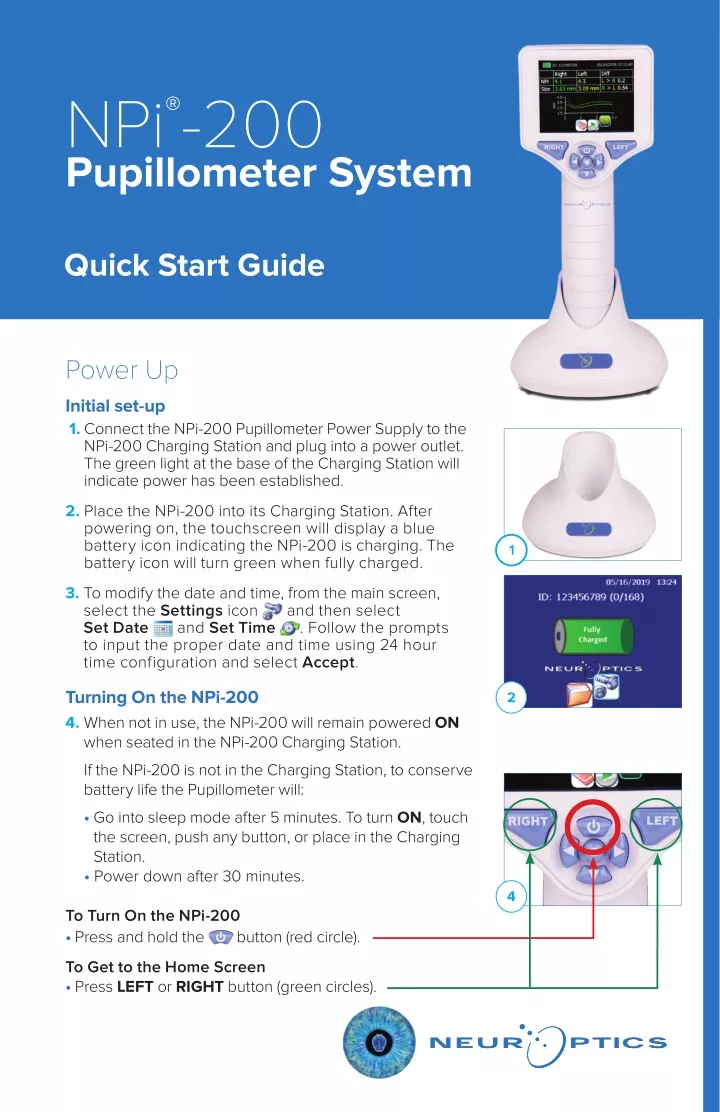
NPi Pupillometer System ®-200 Quick Start Guide Power Up Initial set-up 1. Connect the NPi-200 Pupillometer Power Supply to the NPi-200 Charging Station and plug into a power outlet. The green light at the base of the Charging Station will indicate power has been established. 2. Place the NPi-200 into its Charging Station. After powering on, the touchscreen will display a blue battery icon indicating the NPi-200 is charging. The battery icon will turn green when fully charged. 1 3. To modify the date and time, from the main screen, select the Settings icon Set Date and Set Time to input the proper date and time using 24 hour time configuration and select Accept. and then select . Follow the prompts Turning On the NPi-200 4. When not in use, the NPi-200 will remain powered ON when seated in the NPi-200 Charging Station. If the NPi-200 is not in the Charging Station, to conserve battery life the Pupillometer will: • Go into sleep mode after 5 minutes. To turn ON, touch the screen, push any button, or place in the Charging Station. • Power down after 30 minutes. 2 4 To Turn On the NPi-200 • Press and hold the button (red circle). To Get to the Home Screen • Press LEFT or RIGHT button (green circles).
Scan the Patient ID 5-6. Open a new SmartGuard® (Ex. 5). Gently squeeze the SmartGuard side tabs to position onto the NPi-200. There will be an audible click when the SmartGuard is properly positioned (Ex. 6). 5 6 7. For the first patient use, in order to properly input the patient ID into the SmartGuard, select either Barcode Scanner or Manual ID to indicate the patient ID entry method used. Pairing the NPi-200 to the Barcode Scanner 8. Connect the NeurOptics Barcode Scanner and Charging Cradle to the power supply and plug into a power outlet. Turn on the Barcode Scanner until an audible beep is heard and a blue light on the device flashes. Position the Barcode Scanner next to the NPi-200. 7 9. On the NPi-200, select Barcode Scanner. The NPi- 200 will display “Connecting...” on the touchscreen. 9 10. Once successfully paired, the touchscreen will prompt when the device is ready to scan the patient ID barcode. 11. The patient ID will now appear on the NPi-200 touchscreen. Confirm the patient information is correct and select Accept. 10 12. The NPi-200 will display the patient ID number and read “Ready to scan”. Manual Entry of the Patient ID 13. Press Manual Entry. Using the touchscreen, press the Patient ID. Select Shift to toggle from alpha to numeric (Ex. 13A & 13B) as required. When the patient ID number has been manually entered, check for accuracy and press Enter. 11 12 13A 13B
Measure Pupils 14. Position the NPi-200 with SmartGuard at a right angle to the patient’s axis of vision, minimizing any tilting of the device. 15 15. Press and hold either the RIGHT or LEFT button until the eye is centered on the touchscreen and the display shows a green circle around the pupil. Once the green circle appears, release the button, and hold the NPi-200 in place for approximately three seconds until the result screen is displayed. 16 16. Repeat the scan procedure for the patient’s other eye to complete the bilateral pupil exam. 17. When the bilateral pupil exam is complete, the NPi-200 measurement results will be displayed in green for the Right Eye and in yellow for the Left Eye. 18. Using the touchscreen or keypad, select page 1 (1/2) or 2 (2/2) to display the results of the pupil measurement parameters and pupillary light reflex waveform. 17 19. From the Results screen, select the Video icon to view the video playback of the reading. 20. The SmartGuard is designed for single patient use. To assist facility compliance with HIPAA guidelines, the patient data stored on each SmartGuard can be disabled once pupil exams are no longer required. To permanently disable the patient data on the SmartGuard, in the Settings menu press Disable SG and follow the prompts. Trend for Changes 18 20 21. To visualize the parameter trend display, use either the keypad or the touchscreen to select the Chart icon from the main screen of the NPi-200. Select the Down arrow on the keypad to view a trend display of the patient’s NPi and Size measurements. To trend additional parameters, select Trending Variables from the Settings menu, and choose the desired parameters to trend. 21
The Neurological Pupil index™ (NPi®) Pupil Reactivity Assessment Scale Measured Value* 3.0 – 4.9 < 3.0 0 Assessment Normal/“Brisk” Abnormal/“Sluggish” Non-Reactive, Immeasurable, or Atypical Response * NPi < 3 is considered an abnormal/ “sluggish” pupil assessment, per the Neurological Pupil index (NPi) algorithm. * A difference in NPi between Right and Left pupils of ≥ 0.7 may also be considered an abnormal pupil reading Upload into EMR The NPi-200 is designed to integrate into all hospital Electronic Medical Record (EMR) systems by interfacing through the hospital information technology (IT) infrastructure using the NeurOptics SmartGuard Reader. Please contact your IT department to identify the next steps required to integrate the NPi-200 into your hospital EMR system. Power Down To turn the NPi-200 off, select the icon from the main touch screen and confirm Yes. System Reboot As with any electronic device, the NPi-200 Pupillometer may occasionally require a system reboot. To reboot the NPi-200 Pupillometer, simply press and hold the until the pupillometer powers down. Place the NPi-200 into its charging station. Cleaning and Maintenance Isopropyl alcohol (IPA)-based cleaning solutions, in formula concentrations up to 70% IPA, are recommended for use in cleaning the NPi-200 Pupillometer and NPi-200 Charging Station. Please refer to the Cleaning and Maintenance Instructions included in the Instructions for Use, which can be found at NeurOptics.com. If the NPi-200 Pupillometer and NPi-200 Charging Station are not working properly, or are believed to have been damaged, immediately contact NeurOptics Customer Service at Toll Free North America: 866.99.PUPIL (866-997-8745), international: +1-949- 250-9792, or email: Support@NeurOptics.com. Ordering Information NPi-200 NPi®-200 Pupillometer SG-200 SmartGuard® BCS-CC-04-(1D or 2D) Barcode Scanner by Socket® SmartGuard® Reader (Please contact Customer Service to determine the specific reader compatible with the hospital requirements) button on the device SGR-01 For additional information regarding our product, please refer to the Instructions For Use, which can be found at NeurOptics.com. © 2019 NeurOptics, Inc. NeurOptics, NPi, Neurological Pupil index, SmartGuard, and SmartGuard Reader are all trademarks of NeurOptics, Inc. All rights reserved. Socket is a registered trademark of Socket Mobile, Inc., is a registered trademark of HID Global Corporation/ASSA ABLOY AB. All rights reserved. 23041 Avenida de la Carlota, Suite 100 Laguna Hills, CA 92653 | USA p: 949.250.9792 Toll Free North America: 866.99.PUPIL info@NeurOptics.com NeurOptics.com NPi200-Quick Start_RevJ_HOMA-A9VP25
