Download
1 / 31

E N D
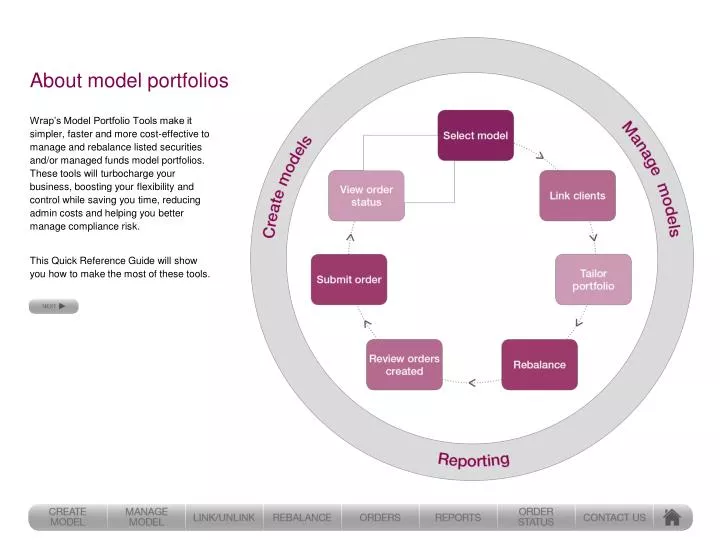
About model portfolios Wrap’s Model Portfolio Tools make it simpler, faster and more cost-effective to manage and rebalance listed securities and/or managed funds model portfolios. These tools will turbocharge your business, boosting your flexibility and control while saving you time, reducing admin costs and helping you better manage compliance risk. This Quick Reference Guide will show you how to make the most of these tools.
Creating models Create models using the Create Model page. Access the Create Model page by clicking My Business >> Models >> Create Model.
Creating models To create a model: Complete the model’s basic fields. Mandatory – Model name, Platform, Product type Optional – Short name 1, Short name 2, Description 1 Optional. Enter model level preferences if different from the defaults. (Minimum order value, Minimum holding value, Cash post-rebalancing). 2 1 3 2 Optional. Enter the percentage amount you wish to allocate to cash. 3 Add investments you wish to include by entering or searching for an ASX/APIR code. 4 To add multiple investments to a model, click the Add icon. A new row is added. 5 For each investment added to the model, enter an allocation amount between 0 and 100. Note: The Total allocated field must add up to 100%. 6 6 7 5 4 8 Optional. Add a tolerance (+/-) which will be used to determine the Tolerance range. 7 Click Save. 8 To import a model: To import a model, click the Import model button and follow the instructions on the Import model page.
Creating models Tips and considerations Models Models are a target portfolio to which clients holdings are then aligned. Your client’s portfolio is only updated when you submit orders. Creating models Only Advisers with ‘Full’ access can create models. Importing models You can import percentage allocations by downloading from CSV format and completing the Import template. Click the Import model button to download the Import template.
Managing models • Use the Manage models page to: • View a list of models that are available • View a model’s details • Edit or delete a model. • Access the Manage models page by clicking: • My Business >> Models >> Manage Models. 1 To edit or delete a model: Click the model’s name on the Manage models page. The View model page displays. 1 • Click on one of the following buttons: • Edit – the Edit Model page displays • Delete – the Delete Model page displays. 2 2
Managing models To edit or delete a model (cont.): Complete the appropriate details and then save your edits or confirm the delete. 3 3
Managing models To edit or delete a model (cont.): 3 Complete the appropriate details and then save your edits or confirm the delete. 3
Managing models Tips and considerations Editing and deleting models Only Advisers with ‘Full’ access can edit and delete models they have created. If you have do not have ‘Full’ access, you will not see the Delete and Edit buttons on the View model page and will only see models created by your Dealer Group (if any). Model allocations If you edit or a delete a model currently linked to clients, you should review your client accounts to see if updated model allocations are required. Print and download model information Click the Print icon to view, save or print model information as a PDF. Alternatively, click the Download icon to view, save or print model information as a CSV file.
Select a model and link clients • Use the Link / Unlink model page to: • Link one or more clients to a model or model blend • Unlink one or more clients from a model or model blend. • Access the Link/Unlink Model page by clicking: • My Clients >> Models >> Link / Unlink. • If not already selected, search for and select a client to link to a model or model blend. 3 1 2 Once you have selected a client, select a model from the Select model dropdown list. 1 To link or unlink a model to your client: 4 To link multiple models (ie blend), click the Add icon. A new row is added. To unlink a model, click the Delete icon. 2 For each model selected, enter an allocation amount between 0 and 100 in the Allocation field. Note: The Total field must add up to 100%. 3 Click Save. 4
Select a model and link clients Tips and considerations More details View a model’s details by clicking the View link. Deleted models When a model is deleted, all clients linked to the model will be delinked. Blended models with an allocation to the deleted model will need to be reviewed and amended.
Setting client preferences Once a client has been linked to a model, use the Set preferences page to set client preferences for rebalancing. Access the Set preferences page by clicking My Clients >> Models >> Set Preferences. To set rebalance preferences: Specify the minimum cash to be excluded from the rebalance, the remainder is included in a rebalance. 1 1 Include, exclude or lock client holdings in a rebalance calculation. 2 Specify minimum order and holding balances. 3 2 Set substitutions for model securities or managed funds. 4 Click Save. 5 3 4 5
Setting client preferences Tips and considerations Rebalancing Rebalancing is a calculation taking into account the current portfolio (not including any pending transactions), the target model and client preferences. Platform minimum balances The minimum cash balance for Wrap is $2,500. We recommend you set a higher cash allocation where required to accommodate price movements during the rebalance process. Lock: Locked holdings will be considered in the rebalance calculation with the constraints that no rebalance actions will be created that reduce the holding below the locked value. Exclude: Excluded holdings are not considered in the rebalance calculations. Wrap will not recommend selling the holding. If the same investment is included in the model, Wrap will recommend buying the investment increasing the total portfolio holding.
Setting client preferences Tips and considerations Setting substitutions Only Advisers with ‘Full’ access can set substitutions. If you do not have ‘Full’ access, you will not see the substitutions fields. Substitution 1 – Allocate to model: Proportionally distribute the selected security or managed fund’s model allocation to all remaining model investments in a client’s linked model(s). Substitution 2 – Another investment: Replace the nominated security or managed fund with another security or managed fund. Selecting this option requires an adviser to enter a valid ASX/APIR code in the Substitute code field. Substitution 3 – Cash: Replace the listed security or managed fund’s model allocation with an equivalent cash allocation.
Rebalancing and viewing saved rebalances Wrap allows you to rebalance multiple client portfolios at the one time. Once the selected portfolios have been rebalanced, the View rebalance page displays. This page displays the actions required to align the selected portfolios with associated models and preferences. To rebalance a single client’s portfolio: My Clients >> Models >> Rebalance. If required, you can filter those clients in or outside the tolerance ranges set at the model level.
Rebalancing and viewing saved rebalances To rebalance a set of client portfolios: Click My Business >> Models >> Rebalance. The Find clients to rebalance page displays. 1 Search for and build a list of clients to rebalance. 2 Select all the clients whose portfolios you wish to rebalance and then click Next. 3 2 If you select over 5 clients, a pop-up message will appear notifying you of the batch ID. Click OK and you will be directed to the Saved Rebalances page while your rebalances are being generated. You can continue to use the DeskTop while the rebalances are generating. 4 3 If required, you can filter those clients in or outside the tolerance ranges set at the model level.
Rebalancing and viewing saved rebalances To rebalance a set of client portfolios (cont.): If you selected less than 5 clients, you will proceed straight to the View rebalance page. Once the status of the rebalances changes to ‘Rebal ready’ you can select the batch to proceed to the View rebalance page. 5 5
Rebalancing and viewing saved rebalances To save a rebalance: You may want to save a rebalance if you need to obtain client consent or you might want to generate rebalances and then submit the orders at a later date, or when the market opens. Select the rebalances you wish to save and click the Save/Hide selected button on the View rebalance page. To view saved rebalances: To view saved rebalances for a single client: Click My Clients >> Models >> Saved Rebalances. To view saved rebalances for all your clients: Click My Business >> Models >> Saved Rebalances. You can search by client, batch ID or rebalance date.
Rebalancing and viewing saved rebalances Tips and considerations Default preferences If you do not set rebalance preferences for a client, we apply a set of defaults/minimums. Preferences impacting a rebalance Client preferences impacting a rebalance are marked with an asterisk (*). Investments included since last reblance Holdings added to a client’s portfolio since the last rebalance will automatically be included in the model. These holdings are marked with an exclamation mark ( ! ). If required, exclude or lock investments on the Set preferences page and rebalance again.
Rebalancing and viewing saved rebalances Tips and considerations Errors and Warnings Any errors and warnings relating to the rebalance calculation and the orders that are required will be summarised on the View rebalances page. You can view the details of the errors and warnings across all accounts to be rebalanced on the Create orders page. Warnings should be considered but will allow you to proceed to submitting orders. Errors needs to be corrected before orders can be submitted. Tolerance Range The ‘Within tolerance’ column flags which accounts are outside the tolerance range recorded as part of the model level preferences.
Creating orders Use the Create orders page to create orders based on actions generated in a rebalance. You can also review your clients’ current cash position on the Create orders page. Access the Create orders page from the View rebalance page by clicking Next. To create orders: Review orders generated from a rebalance. 1 If necessary, you can click on the Edit link in the detailed orders column to delete any orders or amend order details such as units, price type, amount, etc. Alternatively you can amend the client preferences and generate a new rebalance. 2 2 1 3 Click Next. 3
Creating orders Tips and considerations Orders Orders are created based on the saved rebalance and do not consider changes to the portfolio, or market prices in the intervening period. Estimated prices View the latest market price for listed security orders and the last redemption price for managed fund orders in the Est. Price column on the Edit orders pop-up. Listed security trades The default is for listed security trades to be placed ‘at market’. You can amend this to ‘at limit’ before submitting on the Create orders screen by clicking Edit in the Detailed orders column. Access to market information Access Market Depth and Market Company Information while creating orders. Estimated consideration Wrap automatically calculates the estimated consideration for each order using current market prices. View your client’s current cash position Use the Cash Summary section to view your client’s current cash position.
Submitting orders and viewing receipts • Use the Review and submit page to: • Review orders created • Submit orders for your clients. To submit orders: Review all orders. If necessary, go back to the Create orders tab and delete any orders or amend order details. 1 Review all disclaimer information. 2 Tick the confirmation checkbox and enter your password. 3 1 Once orders have been submitted, the Receipt page displays. Use the Receipt page to view the orders submitted for your clients. Click Submit orders. 4 2 3 4
Submitting orders and viewing receipts Tips and considerations Queuing The potential proceeds from listed security sell orders are considered when validating cash. If sale proceeds are required to fund a listed security buy order, the order can be queued and automatically submitted if funds become available on the same day. Real time cash updates As soon as a listed security sell order has traded in the market, the proceeds from the sale can be used to fund a listed security buy order.
Using the Model overview report Use the Model overview report to view a list of models available to use and view the number of clients linked to a model. Access the Model overview report by clicking My Business >> Reports >> Model Overview. To create a Model overview report: 1 Complete the Search criteria section. The more search criteria completed, the more specific the search results. 1 2 Click Show report. A list of models matching the search criteria displays. 2
Using the Model overview report Tips and considerations Search for models containing a specific investment Complete the Investment field and click Show report to view a list of models containing a specific investment. View model details View model details by clicking a model’s name. Link to Clients in models Click on the Clients linked to model link to view a list of clients linked to the model.
Using the Clients in models report Use the Clients in models report to view a list of clients linked to a particular model. Click a model’s name to view details of the model. This report is useful in identifying impacted clients if a model is edited or deleted. Access the Clients in models report by clicking My Business >> Reports >> Clients in Models. 1 To create a Clients in models report: Complete the Search criteria section. The more search criteria completed, the more specific the search results. 1 2 Click Show report. A list of clients matching the search criteria displays. 2
Using the Clients in models report Tips and considerations Model allocations View clients marked with an asterisk (*) whose model allocations do not add to 100%, need to be reviewed and amended. Clients linked to Blended models View model details by clicking a model’s clients linked to more than one model (Blended models). Last orders submitted View which clients you have recently rebalanced and traded for. Clients in models Filter the list to see which clients are in or not in models.
Viewing order status information • View order status information on the Order Status page. This is an important page for monitoring the status of all your orders. • Use the Order Status page to: • View order status information for a single client or for all your clients • Action an order (amend, cancel, submit). 1 To view order status information for a single client: 2 Click My Clients >> Order Status >> Order Status The Order status page displays 1 Complete the search criteria fields and then click Search. A list of orders matching the search criteria displays. 2
Viewing order status information To view order status information for all your clients: 3 Click My Business >> Order Status >> Order Status The Order status page displays 3 Complete the search criteria fields and then click Search. A list of orders matching the search criteria displays. 4 4 To action an order: Click the Amend, Cancel or Submit links in the Action column.
Viewing order status information Tips and considerations View listed security and managed fund orders The Order Status page contains both listed security and managed fund orders. Pending listed securities orders It is important to monitor and submit pending listed securities orders. View a client’s cash position Click a client’s name to view their current cash position. Search by status You can use the Status search field to easily find orders that require attention (eg Search for any Incomplete or Pending orders).
Not all model portfolio functionality may be available to advisers operating under a badged arrangement. To change your current access permission, please contact your badge head office or, for further information, contact Wrap Adviser Relations on 1300 360 899. BT Portfolio Services Ltd ABN 73 095 055 208 (BTPS) operates Wrap and administers SuperWrap. BT Funds Management Limited ABN 63 002 916 458 (Trustee) is the trustee and issuer of SuperWrap ABN 39 827 542 991. This document has been prepared for use by advisers only. It must not be made available to any retail client or attributed to BTPS or the Trustee. This document or any of the information contained within it must not be copied, used, reproduced or otherwise circulated without the prior written consent of BTPS. 11486A-0414ms