Download

1 / 36
360 likes | 507 Views
Monday, Nov. 1 White Balance. We live in a rainbow of colors. You may not notice this rainbow, but it’s there. Every scene features objects illuminated by light that’s slightly blue, green, pink, orange, yellow, or another color.

E N D
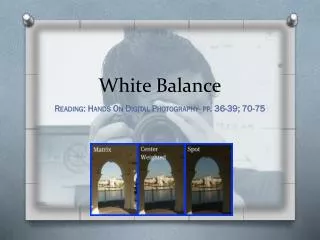
Monday, Nov. 1 White Balance
We live in a rainbow of colors. You may not notice this rainbow, but it’s there. Every scene features objects illuminated by light that’s slightly blue, green, pink, orange, yellow, or another color. Contrary to what we seem to see, light is rarely crystal clear and colorless. We only think the light is colorless because, when we view such scenes, our eyes naturally compensate for the various colors of light, without even thinking about it.
Our cameras, on the other hand, don’t have it so easy. White balance is a terrific new tool for digital photographers that give your photos more accurate and pleasing colors by matching the way the camera captures them to the color of the light.
You might wonder why this control is called white balance. Years ago, a video camera had to be told what neutral was so that it could balance colors to the light. Videographers would point the camera at a white card and set a control that would tell the camera to make the white a true white.
When to use Auto White Balance Your camera comes with the ability to automatically make adjustments to get rid of color casts, and to make neutrals such as white, gray, and black truly neutral. This is called auto white balance, and is often shown as AWB on your camera. This is the default setting of your camera and works well in many situations, sometimes it does not work as well as you would like. You need to know what it can and cannot do if you want the best from your colors.
Auto white balance is simple. The camera analyzes a scene and tries to figure out what the light is doing to colors. Then it creates a setting for the camera that attempts to make colors look accurate, and to show neutrals without color casts. AWB can cause problems with sunrise and sunset Your camera’s white balance system has no way of knowing that a sunrise or sunset is supposed to have a warm color cast to it. It just sees that all the neutral tones have color in them, and so it removes some of that color and takes some of the life out of the scene. AWB works in most light A good thing about AWB is that it works in most light. You can go from inside with fluorescent lights to outside sunlight, and expect to get reasonable colors with your camera. AWB can be inconsistent A problem with AWB is that it can give inconsistent results. For example, when you zoom from wide to telephone, the camera may see different colors in the background and think that the light has changed. It then adjusts white balance when it should keep it constant.
Your camera comes with a group of preset, defined white balance settings. Even the most inexpensive cameras typically have these controls that take the camera off of AWB, but most photographers do not know that they exist. Sometimes they are in a menu, sometimes they are accessed directly by a WB button. These settings define the response of the camera to a specific color of light, although they can be used in other conditions for creative effect as well. They can really help you get better color.
Daylight • Shade • Tungsten • Cloudy • Fluorescent • Flash • Custom
Daylight This is the setting appropriate for most outdoor situations. It balances the colors using the temperature of sunlight as it standard.
Shade This setting acts much like a warming filter, adding a bit of red to a scene. The shade setting will help you bring images made in shaded lighting conditions back to a more natural daylight look. Top image used Florescent and Bottom image used Shade
Tungsten. The Tungsten setting takes care of the overly yellow/orange casts that often occur in images made indoors without a flash. This is good when the scene is illuminated by tungsten, incandescent, or halogen lights (the kinds of bulbs found in most household lamps)
Cloudy. The cloudy setting adds a little bit of warmth to an image made on an overcast day. Some photographers shoot with the Cloudy setting all the time, to give every photo an extra bit of warmth. – Be careful about doing this. IT is much better if you actually think about it first and only use this setting when the light appears to be too cold.
Fluorescent This setting may come in handy if you shoot in stores and other commercial locations where this kind of light is used. Most of the time, the indoor lighting you encounter around the home will be tungsten. But if you images look greenish, or you notice a lot of neon-type bulbs about, try the Fluorescent setting.
Flash This is a very nice setting for when you’re forced to use flash as your light source indoors. The flash setting warms up your subject, effectively eliminating the bluish cast that often occurs with this light source.
Custom Usually used by professionals. Custom white balance allows you to measure the white point from a white sheet of paper and then use this white as your standard, setting the camera to use this temperature for a series of images.
Using White balance creatively You can use white balance settings for creative control that goes beyond simply making colors look more natural. You can choose presets that seem to be completely alien to conditions, just for their effects. There is no rule that you have to use the Daylight setting with daylight (no white balance police will arrest you if you use something different)
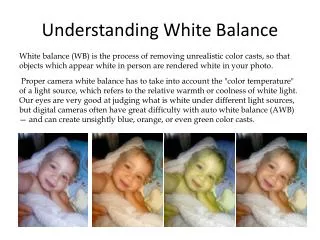
Top Row L – R : Auto White Balance Setting, Daylight, CloudyBottom Row L – R: Tungsten, Fluorescent, Flash (the setting, no flash used)
Experiment with White balance Just to see what is possible, take a series of pictures of the same scene, but with the white balance set to a different setting for each shot. Use the Cloudy Setting for Sunsets Sunset photos are supposed to have rich, warm colors. Digital cameras give much weaker interpretations of sunset unless you choose a specific white balance setting. The Cloudy setting always gives richer sunsets than AWB.
Try the Daylight settings at Night You can get neutral looking colors that disappear by using Sunlight setting. Create blue effects with Tungsten Tungsten settings are designed for shooting with artificial light, not for daylight. This means that you can get unusual, often striking colors by using Tungsten for daylight. It turns daytime scenes blue. With a little underexposure, you can even make them look like night.
For this assignment, I want you to photograph your subject of choice first using Auto White Balance and then again using another white balance setting of your choice that you feel better captures the emotional impact of the scene. Please label each image with the appropriate white balance setting you use Technique Creativity Camera Mechanics Composition Viewpoint and lighting
For this assignment, each shot will be evaluated individually on the merits of: Technique: Have you captured the essence of the assigned shot? Do your shots demonstrate appropriate camera settings relative to the shooting situation? _____/20 Points Creativity: Have you clearly represented the theme – either through literal or symbolic interpretations? Does your text provide a link between image and concept? _____/20 Points Camera Mechanics: Does the image demonstrate appropriate and competent use of camera functions and settings? _____/20 Points Composition: have you employed compositional considerations in the image? Does your image have a “focal point”? Have you maximized your compositional space providing a sense of balance and continuity? _____/20 Points Viewpoint and lighting: Have you maximized camera angle and setting to get the “most” out of your subject. Have you demonstrated thoughtful consideration of lighting? Have you made appropriate choices regarding white balance? _____/20 Points
Monday, Nov. 1 Architecture
Architectural Photography Architecture is a broad subject, and one that surrounds us on a daily basis. It comes as no surprise then that it is also a very popular topic in photography. But despite its diversity there are a number of simple rules that apply in most situations, or will at least get you thinking more deeply about how you can best portray a particular piece of architecture.
Old architecture looks best with a simple composition. When photographing old architecture, a straightforward and simple composition usually works best, showing the natural beauty and elegance of the building. It usually helps to include some of the surrounding scenery to give context to the architecture and make it feel less cramped.
Use a more abstract style for modern architecture. When photographing modern architecture you can get away with using a much more modern, abstract style. Experiment with wide angle lenses to produce extreme perspective, or photograph the building from unusual angles. Also, because modern buildings are often squeezed in very close to one another, you can crop in tightly on the building without making the photo feel unnatural.
Include some scenery to put your architecture in context. The question of whether to show your building's surroundings depends on the situation and the message you want to convey. Ask yourself whether putting your building in context would add to or detract from the photo. If the scenery compliments your building then shoot a wider photo, but if the surroundings don't fit with the message you want to convey, cut them out.
Side-front lighting usually produces the best architecture photos. It provides plenty of illumination and also casts long, interesting shadows across the face of the building, making its surface details stand out and giving the building a more three-dimensional look.
Some buildings really come to life at night. Even the most boring architecture can come alive at night - in fact many modern buildings and city centers are designed specifically with night time in mind. After dark these buildings are lit by dozens of lights which bring color and vibrancy, and cast fantastic shadows across the face of the building. When photographing architecture at night be sure to use a tripod and set your camera to its lowest ISO setting to reduce digital noise to a minimum.
Most architecture is covered with small-scale details which make fascinating photos in their own right - from ornate windows to patterns of rivets to decorative cornices. Be on the lookout for these details and crop in tightly on them for a more intimate photograph that conveys the character of the architecture.
When photographing architecture it is easy to get stuck in the mindset that “architecture equals buildings”. Of course this couldn't be far from the truth, and in fact most man-made structures come under the architecture umbrella - bridges, towers, windmills, monuments, and even lamp posts. See if you can find some interesting photos that most people would miss.
For this assignment, each shot will be evaluated individually on the merits of: Technique: Have you captured the essence of the assigned shot? Do your shots demonstrate appropriate camera settings relative to the shooting situation? _____/20 Points Creativity: Have you clearly represented the theme – either through literal or symbolic interpretations? Does your text provide a link between image and concept? _____/20 Points Camera Mechanics: Does the image demonstrate appropriate and competent use of camera functions and settings? _____/20 Points Composition: have you employed compositional considerations in the image? Does your image have a “focal point”? Have you maximized your compositional space providing a sense of balance and continuity? _____/20 Points Viewpoint and lighting: Have you maximized camera angle and setting to get the “most” out of your subject. Have you demonstrated thoughtful consideration of lighting? Have you made appropriate choices regarding architecture? _____/20 Points