Download
1 / 52
520 likes | 595 Views
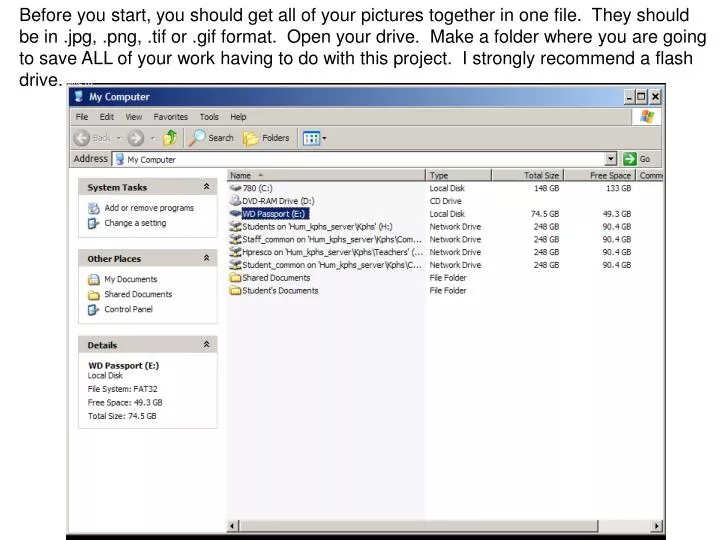
Before you start, you should get all of your pictures together in one file. They should be in .jpg, .png, .tif or .gif format. Open your drive. Make a folder where you are going to save ALL of your work having to do with this project. I strongly recommend a flash drive.

E N D
Before you start, you should get all of your pictures together in one file. They should be in .jpg, .png, .tif or .gif format. Open your drive. Make a folder where you are going to save ALL of your work having to do with this project. I strongly recommend a flash drive.
Right click choose new – folder. Name it geography project or something of that nature – this is where you are going to save all of your project files.
Open power point – start – programs – Microsoft office PowerPoint 2003 – minimize. Open the internet.
To make a power point slide – get a picture from the internet. Example – this is Google images.
Choose this layout – it is easiest to use. Pull the corners to resize. Then return to the internet to get the URL (web address)
Right click – copy the URL (web address). Note that this does not say Google images. The place you are redirected to is the URL. If yours says Google images, yahoo images, etc. You did it wrong – talk to your teacher.
Right click – paste. Then reposition it. It should not be bigger than 12 point (font size) – put it at the bottom of the slide.
Name the file. Create a slide for each of your pictures. When you are ready – file – save as – Choose the folder that you made for this project!!!!
R:123456 choose drop down menu titled save as type – choose jpeg file interchange format (*.jpg) then choose save.
Choose every slide. If you have done this, and have simply added a new slide – choose current slide only (make sure you are on the slide you want to make into .jpg)
It will tell you that each slide has been saved into the folder – and where it saved it. If you followed the directions it should be in your network folder. Now you are ready – you have all your pictures together.
http://presentationsoft.about.com/od/powerpointfaqs/f/what_is_wmm.htmhttp://presentationsoft.about.com/od/powerpointfaqs/f/what_is_wmm.htm Also a great place for help on Movie Maker! Download for free.
Collections view - A list of all imported components for your movie - photos, videos or sounds The Preview Screen Movie task view – Links to the various tasks to create your movie Timeline or Storyboard View - All parts of your movie, whether photos, videos or sounds are dragged to this area. What movie maker looks like when you open it.
Note - Clicking the Show Storyboard link returns you to the Storyboard view. This link will then read Show Timeline. Clicking on the link Show Timeline returns this area to the Timeline view. You will use both views during the creation of your movie.
Steps to Import Pictures • Click on the Capture Video link to open the list of options. In this example we will be using still pictures • Click on Import pictures and locate the folder containing your pictures. ALWAYS KEEP YOUR PICTURES IN THE SAME PLACE!!! IF YOU MOVE THEM YOU WILL CONFUSE THE PROGRAM. I HIGHLY SUGGEST A FLASH DRIVE (USB DRIVE) • Select the picture files you wish to import. • Tip - To select several picture files which are listed consecutively, click the first filename in the list, and then while holding the Shift key, click on the last filename in the list. This will select all the files at once to import. • Similarly, to select several files that are not in consecutive order, hold the Ctrl key rather than the Shift key and then click on the different filenames you wish to import.
Your pictures should now appear in the Collections view. Click on the different pictures to see them in the preview window.
Drag your pictures to the Storyboard area of the window. The Storyboard is where you will build your movie. Notice that after you drag your picture to the Storyboard, it still remains in the Collections view. You can use the same object many times in your movie if you wish.
Before you proceed any further, you should save your project. It is a good idea to do this frequently throughout the movie making process. From the main menu, choose File > Save Project. Windows Movie Maker saves the project in the file format .MSWMM which allows for editing at a later time. When your movie is complete, you have additional options for saving the file, so that it may be played in a webpage or emailed, for example. These other options do not allow editing, so it is important to save your working file in the Movie Maker project format. Important - Make sure that all components of this project are saved in the same folder. USB drives work best, but you have to make sure not to lose your USB drive.
Save into your folder on the network or your USB drive Name your movie
Adding a video clip • Use united streaming…. It is easy. • Any other source – you are on your own.
Username: kparkstudent. Password: student http://streaming.discoveryeducation.com/ search for your topic
Choose DE Streaming and Video Segment (short clips). Video can not be more than 30 seconds from another source. Videos you personally made can be longer.
Press play…. Let it buffer….. Save as….. Put it in your folder with your other stuff for this project!!!! Should be a .wmv file.
Import a Video Clip into Windows Movie Maker • You can import a video clip into a brand new Windows Movie Maker project or add a video clip to an existing movie in the works. • Important - Make sure that all components of this project are saved in the same folder. • In the Tasks pane on the left side of the screen, click on Import video under the Capture Video section. 3. Navigate to the folder that contains all the components of your movie. 4. Click on the video file you wish to import. Such file extensions as AVI, ASF, WMV OR MPG are the most commonly selected video types for Windows Movie Maker projects, although other file types can also be used. 5. Check the box to Create clips for video files. Videos are often comprised of many small clips, which are marked by the creating program when the file is saved. These smaller clips are created when the video process is paused or there is a very obvious change in the filming. This is helpful to you, as the video editor, so that the project is broken down into smaller, more manageable pieces.Not all video files will be broken into smaller clips. This depends on which file format the original video clip was saved as. Checking this box to create clips for video files, will separate the imported video clip into smaller clips, if there are obvious pauses or changes in the original video clip. If you choose not to select this option, the file will be imported in as a single video clip.
Preview the Video Clip in Windows Movie Maker • Click on the new video clip icon in the Collections window. • Preview the imported video clip in the preview window It should look something like this……
Drag Imported Video Clip to Storyboard Now you are ready to add this imported video clip to the movie in progress. Drag the video clip icon from the Collections window to the desired location in the storyboard. Note - If you wish to place the video clip in a location that already contains another object, such as a still picture, simply drag the imported video clip just before the other object on the storyboard. This will insert the video clip before that object.
Before you proceed any further, you should save your project. It is a good idea to do this frequently throughout the movie making process. From the main menu, choose File > Save Project. Windows Movie Maker saves the project in the file format .MSWMM which allows for editing at a later time. When your movie is complete, you have additional options for saving the file, so that it may be played in a webpage or emailed, for example. These other options do not allow editing, so it is important to save your working file in the Movie Maker project format. Important - Make sure that all components of this project are saved in the same folder. USB drives work best, but you have to make sure not to lose your USB drive.
Import an Audio File • Any music, sound file or narration file is known as an audio file. • Steps • Under the Capture Video link, choose Import audio or music. • Locate the folder containing your audio file. • Select the audio file you wish to import. • Once the audio file is imported, you will notice the different type of icon in the Collections window.
Move the blue line to where you want to start the music. Drag the music down to the spot.
Narration is the most important part of your project. You need to thoroughly explain your topic. If you want to have music and narration in the same place – you will have to use audacity or some other audio editing program. Then you drag it into the timeline.
Insert transitions between pictures and video clips – play with them.
Make sure you browse for the correct location for your movie. Realize the completed video can not be changed…. So, make sure you saved the working file before you make your movie!!!!