Download
1 / 12
120 likes | 292 Views
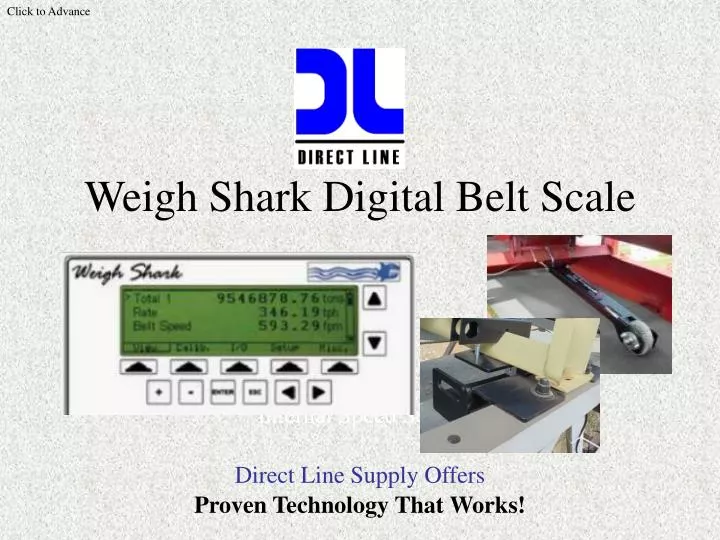
Click to Advance. Weigh Shark Digital Belt Scale. Internal Speed Sensor. Direct Line Supply Offers. Proven Technology That Works!. Weigh Shark Digital Belt Scale. Click to Advance. Easy Installation… Mounts to any width CEMA idler. No holes to drill.

E N D
Click to Advance Weigh Shark Digital Belt Scale Internal Speed Sensor Direct Line Supply Offers Proven Technology That Works!
Weigh Shark Digital Belt Scale Click to Advance • Easy Installation… • Mounts to any width CEMA idler. • No holes to drill. • Installation in just a few minutes to customers idler. • Simple Calibration • Calibration is done via instructions that appear on Large Graphical Display (5.25” x 1.5”). • Simple Step –by –Step instructions through the calibration process. • Speed Sensor mounts to any adjacent idler via special “tri-fold” bolt. • Large oversize NEMA 4x fiberglass enclosure with lockable latch. Standard Features Include • * 4 Inputs: Remote Clear, Print Ticket, etc. • * 4 Outputs: Under / Over Speed, Rate or Tons, Pulse per Ton, etc. • * 4-20 mA Output (16 bit): Chart Recorder, Production Control, etc. • * Accepts 110/220 VAC and 12-24 VDC • * Power Protection both Under and Over (85 to 264 VAC) • * RS 232: Printer, etc. RS 485: Printer, Auxiliary Equipment, etc. • * Ethernet: PLC, PC, Remote Display, HTTP Web Server • * 1 Year Limited Warranty The Weigh Shark Integrators have patented “State of the Art” Features, Functions, & Options That no other can offer.
Click to Advance Accurate and Reliable Repeatability * Solid steel construction with durable powder coating for protection. * Heavy Duty Steel Load Cells temperature compensated for accuracy during wide temperature ranges. * High speed processor and surface mount circuitry components for long reliable operation. Models: * Model 250 (Typically up to 750 TPH)* Can be interchanged between belt widths up to 750 TPH * Model 500 (Typically above 750 TPH)* Can be interchanged between belt widths above 750 TPH Calibration is divided into two categories. A) Auto Zero B) Span Calibration The menu driven display will take you step by step through both processes and instruct you on what is taking place during the process and what to do next.
Click to Advance Auto Zero 1. The first step of calibration is to weigh your empty belt and idler This step will tare off the weight of the belt and the idler so the scale only weighs material on the belt. 2. Push the arrow key located under “Calib.” to select this calibration process. 3. The main calibration screen will appear. An arrow will point to “Zero Test – Press Enter” 4. Mark the belt or use the belt splice as your reference. Follow the instructions on the display 5. Press the Arrow under ENTER when your empty belt passes a reference point start to measure and weigh your belt. The display will show you information during this step. Watch your belt make one (1) revolution and press the arrow under END after completion of this one revolution. 6. The screen will automatically change. It will show Belt Length (feet), Old Zero Value and New Zero Value. It will instruct you to press the arrow under APPLY. This will establish your Auto Zero value. The screen automatically goes back to the main calibration screen. Auto Zero is now Complete
Click to Advance Span Calibration In this step you are going to put a known amount of weight on the belt scale to calibrate the scale. You will put your test bar through the holes in the “V” blocks that secure your idler to the scale. You will place weights on each end of the bar. It is important that you are accurate with your test bar and weights value. 1. Use the down arrow key located to the right of the display to move the cursor arrow (>) down to the next line. “Span Test – Press Enter”. 2. Press ENTER 3. The screen will automatically change and instruct you to “Press START to perform a Span Calibration. 4. Press the arrow under START to start your process. 5. The screen will change and ask you to “Verify the Idler Span”. (If your idlers are on 4 foot centers….. you have a “Span” of 8 feet) ! 6. The screen will instruct you to Press NEXT to continue or Press EDIT to Change. The Idler Span value defaults to 8.00 feet. If you need to change this value, press the arrow under EDIT. 7. To EDIT, press the ◄ or ► Arrow keys to move the cursor to activate the cell you wish to change. 8. Use the + and - keys to change the value up or down. 9. Press the arrow under NEXT to continue.
Click to Advance 10. The screen will change and ask you to “Verify the Test Weight” value. Again you can accept the default value (100 lbs) NEXT or select EDIT and change the value. Enter the total weight of your test bar and weights. (if you are going to run a material test to calibrate your scale…. You can skip these steps…… Press EXIT….Catch material and follow the instructions on the next page …”Material Test” 11. When you press NEXT the screen changes and reads: “Install Test Weights on the scale. When safe, run the belt empty.” INSTALL YOUR TEST BAR AND WEIGHTS through the holes in the “V” Blocks. 12. Start up your conveyor with the belt running empty. Press the arrow under NEXT to start. Since we previously measured your belt, you can start this process at any time and do not have to wait for your reference mark or splice. 13. The screen will again automatically change to show you that the Span Calibration process is taking place. It will show you how many revolutions and feet remain during the test. Since you measured the belt length during the Auto Zero calibration process we know your belt length and count down feet during this step. 14. When the Span Calibration process is complete the display will show you “Actual Accumulation” and “Calculated Accumulation”, “Old Span” and “New Span” and “Difference” (% Error). You want to correct the error. 15.Press APPLY to correct your error. Calibration is Complete ! • We suggest you run the SPAN CALIBRATION process with your test weights 2-3 times. Each time you will see the difference between the Old Span and New Span is smaller thus having a greater degree of accuracy with repeatability.
Click to Advance Weigh Shark Integrator Specifications “MATERIAL TEST” • We also suggest if possible that you verify the accuracy vs. a legal for trade truck scale. Catch material and write down the Belt Scale total and the Truck Scale total….then a) Press ? under “Calib.” b) Use ?at right of display to bring the cursor down to the line SPAN. c) Press ENTER d) You will want to Increase the SPAN if the scale was light and Decrease the SPAN if the scale was heavy. New SPAN = (Truck Scale Wt. / Belt Scale Wt.) X Old SPAN (Multiplier you use to calculate your new SPAN number) IE: If you wish to make the SPAN larger by 12% …. You take your existing SPAN number x 1.12….. If you wish to make your SPAN smaller by 12%, you take your SPAN number x .88. e) Press ?under EDIT. A line will appear under the last number in the New Span: line. f) Use the + or – buttons to change the number. Use the ? to move to the next number to the left and again use the + or – button to change that number. Continue until you have entered in the complete number. g) Press ?under APPLY to accept your changes. h) Press VIEW a couple times to go back to the default screen. 14 Totals There are four (4) independent totals. Each can be viewed and cleared separately. Each has its own Production Screen. It can be viewed and printed (with optional ticket printer). Daily Total: This total is displayed on the default screen. It shows your accumulating total. If you wish to clear off this total, press the ENTER key while the cursor is pointing to the “Daily Total”. This will access your Production screen.
Click to Advance Press arrow button below CLEAR to clear off this total. Press the ESCAPE button or EXIT to go back to your default screen. Scroll down (using ? key located on right of faceplate) 4 times to place the cursor in front of the “Weekly Total”. Weekly Total: This is also an accumulating total for you to use. You can view the Weekly Total production screen by pressing ENTER. Monthly Total: This accumulating total is located next and can be cleared by pressing ENTER to go to its production screen. Yearly Total: Located on the next screen. Just press the down arrow key to move your cursor to this line. Enter will access the production screen. Any of your Totals can be printed while viewing the Production screen. Also you can customize your ticket for your specific applications.
Ticket Printer Option Our thermal ticket printer is housed in the same high quality NEMA 4x enclosure with window and lockable latch as our Weigh Shark electronics. The ticket printer will print individual tickets on demand or automatically when using the Truck Load Out System option. You can easily customize the ticket 2 header lines and 2 footer lines to print your company information or message. Weigh Shark control allows entry of your information and selection if you want the ticket to show current or current / previous information. Time and Date are automatically printed on every ticket. Weigh Shark Automatic Angle Compensator Option This great option bolts to your conveyor frame. It measures the conveyor angle and advises the electronics when elevation changes. Simply install the AAC, wire it to the control box, turn on the feature, and calibrate the scale. The scale will remain calibrated as elevation changes..... great for stackers and portable equipment that is moved.
Weigh Shark Remote Display The remote display uses ethernet communication protocol to communicate with up to 32 individual Weigh Shark scales on the network. Each scale is given a unique IP address. The display will show information for all scales by scrolling process or you can stop scrolling to monitor selected scales on the display. You can also view ALL scales on the network in the Multi-Scale View Mode. Remotely clear totals selectively or all. Assign the remote display a unique address and you can view all scales LIVE via your PC using Internet Explorer. If internet access is available, all scales can be viewed via Internet Explorer. A PC does not have to be connected to the network at the scales. There is no special hardware or software required. Scales can be added to the network at any time. You can import XML files directly into Excel to allow you to create spread sheet files, graphs and charts for reports. For the Ultimate in Production Control and Accountability For single applications or multiple applications for one plant or many plants across the nation in real time charts or graphs
Weigh Shark Truck/Rail Load Out System Truck / Rail Load Out System: Use either our 6 inch monochrome or color touchscreen with special software to automatically load trucks or rail cars. Housed in the same NEMA 4x enclosure w/ window and lockable latch as our Weigh Shark electronics. Follow simple Step-by-Step instructions on the touch screen. Enter your desired Target Weight on the numeric touch pad. Start your conveyor. And watch as we show the loading progression as loading is taken place. When the target weight is reached, our scale outputs will automatically stop the load out procedure and display the truck / rail car load is complete. You can print a ticket for each load with the optional ticket printer. You can also view a summary of your loads telling you the number of trucks / rail cars, Total Tons, Average Tons, Fill Time, Average Rate and more.
Click to Advance • Single Weigh Shark Digital Belt Scales achieve & maintain .5% Accuracy • Dual Weigh Shark Digital Belt Scale achieve & maintain .25% Accuracy • Call 800-940-4044 or Fax 800-845-6787 Guaranteed For the Ultimate in Production Control and Accountability For single applications or multiple applications for one plant or many plants across the nation in real time charts or graphs