Download
1 / 12
120 likes | 165 Views
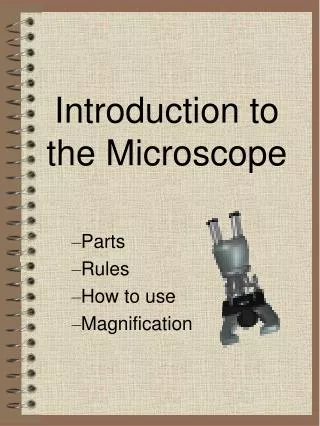
EYEPIECE: 10x. BODY/EXTENSION TUBE. COARSE ADJUSTMENT. FINE ADJUSTMENT. REVOLVING NOSEPIECE. ARM. STAGE CLIPS. OBJECTIVES. STAGE. INCLINATION JOINT. DIAPHRAGM. MIRROR (LIGHT SOURCE). BASE. ALWAYS CARRY THE MICROSCOPE WITH ONE HAND ON THE “ARM” AND THE OTHER HAND ON THE “BASE”. ARM.

E N D
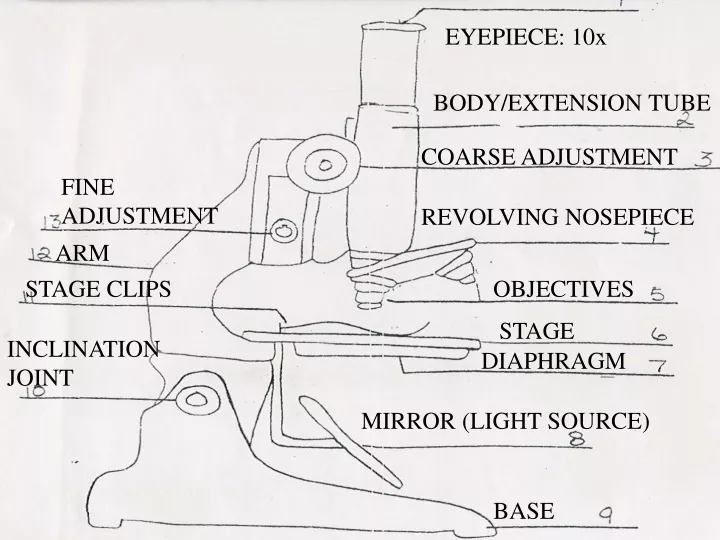
EYEPIECE: 10x BODY/EXTENSION TUBE COARSE ADJUSTMENT FINE ADJUSTMENT REVOLVING NOSEPIECE ARM STAGE CLIPS OBJECTIVES STAGE INCLINATION JOINT DIAPHRAGM MIRROR (LIGHT SOURCE) BASE
ALWAYS CARRY THE MICROSCOPE WITH ONE HAND ON THE “ARM” AND THE OTHER HAND ON THE “BASE” ARM BASE
MICROSCOPE “e” LAB MAKING A WET MOUNT SLIDE -Place the cut-out “e” onto your slide -Place one drop of water onto of the “e” on the slide -Holding a clean coverslip by the edges at one side of the drop of water, place it down, lowering it to the other side -You’ve just made a wet mount slide! coverslip slide
MICROSCOPE “e” LAB Getting Started -Plug the microscope in, make sure that the low power objective is in place over the hole in the stage, and that the body tube is completely lowered. -Place the wet mount slide on the stage of the microscope -Position the slide so that the “e” faces you as it would on a magazine. Put the stage clips into place. -Move the slide so that the “e” is directly over the hole in the stage. -Turn the microscope light on. -Adjust the diaphragm so that the most light enters the microscope.
MICROSCOPE “e” LAB -Look through the eyepiece keeping both eyes open. -RAISE the body tube, with the coarse adjustment until you can see the letter “e” -NEVER LOWER THE TUBE WITH A SLIDE IN -Use the fine adjustment knob to bring the letter into sharp focus -Adjust the slide so that the letter “e” is in the center of your field of view. QUESTION #1: What is the position of the letter “e” viewed with the microscope compared to its position on the stage?
MICROSCOPE “e” LAB QUESTION #2: Make a drawing of the letter “e” under low power. Calculate the total magnification under low power. -Draw the following on your page to answer #2 Magnification: _______
MICROSCOPE “e” LAB -Move the slide to the left, to the right, toward you, and away from you. Note the direction in which the “e” appears to move. QUESTION #3: If you move the slide to the left, which way does the “e” move when looking through the microscope? -Turn the nose piece to bring the high power objective into position. Focus with the fine adjustment. NEVER USE THE COARSE ADJUSTMENT WITH HIGH POWER!!
MICROSCOPE “e” LAB QUESTIONS #4: Draw the letter “e” as it appears under high power. Calculate the total magnification under high power. -Draw the following on your page to answer #4 Magnification: _______
Question #5 Why should the coarse adjustment not be used when focusing with the high power objective lens? • Question #6 Is the image larger or smaller? ________ • Question #7 Approximately how much of the letter is visible now?
Move the iris diaphragm lever while observing the field. Question #8 What happens? ____________ ***Without touching the focusing knob, rotate the high-dry lens out of position and put a drop of immersion oil over the “e”.*** Question #9 Is the image larger or smaller? _______ Magnification: _______
Working Distance • Question #9. How far is the bottom of the objective from the specimen?___mm (this is called working distance) • Tear a piece of the corner off your sheet and hold it between the slide and the lens, make a mark to measure, then use the ruler to determine the working distance.
Hair • Question #10. What color is the hair under the microscope? • Question #11. What color is the hair in real life? • Question #12. Make a sketch of your hair.