Download
1 / 1
10 likes | 103 Views
Skills Sheet: ‘Creating a polygon’. 1. Creating a polygon To create a new polygon, click on the polygon icon.

E N D
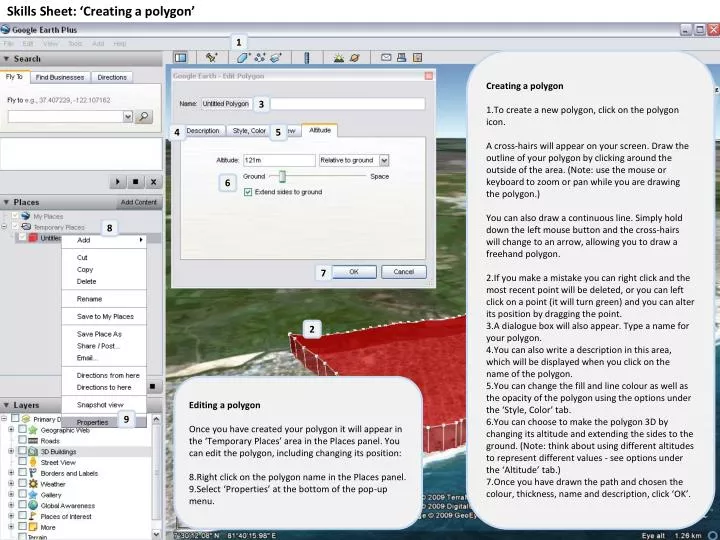
Skills Sheet: ‘Creating a polygon’ 1 Creating a polygon To create a new polygon, click on the polygon icon. A cross-hairs will appear on your screen. Draw the outline of your polygon by clicking around the outside of the area. (Note: use the mouse or keyboard to zoom or pan while you are drawing the polygon.) You can also draw a continuous line. Simply hold down the left mouse button and the cross-hairs will change to an arrow, allowing you to draw a freehand polygon. If you make a mistake you can right click and the most recent point will be deleted, or you can left click on a point (it will turn green) and you can alter its position by dragging the point. A dialogue box will also appear. Type a name for your polygon. You can also write a description in this area, which will be displayed when you click on the name of the polygon. You can change the fill and line colour as well as the opacity of the polygon using the options under the ‘Style, Color’ tab. You can choose to make the polygon 3D by changing its altitude and extending the sides to the ground. (Note: think about using different altitudes to represent different values - see options under the ‘Altitude’ tab.) Once you have drawn the path and chosen the colour, thickness, name and description, click ‘OK’. 3 4 5 6 8 7 2 Editing a polygon Once you have created your polygon it will appear in the ‘Temporary Places’ area in the Places panel. You can edit the polygon, including changing its position: Right click on the polygon name in the Places panel. Select ‘Properties’ at the bottom of the pop-up menu. 9