Download
1 / 37
370 likes | 451 Views
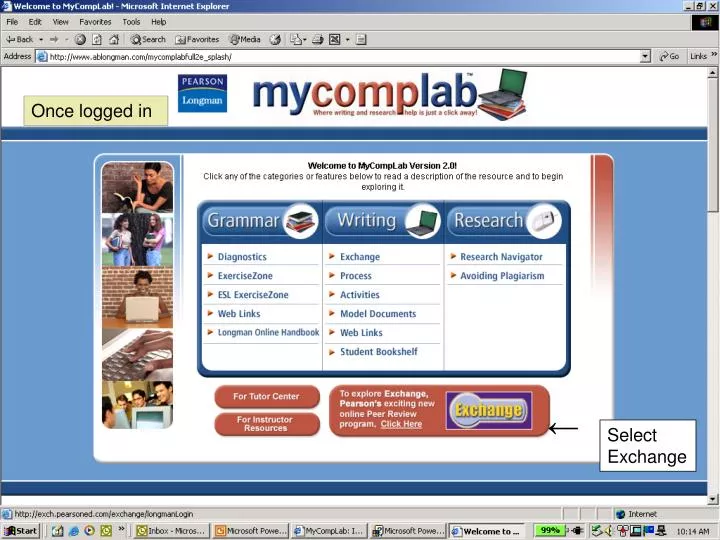
Once logged in. ←. Select Exchange. ↓ click Join Course Icon. ↑. Type in the Course ID that your instructor gave you. Remember that it is case-sensitive—all capital letters must be in CAPS and all lowercase letters must be typed in lowercase!.

E N D
Once logged in ← Select Exchange
↑ Type in the Course ID that your instructor gave you. Remember that it is case-sensitive—all capital letters must be in CAPS and all lowercase letters must be typed in lowercase!
↑ This is a sample EXCHANGE Course ID. DO NOT copy this code. Type in code your instructor gives you! ↑ Then click Join
↑ Here you will see your professor’s course. Click on the blue link to see your assignments.
This is your home page. All of your assignments and due dates are listed below.
↓Below is the list of your classmates’ papers that you have to review and due dates.
Always click on the question mark for ↑ helpful instructions!
←click on the link for the assignment title to view the assignment
↑ as you can see here, assignment 3 asks you to revise your paper for assignment 1
Type paper title ↓ ← Click browse to upload your paper. It will bring up a box for you to choose your document to upload. Make sure you have saved your paper in RICH TEXT FORMAT.
Click File and SAVE AS Select Rich Text Format from the pull down menu and click SAVE
Make sure you upload the .rtf version of your paper as seen here
Software • You will be prompted to download Macromedia Shockwave software, if you do not have it. • Shockwave is the software used to read and comment on papers. • Installation only takes a few seconds but you may have to re login to MyCompLab 2.0 and Exchange
You will see your paper in the screen and you will be asked to confirm that this is the correct paper. Make sure you doublecheck your work. You cannot delete your paper once you click OK! Click OK, if →correct
↑ you will see that your paper is posted and listed under Assignments Completed. Now it is available for students in your peer review group to comment on it and for your professor to grade it and make comments.
↓ Also note on this screen that you may view papers from students in your peer review groups and make comments on them. ↑ Click on this paper icon to view your peer’s paper
Click on a word of the sentence or paragraph that you wish to comment on. This ADD COMMENT box will show up. If you select sentence, the black box above will show the sentence you are commenting on. Type your comments below. ↓ ↑ ←Type your comment here ↑ Click add to Paper
↑You may use your cursor to highlight just a part of a sentence or a couple of sentences that you wish to comment on.
Your name appears in the color purple on the bar above your paper, so your comments appear in purple. All comments are color-coded to the individual. ↓ ↓ ↓ ↑Your comment will show up in this right column. If you roll over the comment with your mouse, it will highlight the place in your paper to which the comment refers. ↑ ↑ Edit delete Comment icons
↑ You can view a checklist for evaluating this assignment. Click on checklist icon above! The checklist pops up in another window. You can close and return to paper review.
↑ Click icon above to review the contents of the assignment. Assignment pops up in a separate window for viewing
↑ Click Export icon if you want to download the paper to your hard drive and print a hard copy. You will still need to enter your comments in this screen later.
Once you click “yes” that you want to post your comments, you can never edit or add any further comments. Your comments will now be visible to the student who wrote the paper and to your professor. ← When you are finished making comments, click on the post button below. If you need to take a break, you can click save and finish later. ↓
Once you post your comments, the paper will now appear under Reviews Completed. ←
↑ ↑ Click on the paper icon to view your own paper and the comments that have been made on it. Here you can view how many people have reviewed and posted comments on your papers.
Below are color-coded comments from student and instructor. Instructors may include a link forthe online handbook to help you correct grammar errors in your writing ←------- ← By rolling the cursor over the comment, you can see the part of the paper that your instructor wishes to comment on.
When you click on the handbook icon, the online handbook pops up in a new window
At the bottom of the handbook entry are some practice tests to help you brush up on the grammar topic ←
Complete the test and submit to see your score and the correct answers