Download
1 / 59
590 likes | 711 Views
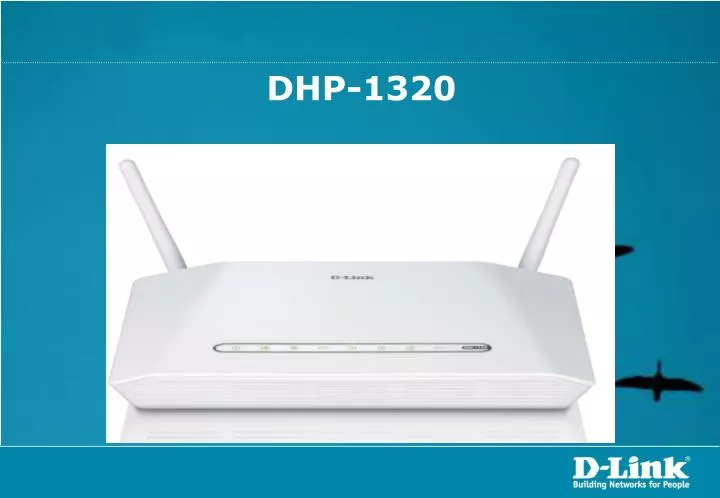
DHP-1320. Agenda:. How to Access Web Interface of the DHP-1320 on Access Point Mode How to Access Web Interface of the DHP-1320 on Router Mode How to Change the LAN IP Address of the DHP-1320 How to Change the Wireless Network Name on the DHP-1320

E N D
Agenda: • How to Access Web Interface of the DHP-1320 on Access Point Mode • How to Access Web Interface of the DHP-1320 on Router Mode • How to Change the LAN IP Address of the DHP-1320 • How to Change the Wireless Network Name on the DHP-1320 • How to Configure Internet Connection using 3G USB Adapter on DHP-1320 • How to Configure Internet Connection using Dynamic IP (DHCP) on DHP-1320 • How to Configure Internet Connection using PPPoE (UsernamePassword) on DHP-1320 • How to Configure Internet Connection using Static IP on DHP-1320 • How to Connect a DHP-306AV to the DHP-1320 • How to Connect a DHP-W306AV to the DHP-1320
How to Enable Dynamic DNS on the DHP-1320 • How to Enable or Disable Wi-Fi Protected Setup on the DHP-1320 • How to Enable Port Forwarding on the DHP-1320 • How to Enable Virtual Server on the DHP-1320 • How to Enable WEP Encryption on the DHP-1320 • How to Enable WPA Only Encryption on the DHP-1320 • How to Enable WPA2 Only Encryption on the DHP-1320 • How to Perform a Firmware Upgrade on the DHP-1320 • How to Setup Encryption Settings on the DHP-306AV and DHP-1320
How to Access Web Interface of the DHP-1320 on Access Point Mode At the back of the DHP-1320, toggle the switch to AP for Access Point mode. Connect one end of the Ethernet cable to the LAN port of the DHP-1320 and the other end of the cable to the Ethernet port of the computer and make it sure the DHP-1320 is plug in to the power outlet.
Open a web browser such as Internet Explorer, Mozilla Firefox, Safari and etc. On the Address bar type in the LAN IP Address of the DHP-1320 which is 192.168.0.1 and then press on the Enter key on your keyboard. A login screen will appear, select User Name as “Admin” then just leave the password field blank and then click on the Log In button.
How to Access Web Interface of the DHP-1320 on Router Mode At the back of the DHP-1320, toggle the switch to RT for Router mode. Connect one end of the Ethernet cable to the LAN port of the DHP-1320 and the other end of the cable to the Ethernet port of the computer and make it sure the DHP-1320 is plug in to the power outlet.
Open a web browser such as Internet Explorer, Mozilla Firefox, Safari and etc. On the Address bar type in the LAN IP Address of the DHP-1320 which is 192.168.0.1 and then press on the Enter key on your keyboard. A login screen will appear, select User Name as “Admin” then just leave the password field blank and then click on the Log In button.
How to Change the LAN IP Address of the DHP-1320 Open a web browser such as Internet Explorer, Mozilla Firefox, Safari and etc. On the Address bar type in the LAN IP Address of the DHP-1320 which is 192.168.0.1 and then press on the Enter key on your keyboard. A login screen will appear, select User Name as “Admin” then just leave the password field blank and then click on the Log In button.
Click on the SETUP tab and the select on NETWORK SETTINGS button on the left hand side. Under the ROUTER SETTINGS section, enter the IP Address you want to assign on the DHP-1320 on the Router IP Address section.
How to Change the Wireless Network Name on the DHP-1320 Open a web browser such as Internet Explorer, Mozilla Firefox, Safari and etc. On the Address bar type in the LAN IP Address of the DHP-1320 which is 192.168.0.1 and then press on the Enter key on your keyboard. A login screen will appear, select User Name as “Admin” then just leave the password field blank and then click on the Log In button.
Click on the SETUP tab and the select on WIRELESS SETTINGS button on the left hand side. Under the MANUAL WIRELESS NETWORK SETUP section, click on the button, Manual Wireless Connection Setup button.
Enter the desired name of your wireless network, on the Wireless Network Name under the WIRELESS NETWORK SETTINGS section. Click on the Save Settings button.
How to Configure Internet Connection using 3G USB Adapter on DHP-1320 Open a web browser such as Internet Explorer, Mozilla Firefox, Safari and etc. On the Address bar type in the LAN IP Address of the DHP-1320 which is 192.168.0.1 and then press on the Enter key on your keyboard. A login screen will appear, select User Name as “Admin” then just leave the password field blank and then click on the Log In button.
Click on the SETUP tab and the select on INTERNET button on the left hand side. Under the MANUAL INTERNET CONNECTION OPTIONS, click on the button, Manual Internet Connection Setup button.
Select on 3G USB Adapter on the drop down box for My Internet Connection is under the INTERNET CONNECTION TYPE section. Under the WWAN INTERNET CONNECTION TYPE section, choose the Country on where you are currently located and then select the name of your Internet Service Provider (ISP) under the IP Address ISP drop down box. Click on the Save Settings button..
How to Configure Internet Connection using Dynamic IP (DHCP) on DHP-1320 Open a web browser such as Internet Explorer, Mozilla Firefox, Safari and etc. On the Address bar type in the LAN IP Address of the DHP-1320 which is 192.168.0.1 and then press on the Enter key on your keyboard. A login screen will appear, select User Name as “Admin” then just leave the password field blank and then click on the Log In button.
Click on the SETUP tab and the select on INTERNET button on the left hand side. Under the MANUAL INTERNET CONNECTION OPTIONS, click on the button, Manual Internet Connection Setup button.
Select on Dynamic IP (DHCP) on the drop down box for My Internet Connection is under the INTERNET CONNECTION TYPE section. Click on the button “Clone Your PC’s MAC Address” under the DYNAMIC IP (DHCP) INTERNET CONNECTION TYPE section. Click on the Save Settings button..
How to Configure Internet Connection using PPPoE (Username Password) on DHP-1320 Open a web browser such as Internet Explorer, Mozilla Firefox, Safari and etc. On the Address bar type in the LAN IP Address of the DHP-1320 which is 192.168.0.1 and then press on the Enter key on your keyboard. A login screen will appear, select User Name as “Admin” then just leave the password field blank and then click on the Log In button.
Click on the SETUP tab and the select on INTERNET button on the left hand side. Under the MANUAL INTERNET CONNECTION OPTIONS, click on the button, Manual Internet Connection Setup button.
Select on PPPoE (Username / Password) on the drop down box for My Internet Connection is under the INTERNET CONNECTION TYPE section. Under the PPPOE section, enter the User Name and the Password provided by your Internet Service Provider (ISP). Click on the Save Settings button..
How to Configure Internet Connection using Static IP on DHP-1320 Open a web browser such as Internet Explorer, Mozilla Firefox, Safari and etc. On the Address bar type in the LAN IP Address of the DHP-1320 which is 192.168.0.1 and then press on the Enter key on your keyboard. A login screen will appear, select User Name as “Admin” then just leave the password field blank and then click on the Log In button.
Click on the SETUP tab and the select on INTERNET button on the left hand side. Under the MANUAL INTERNET CONNECTION OPTIONS, click on the button, Manual Internet Connection Setup button.
Select on Static IP on the drop down box for My Internet Connection is under the INTERNET CONNECTION TYPE section. Under the STATIC IP ADDRESS INTERNET CONNECTION TYPE section, enter the set of IP Addresses provided by your Internet Service Provider (ISP). Click on the Save Settings button..
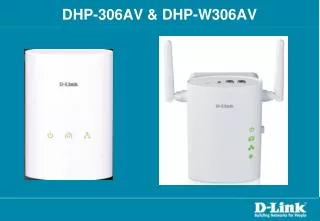
How to Connect a DHP-306AV to the DHP-1320 Connect one end of the power cord to the power receptacle of the DHP-1320. Plug in the other end of power cord to the power outlet. Connect one end of the Ethernet cable to the Ethernet Port of the computer and the other end of the cable to the Ethernet port of the DHP-306AV. Plug in the DHP-306AV to the power outlet.
Run the Powerline AV Utility and it will now show you the Local and the Remote node. The computer connected to the DHP-306AV where able to obtain an IP Address from the DHP-1320.
How to Connect a DHP-W306AV to the DHP-1320 Connect one end of the power cord to the power receptacle of the DHP-1320. Plug in the other end of power cord to the power outlet. Connect one end of the Ethernet cable to the Ethernet Port of the computer and the other end of the cable to the Ethernet port of the DHP-306AV. Plug in the DHP-306AV to the power outlet.
Open a web browser such as Internet Explorer, Mozilla Firefox, Safari and etc. On the Address bar type in the LAN IP Address of the DHP-1320 which is 192.168.0.1 and then press on the Enter key on your keyboard. The computer connected to the DHP-306AV where able to obtain an IP Address from the DHP-1320.
How to Enable Dynamic DNS on the DHP-1320 Open a web browser such as Internet Explorer, Mozilla Firefox, Safari and etc. On the Address bar type in the LAN IP Address of the DHP-1320 which is 192.168.0.1 and then press on the Enter key on your keyboard. A login screen will appear, select User Name as “Admin” then just leave the password field blank and then click on the Log In button.
Click on the TOOLS tab on top and then select on DYNAMIC DNS button on the left hand side. Click on the SaveSettings button. Under the DYNAMIC DNS SETTINGS section, configure the following; - Enable Dynamic DNS : Put a check mark on Enable Dynamic DNS- Server Address : Select the server address where you register a DDNS Service- Host Name : Input the hostname used in registering to a DDNS- User Account : Input the username used in registering to a DDNS- Password : Input the password used in registering to a DDNS
How to Enable or Disable Wi-Fi Protected Setup on the DHP-1320 Open a web browser such as Internet Explorer, Mozilla Firefox, Safari and etc. On the Address bar type in the LAN IP Address of the DHP-1320 which is 192.168.0.1 and then press on the Enter key on your keyboard. A login screen will appear, select User Name as “Admin” then just leave the password field blank and then click on the Log In button.
Click on the ADVANCED. On the left hand side, click on WI-FI PROTECTED SETUP. Under the WI-FI PROTECTED SETUP section, removed the check mark on Enable to Disable the WPS or put a check mark to it. Enable Click on the Save Settings button.
How to Enable Port Forwarding on the DHP-1320 Open a web browser such as Internet Explorer, Mozilla Firefox, Safari and etc. On the Address bar type in the LAN IP Address of the DHP-1320 which is 192.168.0.1 and then press on the Enter key on your keyboard. A login screen will appear, select User Name as “Admin” then just leave the password field blank and then click on the Log In button.
Click on the ADVANCED tab and the select on PORT FORWARDING button on the left hand side. Click on the Save Settings button. • Under the MANUAL WIRELESS NETWORK SETUP section, click on the button, Manual Wireless Connection Setup button. • Put a check mark on the first box provided • Type in the Name of the device or program you want to port forward • Under the Private IP Address type in the IP Address of the running server you want to add on the port forwarding. • Type in the TCP and the UDP Port that is running on the device or application to port forward.
How to Enable Virtual Server on the DHP-1320 Open a web browser such as Internet Explorer, Mozilla Firefox, Safari and etc. On the Address bar type in the LAN IP Address of the DHP-1320 which is 192.168.0.1 and then press on the Enter key on your keyboard. A login screen will appear, select User Name as “Admin” then just leave the password field blank and then click on the Log In button.
Click on the ADVANCED tab and the select on VIRTUAL SERVER button on the left hand side. • Under the MANUAL WIRELESS NETWORK SETUP section, click on the button, Manual Wireless Connection Setup button. • Put a check mark on the first box provided • Type in the Name of the device or program you want to port forward • Under the Private IP Address type in the IP Address of the running server you want to add on the port forwarding. • Type in the Public and the Private Port that is running on the device or application to port forward. • Select TCP or UDP Port Click on the Save Settings button.
How to Enable WEP Encryption on the DHP-1320 Open a web browser such as Internet Explorer, Mozilla Firefox, Safari and etc. On the Address bar type in the LAN IP Address of the DHP-1320 which is 192.168.0.1 and then press on the Enter key on your keyboard. A login screen will appear, select User Name as “Admin” then just leave the password field blank and then click on the Log In button.
Click on the SETUP tab and the select on WIRELESS SETTINGS button on the left hand side. Under the MANUAL WIRELESS NETWORK SETUP section, click on the button, Manual Wireless Connection Setup button.
Under the WIRELESS SECURITY MODE section, select on WEP on the drop down box for the Security Mode. Under the WEP section, configure the following;WEP Encryption: Select 64Bit or 128BitAuthentication: Select BothWEP Key 1: Enter 10 Hexadecimal for 64bit WEP Encryption or 26 Hexadecimal character for 128bit WEP Encryption Click on the Save Settings button.
How to Enable WPA Only Encryption on the DHP-1320 Open a web browser such as Internet Explorer, Mozilla Firefox, Safari and etc. On the Address bar type in the LAN IP Address of the DHP-1320 which is 192.168.0.1 and then press on the Enter key on your keyboard. A login screen will appear, select User Name as “Admin” then just leave the password field blank and then click on the Log In button.
Click on the SETUP tab and the select on WIRELESS SETTINGS button on the left hand side. Under the MANUAL WIRELESS NETWORK SETUP section, click on the button, Manual Wireless Connection Setup button.
Under the WIRELESS SECURITY MODE section, select on WPA-Personal on the drop down box for the Security Mode. Under the WPA section, select on WPA Only on the drop down box for WPA Mode.
Enter a minimum of 8 and a maximum of 63 alphanumeric character password on the Pre-Shared Key section. Click on the Save Settings button.
How to Enable WPA2 Only Encryption on the DHP-1320 Open a web browser such as Internet Explorer, Mozilla Firefox, Safari and etc. On the Address bar type in the LAN IP Address of the DHP-1320 which is 192.168.0.1 and then press on the Enter key on your keyboard. A login screen will appear, select User Name as “Admin” then just leave the password field blank and then click on the Log In button.
Click on the SETUP tab and the select on WIRELESS SETTINGS button on the left hand side. Under the MANUAL WIRELESS NETWORK SETUP section, click on the button, Manual Wireless Connection Setup button.
Under the WIRELESS SECURITY MODE section, select on WPA-Personal on the drop down box for the Security Mode. Under the WPA section, select on WPA2 Only on the drop down box for WPA Mode.
Enter a minimum of 8 and a maximum of 63 alphanumeric character password on the Pre-Shared Key section. Click on the Save Settings button.