Download
1 / 31
310 likes | 412 Views
Click here to go to the table of contents. Click here to leave the demonstrations. Click here to go forward one frame. Click here to go back one frame. Web File Management with SSH Secure Shell 3.2.3. Click a procedure to see it demonstrated. Use these Web links for more information. Index.

E N D
Click here to go to the table of contents. Click here to leave the demonstrations. Click here to go forward one frame. Click here to go back one frame. Web File Management with SSH Secure Shell3.2.3
Click a procedure to see it demonstrated. Use these Web links for more information. Index • Installing SSH Secure Shell • . • Setting up a Profile • . • Connecting to the Web Server Demonstrations Resource Links UD IT Help Center . UD SSH Secure Shell Download Page . SSH Secure Shell Web Site .
Index Installing SSH Secure Shell 1
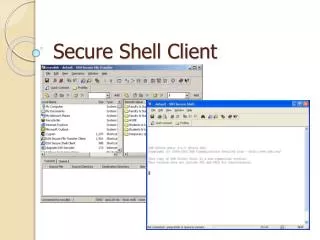
Click the camera to see the demonstration of the step. Installing SSH Secure Shell Index Click each step to see it demonstrated or explained. Step 1 Step 2 Step 3 Step 4 Step 5 Step 6 Step 7 Step 8 Step 9 Step 10
Installing SSH Secure Shell Index Turn off all Windows programs and your antivirus software. Step Finished Step 1 Step 2 Step 3 Step 4 Step 5 Step 6 Step 7 Step 8 Step 9 Step 10
Installing SSH Secure Shell Index Find the downloaded installation file and double-click it. Step Finished Step 1 Step 2 Step 3 Step 4 Step 5 Step 6 Step 7 Step 8 Step 9 Step 10
Installing SSH Secure Shell Index Click “Next.” Step Finished Step 1 Step 2 Step 3 Step 4 Step 5 Step 6 Step 7 Step 8 Step 9 Step 10
Installing SSH Secure Shell Index Read the agreement and click “Yes.” Step Finished Step 1 Step 2 Step 3 Step 4 Step 5 Step 6 Step 7 Step 8 Step 9 Step 10
Installing SSH Secure Shell Index Click “Next” to accept the default folder. Step Finished Step 1 Step 2 Step 3 Step 4 Step 5 Step 6 Step 7 Step 8 Step 9 Step 10
Installing SSH Secure Shell Index 1. The InstallShield Wizard has filled in the program folder name with “SSH Secure Shell.” 2. Change the text as desired. Click “Next.” Step Finished Step 1 Step 2 Step 3 Step 4 Step 5 Step 6 1 Step 7 Step 8 Step 9 Step 10 2
Installing SSH Secure Shell Index Click “Next” to install all components Step Finished Step 1 Step 2 Step 3 Step 4 Step 5 Step 6 Step 7 Step 8 Step 9 Step 10
Installing SSH Secure Shell Index Click “Next” to accept the settings. Step Finished Step 1 Step 2 Step 3 Step 4 Step 5 Step 6 Step 7 Step 8 Step 9 Step 10
Installing SSH Secure Shell Index Click “Finish” to complete the installation. Step Finished Step 1 Step 2 Step 3 Step 4 Step 5 Step 6 Step 7 Step 8 Step 9 Step 10
Installing SSH Secure Shell Index 1. Place the installation file in your recycle bin. 2. After you have successfully run SSH Secure Shell, empty the recycle bin. Step Finished Step 1 Step 2 Step 3 Step 4 1 Step 5 Step 6 Step 7 Step 8 Step 9 Step 10 2
Setting Up a Profile 1 Index
Click the camera to see the demonstration of the step. Setting Up a Profile Index Click each step to see it demonstrated or explained. Step 1 Step 2 Step 3 Step 4 Step 5 Step 6 Step 7
Setting Up a Profile Index Enter the file transfer screen using the file transfer icon. Step Finished Step 1 Step 2 Step 3 Step 4 Step 5 Step 6 Step 7
Setting Up a Profile Index The main screen appears with the Add Profile toolbar which will disappear shortly. Step Finished Step 1 Step 2 Step 3 Step 4 . Step 5 Step 6 Step 7
Setting Up a Profile Index Click on the Profiles icon. Step Finished Step 1 Step 2 Step 3 Step 4 Step 5 Step 6 Step 7
Setting Up a Profile Index 1. Click on “Profiles.” 2. Click “Add Profile.” Step Finished Step 1 Step 2 1 Step 3 2 Step 4 Step 5 Step 6 Step 7
Setting Up a Profile Index Type in the name for this profile (e.g. “UD” or “Copland,” etc.) to replace the highlighted text, “Profile Name.” Click “Add to Profiles.” Step Finished Step 1 Step 2 Step 3 Step 4 Copland Step 5 Step 6 Step 7
UD Setting Up a Profile Index Click on “Edit Profiles.” Step Finished Step 1 Step 2 Step 3 1 2 Step 4 Step 5 Step 6 Step 7
Setting Up a Profile Index 1. Click on the name of the profile you added. 2. Type in the host name and your user name. 3. Click on the Quick Connect profile and enter the same settings. 4. Click “OK.” Step Finished Step 1 Step 2 3 Step 3 1 Step 4 Step 5 copland.udel.edu 2 crtstein Step 6 Step 7 4
Click the camera to see the demonstration of the step. Connecting to the Web Server Index Click each step to see it demonstrated or explained. Step 1 Step 2 Step 3 Step 4 Step 5
UD Connecting to the Web Server Index 1. Click on the profile icon. 2. Select a profile. Step Finished Step 1 Step 2 1 Step 3 2 Step 4 Step 5
Connecting to the Web Server Index When you connect to the server for the first time, you will see the screen below. Click “Yes.” This will store a file on your computer called a “key” which is provided by the server. It ensures secure communications and file transfers with the server. Step Finished Step 1 Step 2 Step 3 Step 4 Step 5
Connecting to the Web Server Index 1. Enter your UNIX password. 2. Click “OK.” Step Finished Step 1 Step 2 2 Step 3 1 ******* Step 4 Step 5
Connecting to the Web Server Index After a successful connection, you will see your personal home directory and files on the server. Step Finished Step 1 Step 2 Step 3 Step 4 Step 5
1. When you are done working, click the disconnect icon. 2. Click “OK” to finish disconnecting. Connecting to the Web Server Index Step Finished Step 1 Step 2 Step 3 1 Step 4 Step 5 2