Download
1 / 41
410 likes | 729 Views
Dynamic Content. Dynamic content is material on a Web page that is added or altered, usually after the page has already been loaded. This often occurs in response to actions or requests by the user.

E N D
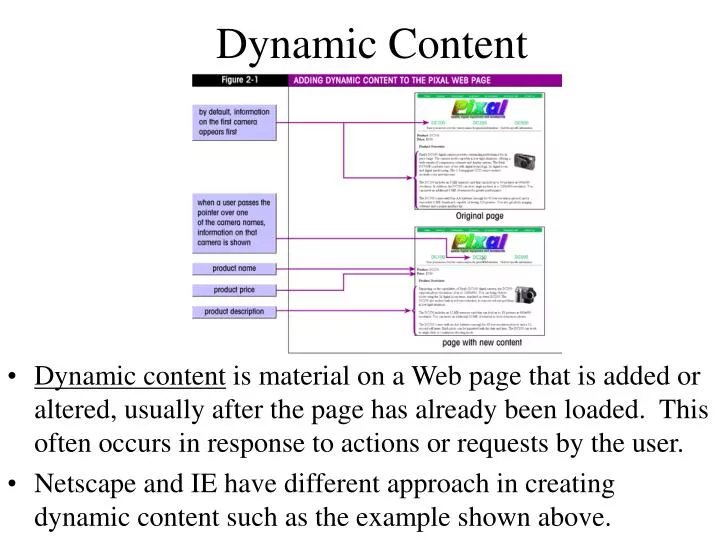
Dynamic Content • Dynamic content is material on a Web page that is added or altered, usually after the page has already been loaded. This often occurs in response to actions or requests by the user. • Netscape and IE have different approach in creating dynamic content such as the example shown above.
Using the <LAYER> tag in Netscape • For the Pixal Web page example above, dynamic content can be produced when the user’s mouse pointer is over either of the DC100, DC250, or DC500 elements. Clicking it reveals more details. • To do this in Netscape, a layer need to be created as follows, <LAYER ID=id properties> document content </LAYER>
<LAYER> Properties • To set the size of a layer in Netscape, we use, <LAYER WIDTH=width HEIGHT=height></LAYER> • To clip a portion of the layer, we use, <LAYER ID=id CLIP=top_x, left_y, bottom_x, right_y> where top_x, left_y, bottom_x, and right_y are coordinates of the clipping region around the layer.
Linking a Layer to a HTML File • To display an external file in a Netscape layer, we use, <LAYER ID=id SRC=URL></LAYER> • The content within the <LAYER> tag uses absolute positioning on the Web page. If we want relative positioning such that other contents can be displayed alongside this content, then we need to use <ILAYER> tag. • If we want to use Browsers that do not support the <LAYER> and <ILAYER> tags, we can do so with the <NOLAYER> tag. • For example, <LAYER SRC=“Pixal.htm” WIDTH=200 HEIGHT=150></LAYER> <NOLAYER> <H1>Pixal Products</H1></NOLAYER>
Using Layers in the Pixal Page • In the Pixal Page example (Pixal.htm), we will create layers for the camera name (NameNS), price (PriceNS), and details of the product (PageNS). The third layer will be linked to an external file named “DC100.htm” as shown above. • When the Pixal.htm file is loaded, the contents in the above layers will be displayed.
Layer Objects • The layers in Netscape are treated as object. Therefore, we can use JavaScript to manipulate these objects. • To write content into a layer, we use, document.id.document.write(dynamic content); where id is the name of the layer, and dynamic content is the new content of the layer. • Because write() method creates and input stream, it must be closed as follows, document.id.document.close(); • For example, if the initial content layer is, <LAYER ID=Intro>Digital Equipment</LAYER> To change the content to “Quality Digital Equipment and Accessories” in boldface, we use, Document.Intro.document.write(“<B>Quality Digital Equipment and Accessories>/B”>
Writing Dynamic Content to the Pixal Page • To make some contents in the Pixal page dynamic, we can make use of the mouseover event. • The above codes will call a function named “showText()” when a mouse pointer passes over the camera name, eg, DC100.
The showText() Function • The showText() Function will store the product name (Pname) and its price (Price) and then write these values into the NameNS and PriceNs layers. • The function only perform write if the Browser is Netscape.
Changing the Source of a Layer Object • In selecting the types of camera via the showText() function, the source of the PageNs layer may need to be changed. To do this, we use, document.id.src=URL; • Since the external files for the types of camera were named DC100.htm, DC250.htm, and DC500.htm, we only need to append .htm to the Pname variable. ie. document.PageNS.src=Pname+”.htm”;
Resizing the Layer Object • As more contents are added to the layer, the size of the layer may need to be changed to fit the new content. The size of the layer will automatically change during loading the page, however, once it had been loaded, we must use JavaScript to change its size. To do this, we use, document.id.clip.width=width; document.id.clip.height=height; • Note that we cannot change the size of the layer larger than the size that had been initially set.
Dynamic Content in Internet Explorer • Compare to Netscape, IE handles dynamic content with greater flexibility and power. In IE the content of almost any tag can be modified. • Unlike Netscape, IE treats each two-sided tag as having an “inner” and “outer” part. • For example, the code, <P><SPAN>Pixal Products</SPAN></P> • the inner part is, <SPAN>Pixal Products</SPAN> • the outer part includes the inner part and the <P> tags.
Inner Properties • To change the text within a two-sided tag, we use, object.innertext=“text”; where object is a two-sided tag, and text is the text of the inner part of the tag. • For example, with the code, <DIV ID=Intro>Digital Equipment”</DIV> we can change the text to “Digital Equipment and Accessories” by, Intro.innerText=“Digital Equipment and Accessories” ; • To change the HTML code within a two-sided tag, we use, object.innerHTML=“text and HTML code”;
Outer Properties • To change the text within the two-sided tag and the text of the two-sided tag itself, we use, object.outertext=“text”; • To change the HTML code within the two-sided tag and the HTML code of the tag itself, we use, object.outerHTML=“text and HTML code”; • For example, the coded, <H1 ID=Title>Pixal products</H1> To change H1 to H2, we use, Title.outerHTML=“<H2 ID=Title>Pixal Products</H2>”;
Inserting Content into a Tag • To insert text into a two-sided tag, we use, object.insertAdjacentText(“position”, text); where position is the position within the tag where the new text should be inserted. Position options are, BeforeBegin, AfterBegin, BeforeEnd, and AfterEnd. • For example, for the coded, <H1 ID=Title>Pixal Products and Accessories</H1> Using the JavaScript code, Title.insertAdjacentText(“AfterBegin”, “<I>Introducing</I>); The result is, Introducing Pixal Products and Accessories. • To insert new HTML code into a two-sided tag, we use, object.insertAdjacentHTML(“position”, text);
Adding Dynamic Content to the Pixal Page (in IE) • The <LAYER> tag is not recognised by IE, so we need to add the <SPAN> tag to “mark” the element that we wanted to change as shown in the code on the right. • To change the content in the <SPAN> tag, we use the innerText command in the showText() function after the “else” statement.
Linking to a HTML File • Like Netscape, IE also allows us to display contents of other HTML files in our Web page. To do this we use <IFRAME> tag which places an internal frame on the page as shown above. The syntax is, <IFRAME SRC=URL WIDTH=value HEIGHT=value> • Unlike Netscape, the size of the internal frame is fixed at the specified values. If the content exceeds the frame size, then scroll bars are introduced into the frame. The internal frame is surrounded by a border. To remove this border, we use, FRAMEBORDER=NO
Changing the Source of the Internal Frame (IE) • In response to the user’s actions, we may need to change the source of the internal frame. The syntax is, document.all.frame.src=URL; where frame is the ID of the internal frame. • Change to the showText() function using this feature is shown above.
Page Branching to Separate HTML Files • Each type of camera has a page containing details of the camera. Since each type of Browser work differently to each other, sometimes it is better to create HTML file that cater for a particular Browser. • In this example, the files, DC100_NS.htm and DC100_IE.htm are created for use with Netscape and Internet Explorer respectively. • We need to use the onMouseDown even handler to response to the user clicking at a particular object.
Processing the User’s Action • When a type of camera is clicked by the mouse, the onMouseDown method will call a function named, showFile(Pname) to choose a corresponding Web page to be displayed. The codes for this function are, function showFile(Pname) { if (isNS) { location=Pname+”_NS.htm”; } else { location=Pname+”_IE.htm”; } }
Expanding and Collapsing an Outline • In some cases, where the content of a page is large which makes reading difficult. • A better way to handle such page is to “expand” and “contract” a section of the page when the user clicks the section heading as shown above. • Netscape and IE use a completely different approach to create such features. We will look at the IE approach first.
IE: Changing Style Attributes • IE uses the style attributes of different page objects to expand and contract the content. • JavaScript is used to modify these style attributes. Some JavaScript style properties are shown above. The syntax is, object.style.styleAttribute=value; where object is the ID of an object, styleAttribute is one the CSS style attributes with a corresponding value. • A demonstration of the style attributes, StylesIE.htm
IE: Changing Multiple Style Attributes and Classes • To change several style attributes at once, we use, object.style.cssText=styles; where object is the ID name of the object, and styles is a text string containing the style attributes. For example, Quote.style.cssText=“color:red font-size:16pt”; • Another way to do this is to create a different class for each set of style attributes. The syntax is, object.className=class; where object is the ID name of the tag, and class is the name of a class previously defined in a global style sheet. • Here is a demonstration of the mentioned features. ClassIE.htm
IE: Changing Style Sheets • A change of a style sheet will affect all of the elements on the Web page. The syntax of a style sheet is, <STYLE ID=id_name> style declarations </STYLE> • In cases where multiple style sheets are used, the most recent one is used by the Web page. • To disable a style sheet, we use, <STYLE ID=id DISABLED> OR use the JavaScript: id.disabled=true; • To enable a disabled style sheet, we use, id.disabled=false;
Working with Style Sheet Objects • IE treats each style sheet as an object. Some of these objects in a style sheet are shown above. • Style sheets are referenced by using their ID name or as part of the style sheets collection. • For example, if the first style sheet in the collection has the ID name Large_Txt, then we can reference it either by, Large_Txt or styleSheets(0)
Style Sheet Objects: Examples • To disable a style with the ID name, Small_Txt, we would use, Small_Txt.disabled=true; • To enable the style sheet, we use, Small_Txt.disabled=false • To add a new rule to H2 headers to the Large_Txt style sheet, we use, Large_Txt.addRule(“H2”, “font-size:16pt”); In this case, the H2 header have new font size set to 16. • The rules themselves also form their own collection within the style sheet object. The first style rule or declaration for the Large_Txt style sheet would have the reference name: Large_Txt.rules(0); • A demonstration of style sheets, SheetsIE.htm
IE: Creating an Expandable Outline • We can use the display property to hide and unhide objects. In the codes above, the 2 classes had been created to do this. • We can also use the visibility attribute to hide/unhide objects, however, this will leave an empty space when the object is hidden. • In order to hide or unhide a block of text, we need to have the text within the <DIV> tags. • For example, <DIV ID=id CLASS=hide> text to be hidden </DIV>
Hide/unhide Text Block • The hidden text in the DC100_IE.htm file is shown on the right. • To unhide or hide a block of text we need a function, toggleView(Text), shown at lower right to achieve this. • This function has a parameter, “Text”. If the class name of Text is “hide”, the function switches the class name to “unhide” and vice versa.
Calling the toggleView() function • The toggleView() function is then inserted into the header tag. • This function should be ran when the user clicks one of the 4 headers on the page.
Managing Style with JASS • Netscape has its own language for creating dynamic styles, called JavaScript Accessible Style Sheets (JASS). • JASS has many similarities to the way IE uses the style object, except it cannot change style after the page has been loaded. • JASS styles are applied within a set of <STYLE> tags with the TYPE=‘text/javascript”. The syntax is, <TYLE TYPE=‘text/javascript’> JASS commands; </STYLE> • The JASS commands follow the object.property form used for JavaScript commands.
Working with Tag Styles • To define a style for a tag in JASS, we use, tags.tagName.attribute=“value”; where tagName is the name of the tag, attribute is the name of the style attribute, and value is the value assigned to the attribute. • Attribute names follow the same format as IE style objects. For example, the CSS style attribute background-color is backgroundColor in JASS. • To set several styles attributes at once, we use, with (tags.tagName) { attribute1=“value” attribute2=“value” ….. }
Working with Class Style • To define a style for a class of objects, we use, classes.className.element.attribute=“value”; where className is the name of the class, element is the name of the element, and attribute and value are the style and value. To set the style for all objects of a particular class, set the value of element to “all”. • For example,to change the colour of all paragraphs with the class name “Quotes” to green, we use, classes.Quotes.P.color=“green”;
Working with ID Styles • To change the style of a single element, we use, ids.idName.attribute=“value”; where idName is the ID name of the element. • For example, if the CSS style is: #Intro {color:red} then in JASS is: ids.Intro.color=“red’;
Working with Contextual Selectors • In JASS, contextual selectors follow the syntax: contextual (selector1, selector2, …).attribute=“value”; • For example, to create a style for boldface text nested within a paragraph, the CSS style declaration is: P B {color: “red”} In JASS, it is, contextual (tags.P, tag.B).color=“red”; • A demonstration on the use of JASS, StylesNS.htm
Creating an Expandable Outline in Netscape • Unlike IE, Netscape does not automatically rearrange document elements when they change size. Therefore, a function which perform resize and move the layers need to be scripted. • Also we will need to create <LAYER> tags for the four sections of the document as shown above. • For example, <LAYER ID=Overview> text </LAYER>
Overlapping Layers • To avoid the 4 layers from overlapping, we need to work out the height of each layers to stack them in a sequence starting with the first layer. • We use the clip.height property of the layer object to record the height of the 4 layers and stores them in 4 variables:OverHgt, FeatHgt, SpecsHgt, and BoxHgt. A StartPos variable uses the top property to record the starting position of the Overview section. • From these 5 variables, the location of each section is determined by adding the heights of the sections above it to the starting position.
Expanding and Contracting the Layers • The codes for calculating the height of the layers are shown above. • To contract a layer, we will clip the layer’s height so that only the header is showing- about 40 pixels. • To expand the layer we need to restore the original height of the layer. • We also need to store the current height of the layer in 4 variables: OverClip, FeatClip, SpecsClip, and BoxClip. Each of these variables will have an initial value of 40.
Rearranging the Layers After a Change • When ever the height of the layers is changed, all the layers on the page must be rearranged in response to the new clip height. • To do this, a restacking of the layers would take place and is achieved by another function named, setPage(). This function has the same format as the initial stacking position of the layers. However, instead of using the height of the layers, the current height of the layers is used. • For example, the first layer in the function would be, document.Overview.clip.height=OverClip;
The Initially Loaded page • The setPage() function is set to run when the page is loaded by using the code, <BODY onLoad=setPage()”> • The setPage() function initially loaded with the initial values of the OverClip, FeastClip, SpecsClip, and BoxClip to give the initial page as show above. i.e, only the header is shown.
Layer Heights Switching Function • Another function, toggle() is needed to toggle the value of OveClip, FeatClip, SpecsClip, and BoxClip variables between 40 pixels (contracting) and the full height of the layer (expanding). • The toggle() function is as follows, function toggle(Clip, Hgt) { if (Clip==40) { Clip=Hgt; } else { Clip=40; } return Clip; }
Adding the onClick() Event Handler • Because Netscape does not support the onClick() event handler for the headers, we enclose each of the <H2> tags within a set of <A> tags with the HREF property set to #, which points to the same page as shown above.
Summary • Expansion and contraction of the layers in response to the actions by the user are as follow: • When the user clicks one of the 4 headers, Netscape runs toggle() function and switches the height of the layer between 40 pixels and the full layer height. - Netscape then runs the setPage() function to apply the new layer height to the page and restack the other layers on the page to compensate.