Download

1 / 21
210 likes | 249 Views
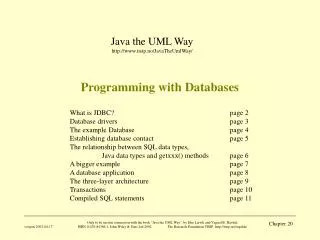
Working with Databases. The Basics of MySQL Data Storage.

E N D
The Basics of MySQL Data Storage • MySQL is a relational database management system, which lets you store data in multiple tables, where each table contains a set of named columns and each row consists of a data entry into the table. Tables will often contain information about other table entries, which allows developers to group relevant information into smaller groups to ease a script’s load on the server, as well as simplifying data retrieval. • You’ll test these commands using the phpMyAdmin control panel provided by XAMPP. Open a browser and navigate to http://localhost/phpmyadmin to access the control panel.
Manipulating Data in MySQL Tables • Creating Databases Using CREATE • CREATE DATABASE test • Deleting Databases Using DROP • DROP DATABASE test
The CREATE TABLE Statement • Of course, the first thing you need to do to start working with MySQL is to create your first table. • MySQL syntax is very simple because it generally mimics natural speech patterns. In the text field, add the following statement: • CREATE TABLE IF NOT EXISTS artists • ( • artist_id INT PRIMARY KEY AUTO_INCREMENT, • artist_name VARCHAR(150) )
CREATE TABLE IF NOT EXISTS albums • ( • album_id INT PRIMARY KEY auto_increment, • artist_id INT, • album_name VARCHAR(150) • )
PRIMARY KEY • A column assigned with the PRIMARY KEY identifier should contain a value that uniquely identifies each value throughout the table. Because you’re using numerical IDs for each artist, you know that there won’t be any overlap in the artist_id column. • The use of primary keys in MySQL tables is mandatory because the data isn’t really useful if you can’t identify entries uniquely.
AUTO_INCREMENT • Using a unique numerical identifier for individual entries is incredibly useful, so MySQL includes an easy way to create unique identifiers called AUTO_INCREMENT. A column flagged with AUTO_INCREMENT generates identifiers in sequence automatically as entries are created, starting at 1.
Data Types in MySQL • INT: an integer value • • FLOAT: a floating point number • • VARCHAR: a short string value • • TEXT: a large string value that is treated as a character string (it’s best suited for blog entries) • • BLOB: a binary large object that is treated as a binary string (it can store images and similar numbers) • • DATETIME: a date value (formatted YYYY-MM-DD HH:MM:SS)
The INSERT Statement • INSERT INTO artists (artist_name) VALUES ('Bon Iver') • The INSERT INTO phrase tells MySQL that you’re adding information. The next steps are to determine what table you want to add information into (artists) and then specify the column(s) you’re adding values into (artist_name), which you enclose in parentheses. With your table name and columns selected, you can insert data using the word VALUES, followed by the data you wish to insert, enclosed in parentheses:
INSERT INTO albums (artist_id, album_name) • VALUES ('1', 'For Emma, Forever Ago'), • ('1', 'Blood Bank – EP'), • ('2', 'Let It Die'), • ('2', 'The Reminder') • Instead of executing four different commands to insert the albums, as you did in the preceding example, you can use what is called an extended insert to add all four albums at once. This works by enclosing each entry in parentheses, separated by commas.
The UPDATE Statement • At some points in your scripts, you will need to change information in an entry. To do this, you use the UPDATE statement. For example, if you were to decide to append the release year to Feist’s album, “Let It Die,” you could do so with the following statement: • UPDATE albums • SET album_name = 'Let It Die (2005)' • WHERE album_name = 'Let It Die'
The DELETE Statement • DELETE FROM albums • WHERE album_name = 'The Reminder' • LIMIT 1 • You start the statement with the DELETE FROM statement, then identify the table you want to remove an entry from (albums). Next, you create a WHERE clause to create the condition you want to match before you delete an entry (album_name = 'The Reminder'). And, just to be sure you don’t accidentally delete your entire table, you add LIMIT 1 to the query, which means that only one entry will be deleted, even if more than one entry matches the conditions. • When you click the Go button, phpMyAdmin pops up a confirmation box and asks you if you’re sure you want to complete the command. This is your last chance to verify that your command has no errors, such as a missing WHERE clause. This confirmation box pops up only when deleting information.
Creating a Connection • mysql_connect • You need a method through which your PHP scripts can connect to MySQL in order to interact with the database. • Before you can access data in a database, you must create a connection to the database. In PHP, this is done with the mysql_connect() function. • Syntax • mysql_connect(servername,username,password);
mysql_pconnect • Creates a persistent connection to a MySQL Server. • The function arguments and the return value are same as those for mysql_connect. • The difference between mysql_pconnect and mysql_connect is that the connection created with mysql_pconnect is not closed when the PHP program exits or a mysql_close call is made. • The PHP interpreter maintains the connection with the MySQL server.
Closing a Connection • The connection will be closed automatically when the script ends. To close the connection before, use the mysql_close() function: • <?php $con = mysql_connect("localhost",“root",""); • if (!$con) • { • die('Could not connect: ' . mysql_error()); • } else{echo “connection sucessful”;} • // some code • mysql_close($con); • ?>
Create database using php • <?php • // Open a MySQL connection • $link = mysql_connect('localhost', 'root', ''); • if(!$link) { • die('Connection failed: ' . mysql_error()); • } • else • { • echo "conectionsucessful .<br/>"; • } • $sql = 'CREATE DATABASE my_db'; • if (mysql_query($sql, $link)) { • echo "Database my_db created successfully\n"; • } else { • echo 'Error creating database: ' . mysql_error() . "\n"; • } • ?>
Create Table • <?php • // Open a MySQL connection • $link = mysql_connect('localhost', 'root', ''); • if(!$link) { • die('Connection failed: ' . mysql_error()); • } • else • { • echo "conectionsucessful .<br/>"; • } • //Select the database to work with • $db = mysql_select_db('nasar'); • if(!$db) { • die('Selected database unavailable: ' . mysql_error()); • } • // Create table • $sql="CREATE TABLE Persons(FirstName CHAR(30),LastName CHAR(30),Age INT)"; • // Execute query • if (mysql_query($sql)) • { • echo "Table persons created successfully"; • } • else • { • echo "Error creating table: " . mysql_error($link); • } • ?>
Syntax • mysql_connect(host,username,password,dbname); • ------------------------------------------------------------------------- • <?php • // Open a MySQL connection • $link = mysql_connect('localhost', 'root', ''); • if(!$link) { • die('Connection failed: ' . mysql_error()); • } • Else • { • Echo “connection successful”; • } • // Select the database to work with • $db = mysql_select_db('test'); • if(!$db) { • die('Selected database unavailable: ' . mysql_error()); • }
// Create and execute a MySQL query • $sql = "SELECT artist_name FROM artists"; • $result = mysql_query($sql); • // Loop through the returned data and output it • while($row = mysql_fetch_array($result)) { • printf("Artist: %s<br />", $row['artist_name']); • } • // Free the memory associated with the query • mysql_free_result($result); • // Close the connection • mysql_close($link); • ?>
As the immediately preceding example illustrates, each step in the process has a function assigned to it: • mysql_connect(): Accepts the host, username, and password for a MySQL connection. You must call this function before any interaction with the database can take place. • die(): This is an alias for the exit() command. It stops execution of a script after displaying an optional message (passed as the function argument). • mysql_error(): If an error occurs in the MySQL database, this function displays that error; this is helpful for debugging. • mysql_select_db(): Selects the database that the script will interact with. • mysql_query(): Executes a query to the database. This query can create, modify, return, or delete table rows, as well as perform many other tasks. • mysql_fetch_array(): Converts the MySQL resource returned by mysql_query() into an array. • mysql_free_result():Frees the memory used by mysql_query() to maximize script performance. • mysql_close(): Closes the connection opened by mysql_connect().