Download
1 / 12
130 likes | 407 Views
Programando el PIC 16F84A. Ing. Armando Mtz. ITNL. Configurando Mplab para PIC16F84A. Configurando Mplab para PIC16F84A. Configurando Mplab para PIC16F84A. EJEMPLO2 ENCENDER Y APAGAR UN LED CON RETARDO. list p=16f84 include <p16f84A.inc> TIEMPO EQU 0X0C org 0

E N D
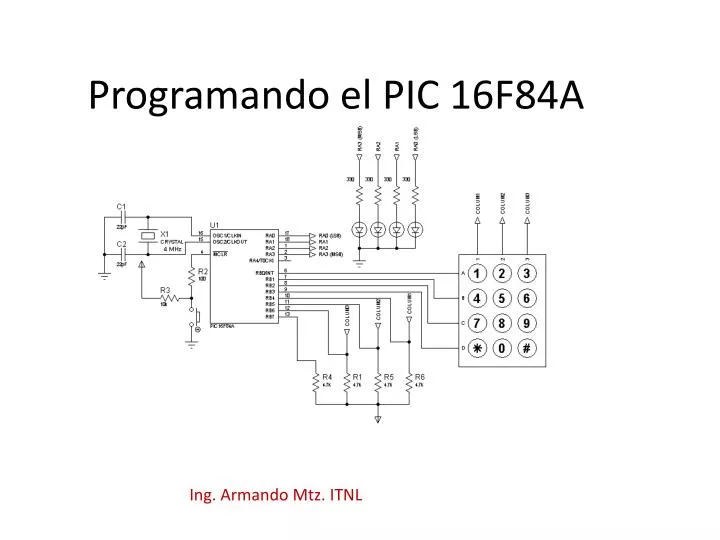
Programando el PIC 16F84A Ing. Armando Mtz. ITNL
EJEMPLO2 ENCENDER Y APAGAR UN LED CON RETARDO list p=16f84 include <p16f84A.inc> TIEMPO EQU 0X0C org 0 bsf STATUS,RP0 ;COLOQUE EN UNO EL BIT 0 DE PUERTO B (RP0=B 1) CLRF PORTB ; DECLARO 00000000 PARA INDICARLE QUE SERAN LOS 8 BITS DE SALIDA bcf STATUS,RPO ; FIJO EN 0 EL BIT DEL REGISTRO RP0, DE STATUS PARA ACCEDER AL BANCO DE MEMORIA 0 ; XXXXXXXXXXXXXXXXXXXXX ZONA DE CODIGO XXXXXXXXXXXXX INICIO BCF PORTB,0 ; COLOQUE EN CERO EL PIN 0 DEL PUERTO B CALL RETARDO ; LLAMO A LA SUBRUTINA DE RETARDO BSF PORTB,0 ; COLOQUE UNO EN EL PIN 0 DEL PUERTO B CALL RETARDO ; LLAMO A LA SUBRUTINA DE RETARDO GOTO INICIO RETARDO MOVLW D'255' ; CARGA EL REGISTRO W CON 255 (11111111) MOVFW TIEMPO ; CARGA LA VARIABLE LLAMADA TIEMPO CON 255 DEC DECFSZ TIEMPO ; LO VA DECREMENTANDO DE UNO EN UNO CUANDO TIEMPO=0 SE SALE DEL LOOP GOTO DEC ; MIENTRAS TIEMPO NO SEA CERO SALTARA A DEC RETURN END
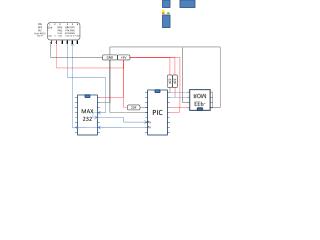
Una vez armando el circuito donde incluimos el PIC 16F84A, damos doble click sobre el símbolo del PIC para configurarlo. Revisa las Referencias de video tutorial http://www.youtube.com/watch?v=Z67GlpBZJYAhttp://www.youtube.com/watch?v=fUjBNoEPIrs http://www.youtube.com/watch?v=UFzIn7CuFwc http://www.youtube.com/watch?v=_yKLOYoEzdo