Download
1 / 6
60 likes | 75 Views
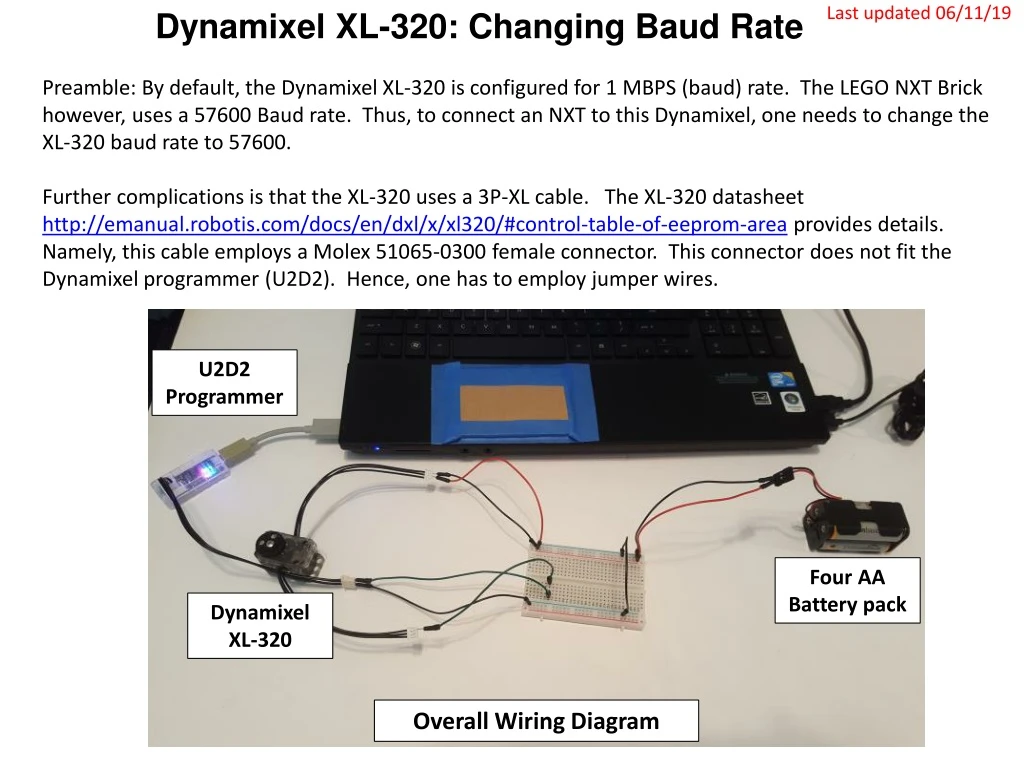
Last updated 06/11/19. Dynamixel XL-320: Changing Baud Rate. Preamble: By default, the Dynamixel XL-320 is configured for 1 MBPS (baud) rate. The LEGO NXT Brick however, uses a 57600 Baud rate. Thus, to connect an NXT to this Dynamixel, one needs to change the XL-320 baud rate to 57600.

E N D
Last updated 06/11/19 Dynamixel XL-320: Changing Baud Rate Preamble: By default, the Dynamixel XL-320 is configured for 1 MBPS (baud) rate. The LEGO NXT Brick however, uses a 57600 Baud rate. Thus, to connect an NXT to this Dynamixel, one needs to change the XL-320 baud rate to 57600. Further complications is that the XL-320 uses a 3P-XL cable. The XL-320 datasheet http://emanual.robotis.com/docs/en/dxl/x/xl320/#control-table-of-eeprom-area provides details. Namely, this cable employs a Molex 51065-0300 female connector. This connector does not fit the Dynamixel programmer (U2D2). Hence, one has to employ jumper wires. U2D2 Programmer Four AA Battery pack Dynamixel XL-320 Overall Wiring Diagram
Last updated 06/11/19 Step 1: 6 Volt Motor (Dynamixel XL-32) Voltage wiring Datasheet of XL-320 shows pins connections. http://emanual.robotis.com/docs/en/dxl/x/xl320/#control-table-of-eeprom-area NB: left figure is from Top i.e. looking into the servo horn Servo Horn Servo Horn Insert male black and red jumper wires into the XL-320’s Molex connector. Attach other ends into breadboard. Insert Battery pack’s +6V and GND lines into breadboard as well Note: Work with XL-320 Right side connector. Not connected RED Jumper BLK Jumper Close-up Four AA Battery pack
Last updated 06/11/19 Step 2: U2D2 Programmer wiring U2D2 Manual http://support.robotis.com/en/product/auxdevice/interface/u2d2.htm shows the pinout diagram below U2D2 Programmer Breadboard data line BLK Jumper Breadboard GND bus GRN Jumper Insert BLK male jumper wire into U2D2 cable connector’s Pin 1 (GND). Insert other end into breadboard GND line Insert GRN male jumper wire into U2D2 cable connector’s Pin 3 (Data). Insert other end into breadboard data line (for Step 3) Close-up
Last updated 06/11/19 Step 3: Dynamixel XL-320 Data line Wiring (and tying Grounds) Note: Work with XL-320 Left side connector. Servo Horn Not connected Breadboard data line Not connected GRN Jumper GND Bus GND Bus Insert GRN male jumper wire in XL-320 Molex connector. Attach other end into Breadboard Data line (so that connection in made from Step 2-2 Tie GND lines; connect BLK jumper wire between the two GND Busses on Breadboard
Last updated 06/11/19 Step 4: Execute Dynamixel Wizard program from PC 1. Opening screen; this particular setup uses serial COM port 5 2. Click Open Port icon and then “Start Searching” button
Last updated 06/11/19 Step 4: Continued 3. Successful search discovers Dynamixel XL-320. Click on [ID:003] XL-320 4. XL-320 description results. Scroll and click on Baudrate. Use pull-down menu to select 1 (57600 bps). Click Apply button. Congratulations! The Dynamixel XL-320 is now set for 57600 BPS and ready for future LEGO NXT communications