Download
1 / 39
390 likes | 561 Views
Eric J. Oszakiewski MCTS: SharePoint Application Development SharePoint Configuration. Connecting a SharePoint list to a SQL table for CRUD ops. Overview of architecture Creating the Secure Store Application Understanding security between SharePoint & target DB

E N D
Eric J. Oszakiewski MCTS: SharePoint Application DevelopmentSharePoint Configuration Connecting a SharePoint list to a SQL table for CRUD ops
Overview of architecture • Creating the Secure Store Application • Understanding security between SharePoint & target DB • Creating the External Content Type • Modifying the Business Data Connectivity Model • Creating the SharePoint List • Demos throughout Session Agenda
Started programming in 1982 on IBM 3090 mainframes • Began with SharePoint in 2007 with WSS 2.0 • MCTS: MOSS 2007 & SharePoint 2010 Application Development • Currently Enterprise Developer for Casino Arizona, also independent contractor • Twitter: @eoszak About Me
Give users the ability to manage database content using a SharePoint list. • Control list access using multiple security models • Removes the burden of managing end-user data and places it back on them. • Provides a central place for users to access and modify their data. • Works in both SharePoint 2010 & 2013 Overview – Why Would We Do This?
Users need the ability to edit BI properties stored in a separate SQL table • Website administrators want to modify configuration data stored in a database but they can’t have access to the production server or content. • You want to give certain users ability to view data in a convenient way without granting them DB access. Examples
Preparation • SQL server/database name & account connecting to database • Ensure account has appropriate permissions • User account(s) who will be viewing/modifying the data • Which fields from SQL table you want to expose to the list • Which site the list will reside on Architecture
Secure Store Application • External Content Type • Set Object Permissions • Create Linked List
Replaced SSO in MOSS 2007 • Navigate to Central Administration • Under Application Management, click Manage Service Applications Secure Store Application
In Service Applications, click Secure Store Service Secure Store Application
NOTE: You may be prompted to create a Key if you have not already. Follow the on-screen prompts to create the key before proceeding. • In the ribbon, under Manage Target Applications, click New Secure Store Application
Target Application Settings • Application ID • Unique Identifier, but can be anything you want (text, numbers, both, no spaces) • Cannot be changed after creating target application • Display Name • Friendly name (spaces ok) to identify the connection Secure Store Application
Target Application Settings • Contact E-mail • Primary contact for this application • Application Type • Individual Ticket – used for mapping each individual to a unique set of credentials on the external system, and can issue tickets that can be redeemed later. • Individual Restricted – same as individual ticket but has restricted access to the calling context. Recommended for SharePoint Online. • Individual – you only have one person who will be accessing this data • Group Ticket- used for mapping all members of one or more groups to a unique set of credentials on the external system, and can issue tickets that can be redeemed later • Group Restricted - same as group ticket but has restricted access to the calling context. Recommended for SharePoint Online • Group – you have more than one person who will be accessing this data • Cannot be changed after creating target application Secure Store Application
Target Application Settings • Target Application Page URL • Custom login page • Disabled for any Group type selected • Display Name • Friendly name (spaces ok) to identify the connection Secure Store Application
Credential Fields • Field Name – the internal name of the field you will be referencing (friendly) • Field Type • Generic- a value that does not fit into any other category • User Name – non-specific username (windows, SQL, etc) • PIN – a secret word or phrase • Key – a parameter that determines the functional output of a crypto algorithm or cipher • Windows User Name • Windows Password • Certificate (SP2013) • Certificate Password (SP2013) Secure Store Application
Credential fields • Typically will only need username and password • Some application (ex: CRM) may require additional fields • CRM username • CRM password (masked) • CRM system number • CRM client number • Language • Use Add Field at the top to add/define more fields Secure Store Application
Membership Settings • Target Application Administrators • Users who will have the ability to manage these settings, not necessarily the data • Should be domain admins, farm admins, network admins, etc. • Separate users with semicolons • Members • Users/groups mapped to the credentials defined for this application • Important: ONLY these individuals/groups will be able to access the data! Not even Farm admins can access the data if they’re not included here! Secure Store Application
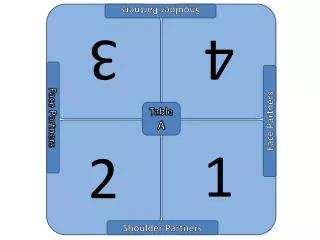
SSSDB usernameDB Password SQL SharePoint OK to access Understanding Security Between SharePoint and target DB
Set Application Credentials Secure Store Service
Set Credentials • Username – this is the username of the account that will have access to the database. • Password • Confirm Password Secure Store Application
Secure Store Application • External Content Type • Set Object Permissions • Create Linked List
Open SharePoint Designer • Site Objects->External Content Types->External Content Type External Content Type
Choose a name for the External Content Type • Click link next to External System External Content Type External Content Type
Click Add Connection External Content Type
Database Server • Database Name • Choose Connect with Impersonated Custom Identity and enter the Secure Store Application name External Content Type
Expand table listing and locate the desired table. Right-click and choose the desired CRUD method(s) External Content Type
CRUD methods • Read Item (Specific Finder): Used for returning information from a single list item based on passed-in parameter(s) • Read List (Finder): Used for returning multiple entity instances. Providing filter criteria and returning list items. • Create: Allows the user to create list items • Update: Allows the user to update existing list items • Delete: Allows the user to delete existing list items External Content Type
Parameters Configuration • Choose which fields from the database will be exposed and how • Choose an identifier (primary key) • Required? Read Only? • Click Finish when done • Click Save at top. External Content Type
Secure Store Application • External Content Type • Set Object Permissions • Create Linked List
Central Administration • Manage Applications->Manage Service Applications • Locate BDC service and click the link • Find your newly created service (created when External Content Type was created), check the box next to it and click Set Object Permissions Set Object Permissions
Central Administration • Enter all names or groups who will need access to this database resource & click Add • Set item permissions on each. At least one must have Set Permissions. Set Object Permissions
Secure Store Application • External Content Type • Set Object Permissions • Create Linked List
SharePoint Designer • Site Objects->External Content Type • Locate newly created External Content Type and click it once to select, then click External List at the top. • Enter name and description (optional) and click OK. Create Linked List
Creating the Secure Store Application • Understanding security between SharePoint & target DB • Creating the External Content Type • Modifying the Business Data Connectivity Model • Creating the SharePoint List Review
MSDN: Use Secure Store Service to Connect to an External Systemhttp://msdn.Microsoft.com/en-us/library/ee554863(v=office.14).aspx • Implementing Stereotyped Operations in Your Methods (CRUD)http://msdn.Microsoft.com/en-us/library/ff464422(v=office.14).aspx • Blog: Connecting a SharePoint 2010 list to an external database table http://eoszak.me/11gUsPF • Download this slide deck: http://eoszak.me/spsatpres Twitter: @eoszak Blog: http://eoszak.me/speric Email: eric@oszakiewski.net Thank you! Resources