Download
1 / 21
220 likes | 295 Views
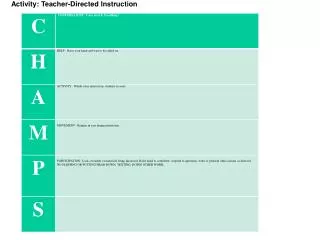
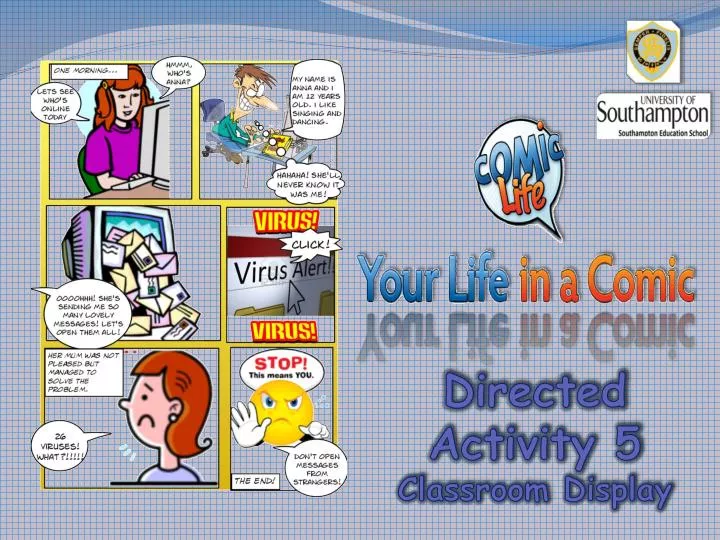
Directed Activity 5 Classroom Display. Menu bar: Contains menus for performing tasks. The menus are organized by topic. Tool bar: Contains clickable icons for common actions. You can customize the contents to suit your work style.

E N D
Directed Activity 5 Classroom Display
Menu bar: Contains menus for performing tasks. The menus are organized by topic.
Tool bar: Contains clickable icons for common actions. You can customize the contents to suit your work style
Page Edit Area: The main editing area where you'll compose your pages
Resource Area: Provides access to photos, page templates, details on the selected element and the current styles
Element Well: Contains the various comic elements such as balloons, captions and display lettering for titles and sound effects
Page Organizer: Provides an overview of all the pages in the comic and quick access to any particular page.
Select a template group from the template library (i.e. Build-in: Basic)
Use the explorer button and folder list to locate the pictures
Double click on the picture to select it. Select Libraries and then style attributes to select a different picture style.
Select the desired style Now, lets drag some lettering
STEP 1 Write your text here STEP 2 Make desired changes to font and size STEP 3 Press this to enter the text to the page
You can reshape a speech bubble using the Style Attributes pane
You can save your work … ..or you can export your work for use in other applications
Directed Activity 5 Classroom Display