Download
1 / 15
150 likes | 309 Views
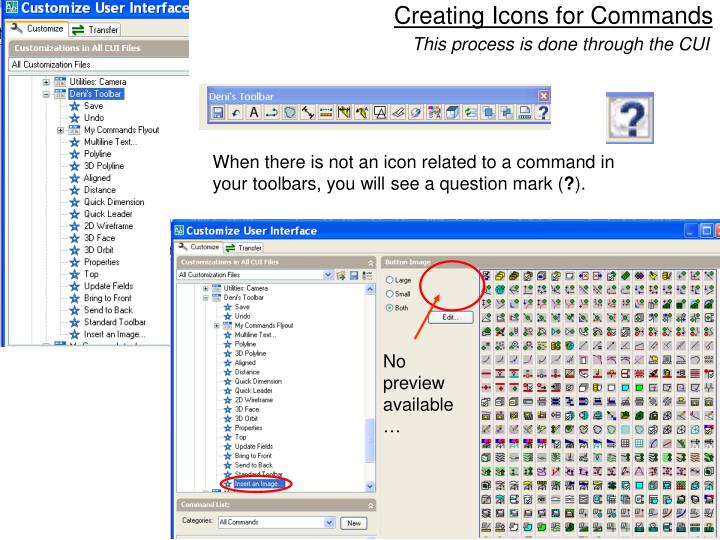
Creating Icons for Commands. This process is done through the CUI. When there is not an icon related to a command in your toolbars, you will see a question mark ( ? ). No preview available…. preview.

E N D
Creating Icons for Commands This process is done through the CUI When there is not an icon related to a command in your toolbars, you will see a question mark (?). No preview available…
preview CAD has an extensive list of icons already loaded, from which you may choose one that can help you identify your command. You will see a large preview of any icon you choose.
If you like an icon from the list but would like to modify it so that it becomes unique for you to identify, you may Edit the icon. Use the drawing tools provided in the Button Editor window to modify your icon. If instead you would like to create your own icon from scratch, click on Clear. This will remove the image from the editor button. You can turn the grid on to help guide you with your drawing.
Use the drawing tools… Choose your colors and draw! Turn the grid off when done Save your image…
Name your icon and click Save. You can share your icon if needed. Your new icon is now part of the list! The default directory where your icon will be saved should be C:\Documents and Settings\user.name\Application Data\Autodesk\Autodesk Land Desktop 200#\R1#.0\enu\Support\Icons Now that your command has an icon assigned, click Apply.
Creating Toolbars for Complete Procedures In the CUI, right click on Toolbars, click on New - Toolbar. Rename your toolbar according to the procedure it will be used for.
Knowing ahead of time what commands I want as part of my toolbar, I find them and drag them into my newly created toolbar.
Once your toolbar is complete, you can see the icons that form part of it in a preview. Icons with a question mark do not have an image assigned to them. See the Creating Icons for Commands section for guidance on how to change this. You may rearrange the order in which the icons appear by dragging the command names from the list. When finished, click Apply.
Following the same process, you can create a toolbar for any group of commands. Inserting separators helps group icons for multi-step procedures. To do this, right click on the command after which you would like to have a separator, and click on Insert Separator.
Notice the placement of separators. We are able to group a two-step process.
Sharing Custom Toolbars You can bring in another user’s toolbars without having to bring in their whole workspace. Go to the CUI window. In the Transfer tab, select Open… from the drop down menu on the right pane. The default directory where your CUI’s should be saved should be C:\Documents and Settings\user.name\Application Data\Autodesk\Autodesk Land Desktop 200#\R1#.0\enu\Support\ Find the cui file that was sent to you. Click Open. When you receive a CUI file from another user, save it to this folder!
Expand Toolbars for the cui file you just opened. Select the toolbars from the right pane that you want to add to your workspace and drag them over to your toolbars (left pane).
Expand Toolbars on the left pane. You will now have the new toolbars in your workspace. Click Apply. Click OK.