Download
1 / 22
680 likes | 1.88k Views
Pen and Ink Drawing. Mr. K Baker Grade 7 Art 2008-2009. Pen and Ink.

E N D
Pen and Ink Drawing Mr. K Baker Grade 7 Art 2008-2009
Pen and Ink • Pen & Ink drawing is similar to pencil drawing in that the use of line and technique is closely related. It is however a little more difficult to master and should only be taught to or used by the older students. India ink is permanent ink and a mess to clean up, virtually non-erasable and not very forgiving if a spill or mistake happens. However after stating that, pen & ink drawing can be very rewarding. You will be able to create a range of work from photo-realism to total abstraction and everything else in between.
Value • The Illusion of ValueWe usually think of ink drawing in terms of line, because of the solid black line created with pen-and-ink, we imagine that we can't create tonal value. While this might be, strictly speaking, true - there are many ways that we can create the illusion of value
Pen and Ink Hatching, Crosshatching and Scumbling Basic Pen Strokes for Ink Drawing
Hatching • The most basic method of creating value in ink drawing is linear hatching. Fine parallel lines fill an area, so that from just a slight distance, we have the illusion of value. The closer the lines are, the less white paper shows, and the darker the value appears. Heavier lineweight (pressing more firmly or using a bigger nib) also gives a darker appearance.
Crosshatching Crosshatching uses layers of hatching placed at an angle. Usually, the first layer would be vertical, the next horizontal, the next at forty-five degrees, and so on. This methodical approach can look a little mechanical, so artists often use variation in direction to add interest
Contour Hatching Hatching placed at a slight angle creates a moire-like effect, the diamond-shaped fragments of white paper enlivening the denser areas of value. This technique is often used in figure drawing, with the direction of line helping to suggest the cross-contours of the body. Hatching which follows a contour can also help to make objects appear more three-dimensional.
Scumbling and Random Hatching Scumbling, often called the 'brillo pad' technique, uses layers of small calligraphic, scribbled marks to build up value and texture. Varying the direction and shape adds more interest than a simple circular scribble. Random hatching uses layers of short, straight marks. Various textures result depending on whether these short hatches are applied vertically, at right angles, following a contour or at random angles.
Stippling Stippling uses tiny dots to create value. The closer together the dots, the darker the tone. Larger dots create a denser tonal value more quickly, but can look coarse.
Flower • When sketching flowers in pen and ink, try varying your lineweight - using hard, medium and light pressure. Use dark, stronger lines and hatched shading in the darker areas, and very light, loose lines on the brigher areas of the flower. Note that you don't have to outline every petal - you can just suggest the tips with a curve, or use short strokes to suggest the direction of the petals.
Introduction to Pen & Ink While the use of pen & ink may be similar to pencil drawing in some fashion it is quite different in others. Basic line drawing, contour line, cross-hatching, scribbling/scumbling have similar techniques. However the nature of pen and ink can create more problems and it can also have more interesting and varied results. One other thing that is different is that you can unintentionally smudge an ink drawing while the ink is wet f it indelible or when it is dry if it is water soluble and you rub your hand across the work.
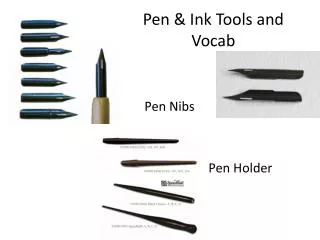
Tools and Materials Pens: There are many pens on the market that you can choose from. Or if you are the adventurous type you may decide to make your own from feathers the way our forefathers did. You might also try different sticks, reeds, bamboo or other exotic materials. The crow quill dip pens and metal replacement points are still a good choice. However they will leak and splatter and require you to stop during your drawing to refill the nib. If you drop one you will have a mess that needs to becleaned up quickly.
Ink: Many companies manufacture India Ink and the quality of each depends on the process used by each company. India Ink is a mixture of water, carbon black (lampblack) and a binder of shellac, latex and other binding materials. The finer the lampblack usually the more flowing the ink. It is also very important that use choose ink that is not water soluble unless that is a planned part of your work. I use inks that are classified as permanent and good for all surfaces. Most of the colored inks are not light safe and are water-soluble. They will fade over time and will have to be kept away from high humidity sources and must be framed and treated with care. I guess it would be important to tell you at this time that once you have put ink to surface it is almost impossible to remove it. If your work is for reproduction purposes you could use white out to cover a small mistake but you have to make sure it is completely dry before you try inking over it again or it could clog your pen. Also if the work will be hung white out is not an option. You will have to start your work over
Paper and Other Surfaces: When using India Ink it is important to choose the surface that will reflect the type of work you are doing. If you are using a technical pen and a very fine nib you will need a surface that is firm and smooth. The nib of the pen should move across the surface without hitting any bumps or snagging on the surface. This could cause a clog or an ink flare if the surface is weak or porous at that point.
Line and Value With this media line is the most important tool you have. The closer the line the darker the drawing looks. Inversely the farther apart your line the lighter the drawing looks. Let's take a closer look at each of these styles. First lets look at the straight line and the effects that this can create.
Each of these styles also mimic old-fashioned wood or line cut prints in their appearance. Illusion is not only the purlieu of magicians but also that of the artist. Making an object look three dimensional on a flat piece of paper is almost magical but it is not. It is just a matter of perception, the way in which we see.
In example "D" we are starting a crosshatching process and right now this drawing looks pretty flat. As we add lines as in example "E" the illusion of roundness begins to come through. The more and closer the line the more the illusion seems real. However one of the more important personal tools you can have is, knowing when to stop and how much to add. Example "F" is just about right, however notice how example "G" is much more effective in illustrating roundness than example "F". This is a contoured crosshatch drawing. It is contoured in two directions and creates a better illusion of roundness
Line and Value Contour line is basically drawing your line to follow the curvature or shape of the object you are rendering. It can be done in many different ways. Example "H" is a cross contour line meaning that the lines cross over each other somewhat like a ball of twine or the hair or fur in people and animals. It gives the illusion of roundness but I wouldn't want to use it to draw an apple or other object that would not be represented well this way. It is faster than example "I", but example "I" would be more suited for the apple or an automobile or any other smooth shiny surface
Pointillism, Dots or Stippling are all the same thing basically. It is just a matter of laying down a pattern or random pattern of dots to create the illusion of shape and softness. Drawings done in this fashion have an overall softer look and texture to them
Last but not least for now is the scumbling or scribbling method of line drawing. This is the method used most for quick study sketching especially for subjects that are moving around like children and animals at the zoo. When you need it done fast this is the method for getting it done.
Your Project • Your project is to draw your letter (one more time) using the pen and ink techniques that we have just looked at. • You will be marked on: • Accuracy of your letter • Use of ink technique • Use of class time • Neatness of project and workstation A copy of this presentation will be available on my website