Download
1 / 12
120 likes | 216 Views
Internet Explorer 9.0 Configuration and Electronic Certificate Print Process. Internet Explorer 9.0 Configuration. Open the Internet Explorer. Locate the nut, at the Top right corner of the Internet Explorer, at the right of the Star. That is the configuration menu.

E N D
Internet Explorer 9.0 Configuration and Electronic Certificate Print Process
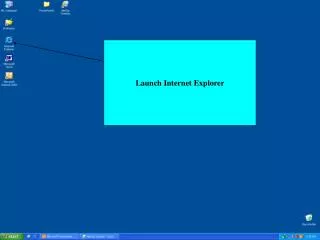
Internet Explorer 9.0 Configuration
Locate the nut, at the Top right corner of the Internet Explorer, at the right of the Star. That is the configuration menu.
Press the nut and select Print and then click in Page Setup.
After you press Page Setup, you will see this screen. Make the modifications and press OK. This is the configuration your Internet Explorer should have. Why the config should be like this? To avoid at the moment of printing to see number of pages, url address on top and bottom of the page.
Enter the Pele-Marine Web Platform, using this link http://186.73.192.211/indexPeleMarine.html, you will this screen. Use your Inspector’s Account to login.
Search for the request that the system or Panamanian Maritime Authority approved.
After you got the request look in the last column (Actions) the printer icon and press it. This Icon will be activated only when the request have a status Waiting for test.
After you press the Printer Icon, a new window will pop up. Also will pop up the window to select which printer you want to use. Verify the information in the print preview to make sure the information is OK, then press the Print after you select the printer you want to use.